
Crivit SDBS 2400 A1
Silvercrest SDBS 2400 A1 Steam Iron Station
User Manual
1. Introduction
This user manual provides important information regarding the safe operation, setup, maintenance, and troubleshooting of your Silvercrest SDBS 2400 A1 Steam Iron Station. Please read this manual thoroughly before first use and keep it for future reference.
The Silvercrest SDBS 2400 A1 is a powerful 2400-watt steam iron station designed for efficient and effective ironing. It features a high-quality ceramic-coated soleplate for smooth gliding and a large 2-litre water tank for extended ironing sessions.
2. Important Safety Instructions
Always follow basic safety precautions when using electrical appliances to reduce the risk of fire, electric shock, and injury.
- Do not immerse the iron or base station in water or other liquids.
- Ensure the voltage indicated on the appliance matches your local mains voltage before connecting.
- Do not leave the iron unattended while it is connected to the power supply.
- Keep the iron and its cord out of reach of children when it is switched on or cooling down.
- Use the iron only for its intended purpose as described in this manual.
- Always unplug the iron from the electrical outlet before filling or emptying the water tank, and when not in use.
- Do not operate any appliance with a damaged cord or plug, or after the appliance malfunctions or has been dropped or damaged in any manner.
- The soleplate and steam can become extremely hot and cause burns. Handle with care.
3. Product Components
Familiarize yourself with the parts of your Silvercrest SDBS 2400 A1 Steam Iron Station.


- Iron Unit: Features the ceramic-coated soleplate, handle, and steam buttons.
- Base Station: Houses the 2-litre water tank, control panel, and heat-resistant shelf for the iron.
- Water Tank: Removable tank for easy filling.
- Control Panel: Buttons for power, temperature settings, and steam modes.
- Anti-Limescale Filter: Replaceable filter to prevent limescale buildup.
- Power Cord: 1.8m length for convenient reach.
4. Setup
4.1 Unpacking
- Carefully remove all packaging materials from the iron station.
- Check for any damage during transit. Do not use if damaged.
- Retain packaging for future storage or transport.
4.2 Filling the Water Tank
The 2-litre water tank allows for extended ironing without frequent refills.
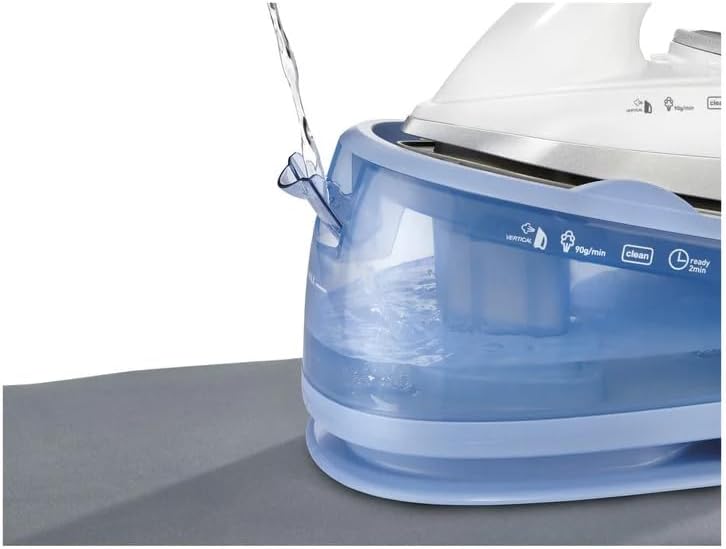
- Ensure the iron station is unplugged from the power outlet.
- Remove the water tank from the base station.
- Fill the tank with clean tap water up to the MAX fill line. Distilled or demineralized water is recommended to prolong the life of the appliance and reduce limescale buildup.
- Securely place the water tank back into the base station.
4.3 Inserting the Anti-Limescale Filter
The replaceable anti-limescale filter helps maintain optimal performance.
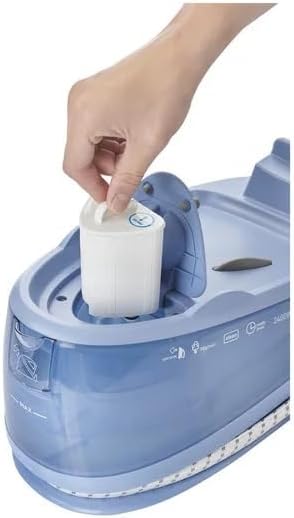
- Locate the filter compartment on the base station.
- Insert the anti-limescale filter firmly into its slot.
- The station will remind you when the filter needs replacement.
5. Operating Instructions
5.1 Powering On and Heat-Up
- Place the iron station on a stable, heat-resistant surface, preferably an ironing board.
- Plug the power cord into a suitable electrical outlet.
- Press the power button on the base station. The iron has a short heat-up time for quick operational readiness.
- Wait for the "ready" indicator light to illuminate, signaling the iron has reached the desired temperature.
5.2 Temperature Settings
The iron offers 3 adjustable temperature settings for various fabric types:
- Low: Suitable for silk and synthetic fabrics.
- Medium: Ideal for wool.
- High: Recommended for cotton and linen.
Select the appropriate temperature using the controls on the base station or iron, if available.
5.3 Steam Functions
The SDBS 2400 A1 offers versatile steam options for effective wrinkle removal.


- Vario Steam (Permanent Steam): Adjustable up to 90 g/min. Press the steam button on the iron handle to activate continuous steam. Adjust the steam output via the control panel on the base station.
- Powerful Steam Boost: For stubborn wrinkles and thick fabrics. Press the steam boost button (if available) for an extra burst of steam.
- Vertical Steam: For refreshing hanging textiles and curtains. Hold the iron vertically and press the steam button.

5.4 Eco and Power Modes
The base station allows selection between Eco and Power modes to optimize energy consumption and steam output.
- Eco Mode: Reduces energy consumption while still providing effective steam. Ideal for lighter fabrics or when less steam is needed.
- Power Mode: Delivers maximum steam output and heat for heavy-duty ironing tasks and stubborn creases.
Select the desired mode using the corresponding buttons on the control panel.
6. Maintenance and Cleaning
Regular maintenance ensures the longevity and optimal performance of your steam iron station.
6.1 Cleaning the Soleplate
- Ensure the iron is unplugged and completely cool before cleaning.
- Wipe the ceramic-coated soleplate with a damp cloth and a mild, non-abrasive cleaner if necessary.
- Do not use abrasive pads or harsh chemicals, as these can damage the soleplate.
6.2 Descaling / Anti-Limescale Function
The iron station features a self-cleaning and anti-limescale function, along with a replaceable filter.
- The "anti-calc" reminder on the station will indicate when the filter needs attention or replacement.
- Refer to the specific instructions for replacing the anti-limescale filter (see Section 4.3).
- Periodically perform the self-cleaning cycle as per the instructions in the full manual (if applicable, typically involves a specific button press or procedure).
6.3 Emptying and Storing
- After each use, unplug the iron and allow it to cool completely.
- Empty any remaining water from the tank to prevent mineral buildup.
- Store the iron station in a dry, safe place, with the iron securely placed on its base.
- Wrap the power cord neatly around the designated area on the base station.
7. Troubleshooting
Before contacting customer support, please refer to the following common issues and their solutions.
| Problem | Possible Cause | Solution |
|---|---|---|
| Iron does not heat up. | Not plugged in; power switch off; faulty outlet. | Ensure plug is fully inserted; turn power switch on; test outlet with another appliance. |
| No steam or insufficient steam. | Water tank empty; temperature too low; limescale buildup; steam button not pressed. | Fill water tank; set higher temperature (steam only activates at higher temps); perform descaling; press steam button. |
| Water leaking from soleplate. | Temperature too low for steam; overfilled water tank. | Allow iron to reach full temperature before using steam; do not overfill water tank. |
| "Anti-calc" reminder light is on. | Filter needs cleaning or replacement. | Clean or replace the anti-limescale filter as per instructions. |
8. Technical Specifications
- Model: SDBS 2400 A1
- Power: 2400 Watt
- Voltage: 230 Volts
- Soleplate: Ceramic-coated, non-stick
- Vario Steam Output: Up to 90 g/min
- Steam Pressure: 3 bar
- Water Tank Capacity: 2 Litres
- Cable Length: 1.8 m
- Special Features: Vario Steam, Eco and Power Modes, Anti-Limescale Filter, Quick Heat-Up Time, Vertical Steam, Self-cleaning function.
9. Warranty and Support
For warranty information and customer support, please refer to the documentation provided with your purchase or visit the official Crivit website. Keep your proof of purchase for warranty claims.
Manufacturer: Crivit
Date First Available: 12 July 2023
Ask a question about this manual
Ask about setup, troubleshooting, compatibility, parts, safety, or missing instructions. Manuals+ will review the question and use this page’s manual context to help answer it.