
RYOBI RY40706
RYOBI 40V HP Brushless 9 in. Cordless Grass Lawn Edger User Manual
Model: RY40706
1. Important Safety Information
Always read and understand all safety warnings and instructions before operating this product. Failure to follow the warnings and instructions may result in electric shock, fire, and/or serious injury.
General Safety Precautions:
- Wear protective gloves and eye protection.
- Keep bystanders away from the operating area.
- Ensure the area is clear of debris and obstacles before starting.
- Avoid contact with the blade.
- Do not operate the edger in wet conditions.
- Always disconnect the battery pack before making any adjustments, changing accessories, or storing the tool.
2. Product Overview
The RYOBI 40V HP Brushless 9 in. Edger is designed for precise and clean lawn edging. It features a brushless motor for enhanced power and motor life, ensuring efficient performance. The edger is equipped with multiple features to simplify operation and maintenance.
Key Features:
- 4-Position Single Point Depth Adjustment: Allows for precise depth control from 0.5 inches to 2.0 inches.
- Adjustable Rear Wheel: Facilitates easy edging along curbs.
- Variable Blade Speed Control: Provides flexibility for different edging needs.
- Rotating Handle: Enhances user comfort and allows for edging at difficult angles.
- Compact Storage: Handles can lay flat for convenient storage.
- Integrated Debris Cleaner: Helps clear build-up from the blade guard.
- Easy Blade Changes: Features spindle-lock with on-board blade and wrench storage.

Figure 2.1: Full view of the RYOBI 40V HP Brushless 9 in. Cordless Grass Lawn Edger, showcasing its overall design and components.
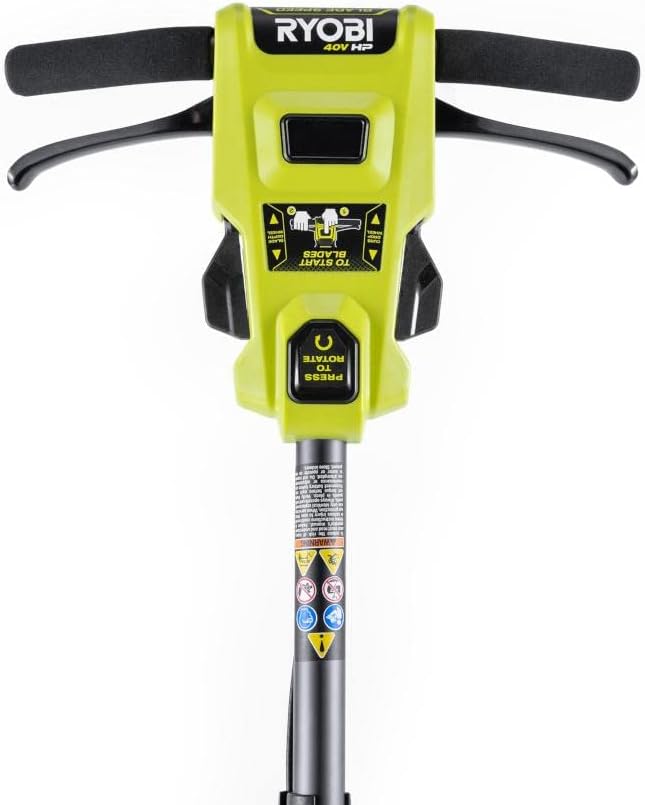
Figure 2.2: Close-up view of the edger's top handle, showing the control panel and ergonomic grips.

Figure 2.3: View of the battery compartment, located on the main body of the edger, designed for easy battery insertion and removal.

Figure 2.4: An individual demonstrating the use of the RYOBI edger along a paved walkway, highlighting its maneuverability and effectiveness in creating clean edges.
3. Setup and Assembly
The RYOBI 40V HP Brushless Edger is designed for quick setup. Follow these steps to prepare your edger for use:
- Handle Assembly: Ensure the handle is securely attached and adjusted to a comfortable operating height. The handle can be rotated for different angles and laid flat for storage.
- Battery Installation: Insert a fully charged RYOBI 40V battery pack into the battery compartment until it clicks into place. Ensure it is seated firmly.
- Depth Adjustment: Utilize the 4-position single point depth adjustment mechanism to set the desired cutting depth between 0.5 inches and 2.0 inches. Adjust based on your lawn's needs and desired edge depth.
- Rear Wheel Adjustment: If edging along a curb, adjust the rear drop wheel to allow the edger to maintain proper alignment and depth.
- Pre-Operation Check: Before starting, inspect the blade for any damage or debris. Ensure all fasteners are tight.
4. Operating Instructions
Operating your RYOBI edger is straightforward. Follow these guidelines for effective and safe use:
- Starting the Edger: Press the push-button start. The edger will begin operating.
- Variable Blade Speed Control: Adjust the blade speed as needed for different types of grass or soil conditions. Higher speeds are generally used for tougher jobs.
- Edging Technique:
- Position the edger with the blade aligned with the desired edge line.
- Utilize the 3 ground-mounted wheels and edge guide to maintain a straight and consistent line.
- Move the edger slowly and steadily along the edge. Do not force the tool.
- Clearing Debris: The integrated debris cleaner can be used to clear build-up from the blade guard during operation, ensuring optimal performance.
- Stopping the Edger: Release the trigger or press the stop button to turn off the edger. Always wait for the blade to come to a complete stop before setting the tool down.
5. Maintenance
Regular maintenance ensures the longevity and optimal performance of your RYOBI edger. Always disconnect the battery before performing any maintenance.
- Blade Inspection and Replacement:
- Regularly inspect the blade for wear, damage, or dullness. A dull blade can reduce performance and strain the motor.
- To replace the blade, use the spindle-lock feature and the on-board wrench. Refer to the blade storage compartment for the wrench.
- Ensure the replacement blade is a genuine RYOBI part or an approved equivalent.
- Cleaning:
- After each use, clean the edger, especially the blade guard and wheels, to remove grass clippings and debris.
- Use a damp cloth; do not use harsh chemicals or abrasive cleaners.
- Utilize the integrated debris cleaner to clear any build-up from the blade area.
- Storage:
- Store the edger in a dry, secure location, out of reach of children.
- For compact storage, the handles can be laid flat.
- Remove the battery pack before storing for extended periods.
6. Troubleshooting
If you encounter issues with your RYOBI edger, refer to the following common troubleshooting steps:
| Problem | Possible Cause | Solution |
|---|---|---|
| Edger does not start. | Battery not charged or not properly inserted. Safety switch/trigger not fully engaged. |
Ensure battery is fully charged and securely inserted. Fully depress the trigger and engage any safety switches. |
| Poor edging performance or uneven cut. | Dull or damaged blade. Incorrect depth setting. Excessive speed or forcing the tool. |
Inspect and replace the blade if necessary. Adjust the depth setting. Operate at a steady, appropriate pace. |
| Excessive vibration. | Damaged or unbalanced blade. Loose fasteners. |
Inspect blade for damage and replace if needed. Check and tighten all screws and bolts. |
| Motor stops during operation. | Overload protection activated. Battery charge low. |
Reduce load on the edger. Recharge or replace the battery. |
If the problem persists after attempting these solutions, contact RYOBI customer support for further assistance.
7. Specifications
| Attribute | Detail |
|---|---|
| Brand | RYOBI |
| Model Number | RY40706 |
| Power Source | Battery Powered (40V) |
| Cutting Width | 9 Inches |
| Speed | 10000 RPM |
| Item Weight | 20 Pounds |
| Product Dimensions | 16"L x 38"W |
| Assembly Required | No (Minimal setup) |
| UPC | 604467965959 |
8. Warranty and Support
For detailed warranty information, please refer to the warranty card included with your product packaging or visit the official RYOBI website. Warranty terms and conditions may vary.
For technical support, replacement parts, or service inquiries, please contact RYOBI customer service directly. Contact information can typically be found on the manufacturer's website or in your product documentation.
Manufacturer: Ryobi
Related documentsRY40706


Ask a question about this manual
Ask about setup, troubleshooting, compatibility, parts, safety, or missing instructions. Manuals+ will review the question and use this page’s manual context to help answer it.