
Smad DWF-180A13LBM
Smad 27 in. 4.5 Cu. Ft. Front Load Washing Machine User Manual
Model: DWF-180A13LBM | Brand: Smad
Introduction
This manual provides comprehensive instructions for the safe and efficient operation, installation, and maintenance of your Smad 27-inch, 4.5 Cu. Ft. Front Load Washing Machine. Please read this manual thoroughly before using the appliance and retain it for future reference.

Image: Front view of the Smad 4.5 Cu. Ft. Front Load Washing Machine, highlighting its capacity.
Safety Information
Always adhere to basic safety precautions when using electrical appliances to reduce the risk of fire, electric shock, or injury to persons.
- Ensure the washing machine is properly grounded.
- Do not operate the machine if it is damaged or malfunctioning.
- Keep flammable materials away from the appliance.
- Supervise children when the appliance is in use.
- Disconnect power before performing any maintenance or cleaning.
Setup
Unpacking
Carefully remove all packaging materials. It is crucial to remove the four shipping bolts located at the rear of the machine before operation to prevent damage and excessive vibration.

Image: Rear view of the washing machine indicating the location of the four shipping bolts that must be removed prior to use.
Placement
Place the washing machine on a firm, level surface. Ensure there is adequate clearance around the unit for proper ventilation and operation. Recommended dimensions for placement are approximately 33.75 inches deep, 27 inches wide, and 39.82 inches high, with an additional 1-2 inches clearance recommended.

Image: The washing machine positioned in a bedroom setting, illustrating its quiet operation and providing key dimensions (39.82"H x 27.0"W x 33.75"D).
Connections
Connect the water inlet hoses to the appropriate hot and cold water taps. Ensure all connections are secure to prevent leaks. Plug the power cord into a standard 120V grounded electrical outlet. Avoid using extension cords.
Operating Instructions
Control Panel Overview
The washing machine features an LED intelligent touch control panel for easy selection and adjustment of various functions. The main dial allows for cycle selection, while touch buttons control specific settings.

Image: Close-up view of the washing machine's control panel, showing the cycle selection dial, LED display, and touch buttons for various functions like Steam, Water Plus, Soil Level, Wash Temp, Spin Speed, and Delay.
Wash Cycles
The appliance offers 12 distinct wash cycles to accommodate various fabric types and soil levels. Select the appropriate cycle using the main dial.
- Normal/Colors
- Bulky/Sheets
- Heavy Duty
- Whites
- Towels
- Sanitize
- Quick Wash
- Delicates
- Baby Care
- Sportswear
- Tub Clean
- Rinse & Spin
Key Functions
- Steam Wash: This function uses steam to gently remove stains and ensure a deep clean by thoroughly saturating every item in the load.
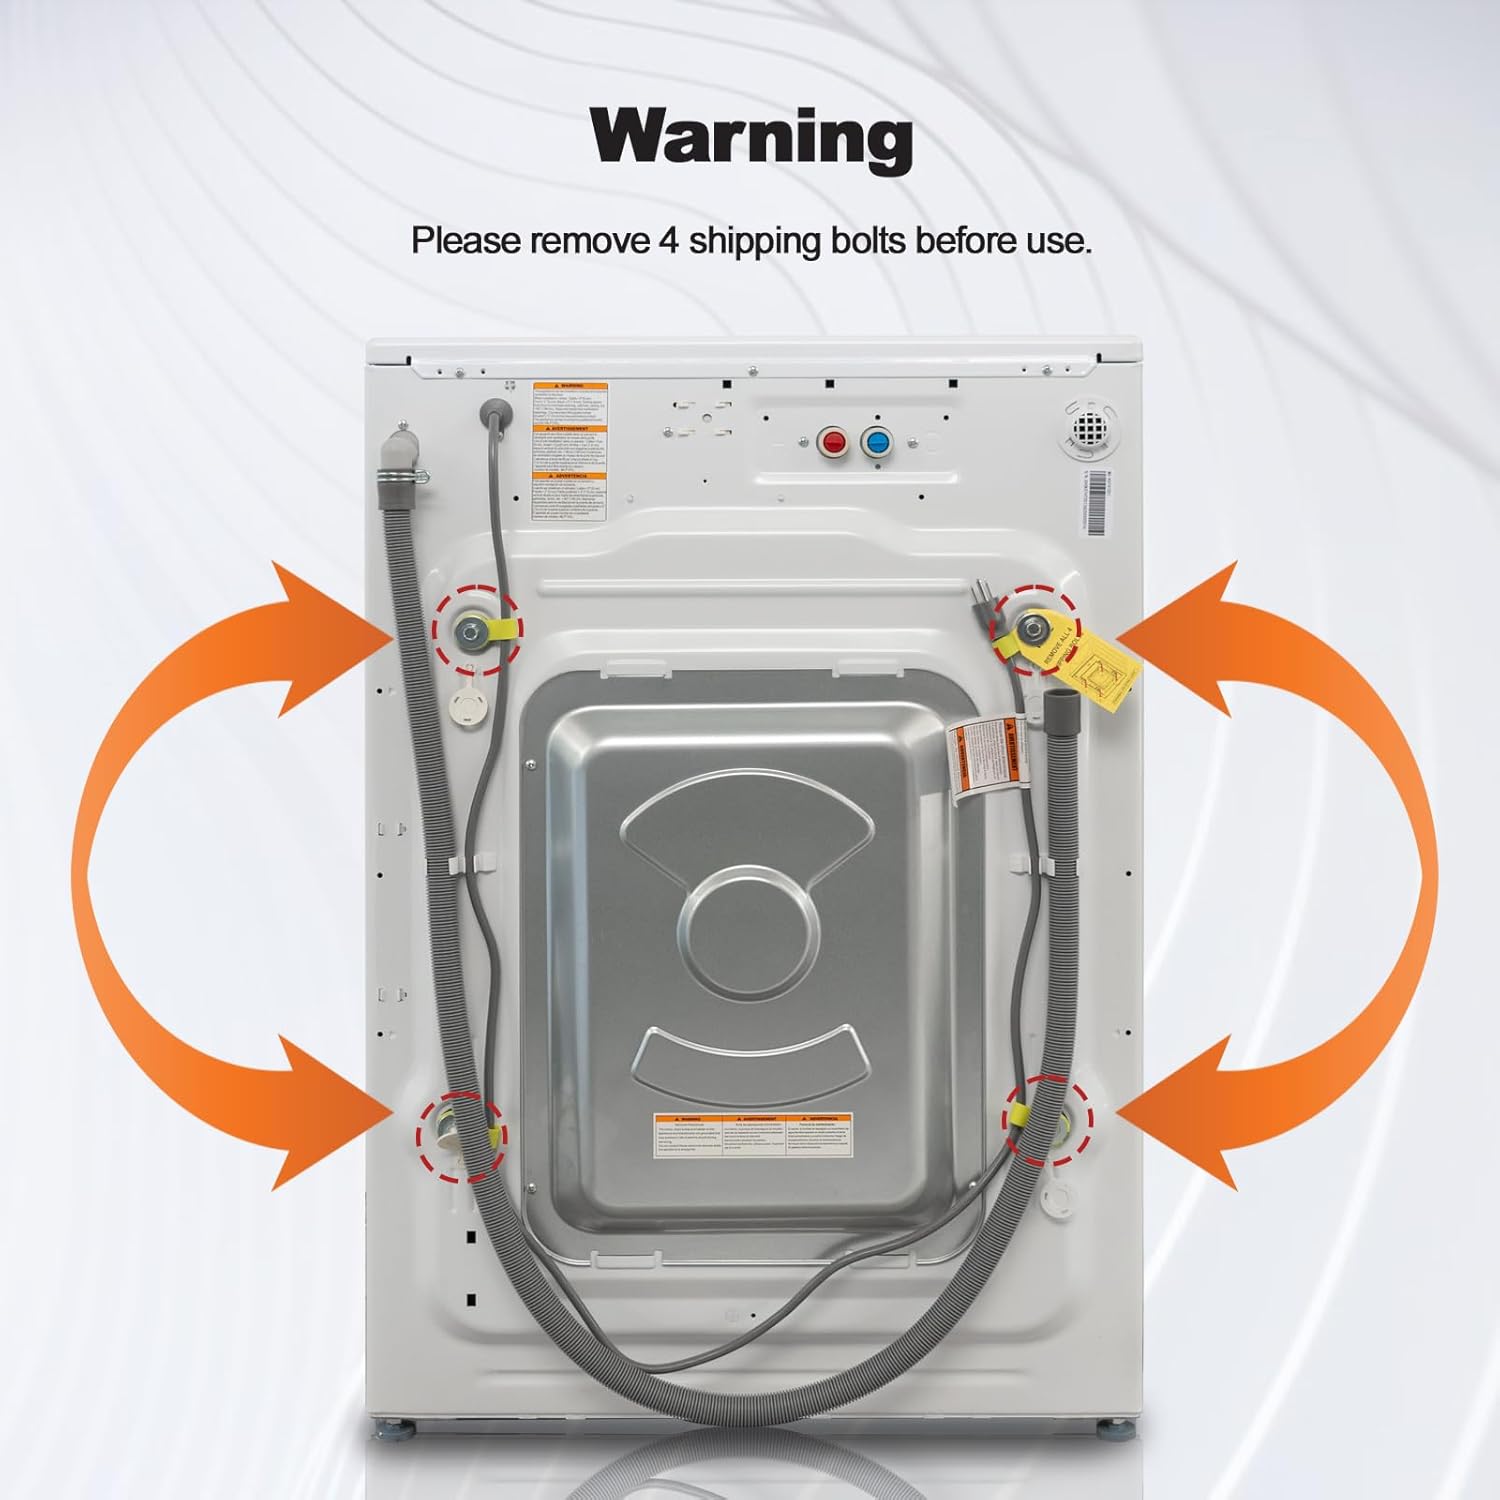
Image: Inside the washing machine drum with steam visible, illustrating the Steam Wash function for deep cleaning.
- Quick Wash: Reduces washing time for lightly soiled items. This function can be added to specified main cycles.

Image: Graphic illustrating the Quick Wash function, showing a 40-minute cycle and a performance graph comparing it to a standard wash.
- Water Plus: Allows adjustment of the water level during the washing process without interrupting the cycle. Useful if more water is needed.

Image: Diagram showing the Water Plus function with three adjustable water levels (Level 1, Level 2, Level 3) and text explaining its benefit for adjusting water during a cycle.
- Pre Soak: Adds a soaking phase before the main wash to pretreat extra dirty clothes, enhancing cleaning performance.

Image: Close-up of clothes soaking in the washing machine drum, illustrating the Pre Soak function for stubborn stains.
- Add Garment: Allows you to add more clothes during a cycle without powering off or restarting. Simply press the "Start/Pause" button for 3 seconds to reload.

Image: A hand adding clothes to the washing machine drum, demonstrating the "Add Garment" feature.
- Child Lock: When activated, all buttons except the power button are disabled, preventing accidental operation by children.

Image: A washing machine with a child lock icon, showing children playing nearby, illustrating the Child Lock safety feature.
- Power Off Memory: The cycle process will resume when power supply is restored after an interruption. Just press to continue instead of starting over.

Image: A washing machine with a circular arrow icon, representing the Power Off Memory function.
- Soil Level: Washing tempo and time are automatically matched with the pre-selected soil level to optimize cleaning and energy performance.

Image: A button labeled "SOIL LEVEL", indicating the function to adjust wash intensity based on dirtiness.
- Auto Balance: The M-BLDC inverter motor ensures stable operation during high-speed spinning and prevents displacement and noises disturbing.

Image: A graphic illustrating the Auto Balance system with shock-absorbing and noise-reducing brackets, ensuring stable operation and reduced noise during spinning.
- BLDC Inverter Motor: Provides quiet operation, energy saving, and a durable life for the appliance.

Image: Close-up of the detergent dispenser drawer, showing compartments for detergent and fabric softener, with labels for High Efficiency (HE) detergent.
Maintenance
Tub Clean
Use the dedicated Tub Clean feature monthly to remove residue and odors from the drum. Warm water streams effectively clean the inner and outer tubs, preventing secondary pollution to clothes.

Image: The washing machine with its door open, revealing the Diamond Drum interior. An inset image shows the drum during a Tub Clean cycle, emphasizing its importance for hygiene.
Detergent Dispenser Cleaning
Regularly clean the detergent dispenser drawer to prevent buildup and ensure proper dispensing of detergents and softeners. High Efficiency (HE) detergent is required for this machine.
Image: Close-up of the detergent dispenser drawer, showing compartments for detergent and fabric softener, with labels for High Efficiency (HE) detergent.
General Cleaning
Wipe down the exterior of the machine with a soft, damp cloth. Do not use abrasive cleaners. Periodically check the door seal for debris and clean as necessary to prevent mold and odors.

Image: Inside the washing machine drum with an icon indicating anti-bacterial properties, highlighting the importance of cleanliness.
Troubleshooting
This section provides solutions to common issues you might encounter. If the problem persists, please contact customer support.
| Problem | Possible Cause | Solution |
|---|---|---|
| Machine does not power on. | Not plugged in; power outage; circuit breaker tripped; incorrect outlet type. | Ensure plug is secure. Check household circuit breaker. Verify connection to a standard 120V grounded outlet. |
| Excessive vibration or noise during spin cycle. | Shipping bolts not removed; machine not level; unbalanced load. | Remove all shipping bolts (refer to Setup). Adjust leveling feet. Rearrange clothes in the drum to balance the load. |
| Water leakage. | Loose hose connections; clogged drain hose; excessive detergent. | Check and tighten all water inlet and drain hose connections. Clear any blockages in the drain hose. Use only HE detergent and do not overfill. |
If you encounter any issues or need assistance, please refer to the contact information provided in the Warranty and Support section.
Specifications
Detailed technical specifications for your Smad Front Load Washing Machine.
| Feature | Detail |
|---|---|
| Brand | Smad |
| Model Number | DWF-180A13LBM |
| Capacity | 4.5 Cubic Feet |
| Dimensions (D x W x H) | 33.75" x 27" x 39.82" |
| Item Weight | 216 pounds |
| Max Spin Speed | 1300 RPM |
| Voltage | 120 Volts |
| Control Console | Touch |
| Standard Cycles | 12 |
| Access Location | Front Load |
| Color | White |
| Certification | UL |
Warranty and Support
For information regarding product warranty, please refer to the documentation included with your purchase or contact Smad customer service. Protection plans are also available for extended coverage.
If you experience any issues with your product, including damaged shipments, please contact us immediately. Provide your order number, photos of any damage, and a detailed description of the issue to facilitate a quick resolution.

Image: Graphic illustrating steps for handling damaged shipments, including inspecting the package, documenting damage, contacting support, and providing information. Also shows a customer support icon.
For direct support, please visit the official Smad website or contact their customer service line.
Related documentsDWF-180A13LBM


Ask a question about this manual
Ask about setup, troubleshooting, compatibility, parts, safety, or missing instructions. Manuals+ will review the question and use this page’s manual context to help answer it.