
AECOJOY 12090GR
AECOJOY 84-inch Large Chicken Coop Instruction Manual
Model: 12090GR
Introduction
Thank you for choosing the AECOJOY 84-inch Large Chicken Coop. This multi-level outdoor poultry cage is designed to provide a safe and comfortable habitat for your chickens. Constructed from natural fir wood with a waterproof roof and wire fencing, it features two nesting boxes, ramps, and a removable tray for convenient cleaning. This manual provides essential information for assembly, operation, maintenance, and troubleshooting to ensure optimal use and longevity of your chicken coop.

Image: Overview of the AECOJOY 84-inch Large Chicken Coop.
Safety Information
- Read all instructions carefully before assembly and use.
- Keep children and pets away from the assembly area. Small parts can be a choking hazard.
- Wear appropriate safety gear, such as gloves, during assembly to prevent injury.
- Ensure the coop is placed on a level, stable surface.
- For added stability, secure the coop to the ground using ground spikes (not included) to prevent tipping in windy conditions.
- Regularly inspect the coop for any loose parts, damage, or wear that could compromise the safety of your animals.
- Do not overload the coop with more animals than its recommended capacity.
Package Contents
Before beginning assembly, verify that all components and hardware are present and undamaged. Refer to the included parts list in your packaging for a detailed inventory. Contact customer support immediately if any parts are missing or damaged.
The package includes all necessary hardware for assembly.
Setup Instructions
- Unpack Components: Carefully remove all parts from the packaging. Lay them out on a clean, flat surface.
- Identify Parts: Match each part to the corresponding diagram in your assembly guide.
- Assemble Base Structure: Begin by assembling the base frame of the coop, ensuring all connections are secure.
- Install Wire Fencing: Attach the durable galvanized wire fencing panels to the designated sections of the coop.
- Construct Main House: Assemble the upper main house section, including the sleeping area and nesting boxes.
- Attach Ramps: Securely install the built-in ramps that connect the upper and lower levels.
- Mount Roof: Place and secure the waterproof PVC roof panels. Ensure they overlap correctly to prevent water entry.
- Install Doors and Latches: Attach all doors and ensure the lockable latches function correctly for security.
- Insert Removable Tray: Slide the galvanized pull-out tray into its designated slot beneath the main house.
- Final Inspection: Double-check all screws, bolts, and connections to ensure the coop is stable and safe for use.

Image: Detail of the durable galvanized gridding fence.
Operating Instructions
- Accessing the Coop: The coop features multiple entrances for easy access to your pets and for cleaning. Utilize the various doors on the main house and run area as needed.
- Nesting Boxes: The two large nesting boxes are designed for egg collection. Chickens can access these boxes for laying. Regularly check and collect eggs from these compartments.
- Ramps: The built-in ramps allow chickens to move freely between the upper sleeping area and the lower run. Ensure the ramps are clear of obstructions.
- Perches: The coop includes three polished perches (two in the sleeping area, one in the active area) for chickens to roost on during the day or night.
- Ventilation: The ventilated window in the main house helps ensure proper airflow.
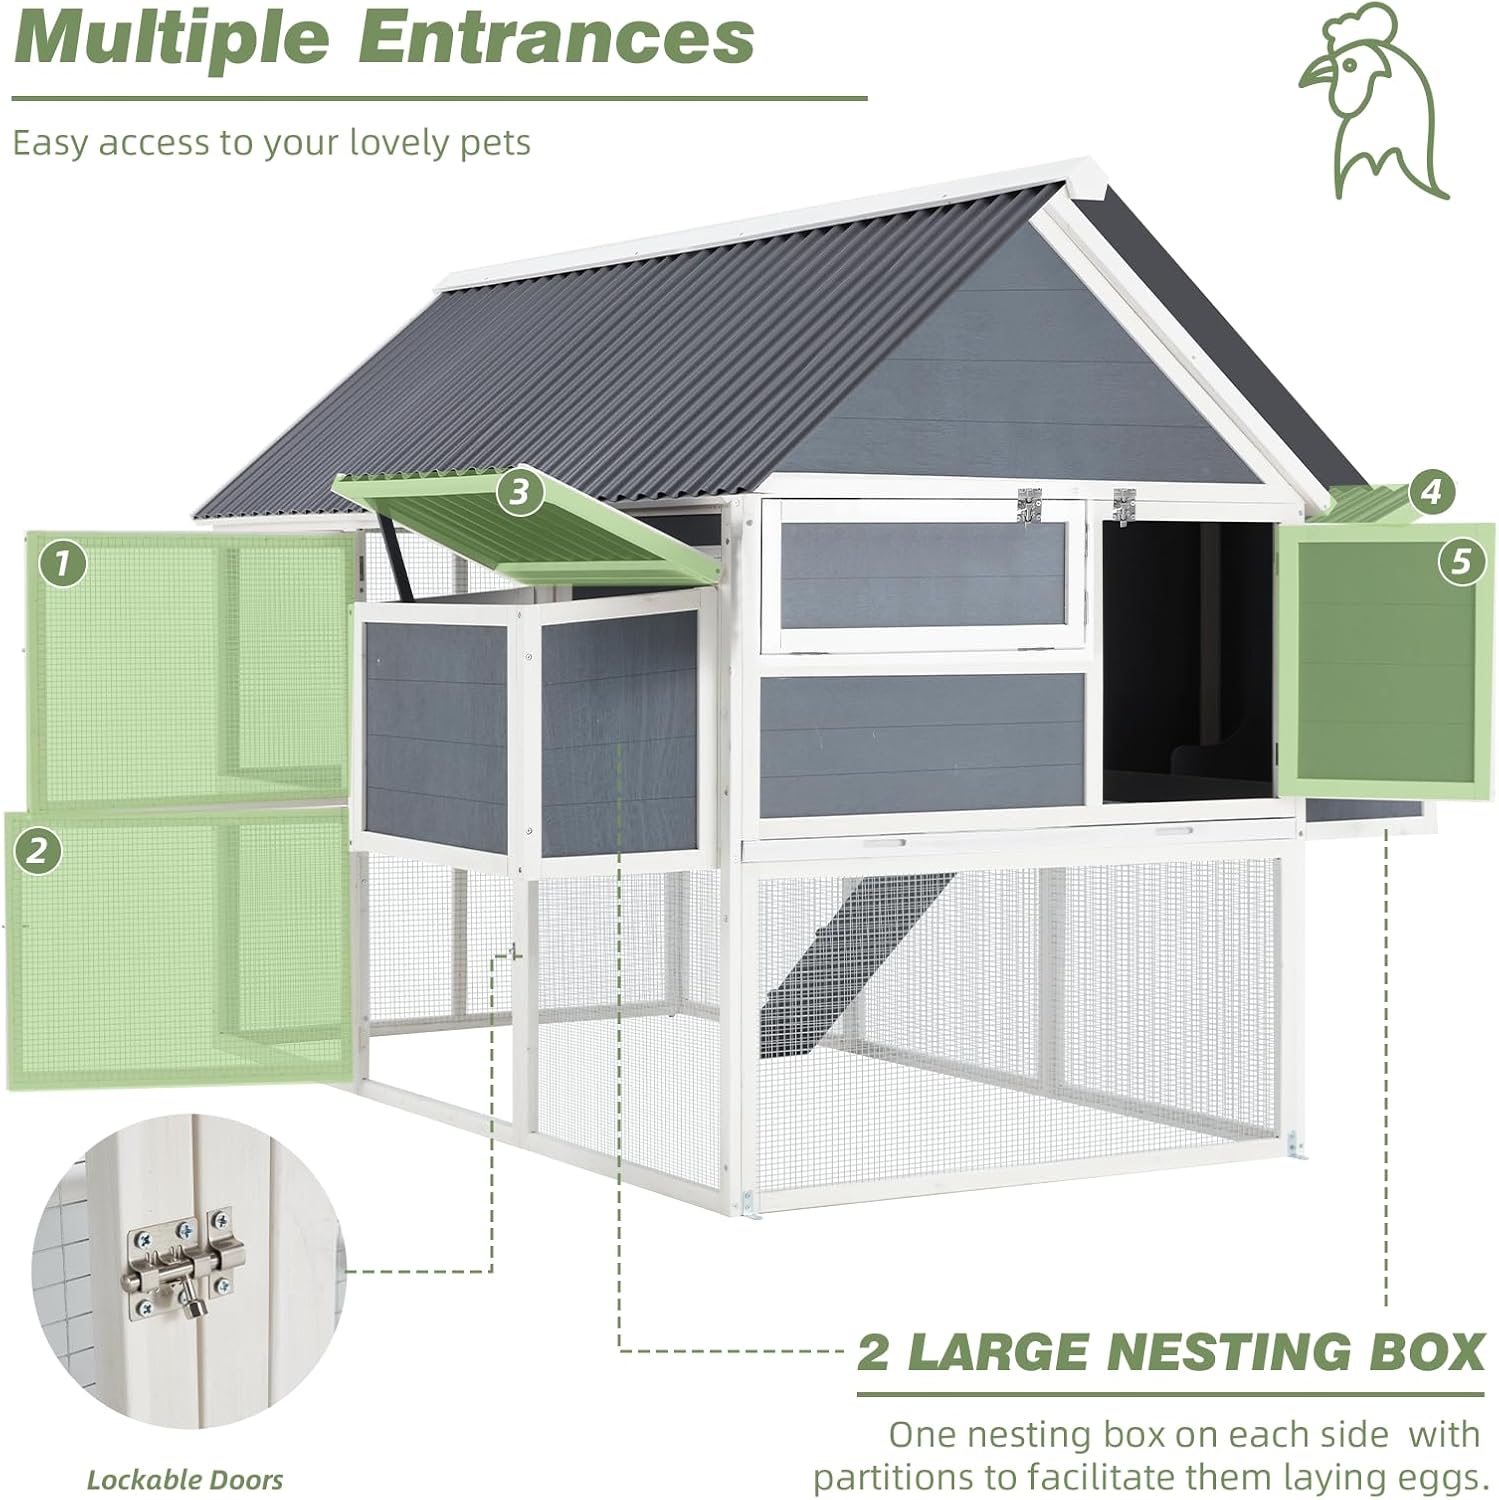
Image: Multiple entrances and two large nesting boxes for egg collection.

Image: Close-up view of the nesting boxes, designed for egg laying.
Maintenance
- Cleaning the Removable Tray: The galvanized pull-out tray allows for easy cleaning of the main house. Regularly slide out the tray, empty waste, and clean it with appropriate disinfectants.
- Roof Inspection: Periodically check the waterproof PVC roof for any damage or leaks. Ensure it remains securely fastened to protect animals from harsh weather.
- Wood Treatment: The natural fir wood is painted with waterproof and non-toxic varnish. To maintain its condition, consider reapplying a suitable, non-toxic wood sealant annually, especially if exposed to extreme weather.
- Wire Fence Check: Inspect the wire fencing for any signs of damage or gaps that could allow predators in or animals out. Repair as necessary.
- General Cleaning: Clean the entire coop regularly to maintain hygiene and prevent the buildup of waste.

Image: Detail of the galvanized pull-out tray for convenient cleaning.

Image: Close-up view of the waterproof PVC roof material.
Troubleshooting
| Problem | Possible Cause | Solution |
|---|---|---|
| Coop feels unstable or wobbly. | Loose connections; uneven ground; insufficient anchoring. | Tighten all screws and bolts. Ensure the coop is on level ground. Use ground spikes (purchased separately) to firmly fix the cage. |
| Water leakage inside the coop. | Roof panels not properly aligned or damaged; gaps in construction. | Inspect roof panels for proper overlap and secure fastening. Check for any cracks or damage to the waterproof material and repair as needed. |
| Difficulty accessing coop doors. | Doors misaligned; hinges stiff or damaged. | Check door alignment and adjust hinges if necessary. Lubricate hinges if they are stiff. |
| Animals not using upper level. | Ramp obstructed or too steep for smaller/younger animals. | Ensure the ramp is clear and free of debris. Guide younger animals to the ramp initially. |
Product Specifications
| Feature | Detail |
|---|---|
| Model Number | 12090GR |
| Overall Dimensions (L x W x H) | 84" x 41.6" x 60" (213.4 cm x 105.7 cm x 152.4 cm) |
| Product Weight | 186 pounds (84.4 kg) |
| Material | Natural Fir Wood, Galvanized Wire, PVC Roof |
| Color | Grey & White |
| Number of Levels | 2 |
| Nesting Boxes | 2 (with partitions) |
| Special Features | Waterproof Roof, Removable Tray, Multiple Entrances, Built-in Ramps, 3 Perches |
| Target Species | Chicken (suitable for various breeds) |
| Included Components | Hardware |

Image: Detailed product dimensions of the AECOJOY chicken coop.

Image: Breakdown of inner space, including sleeping area and ground activity area.
Warranty Information
The manufacturer provides a limited warranty for this product. Specific details regarding the warranty period and coverage are typically included with your purchase documentation. For comprehensive warranty information, please refer to the warranty card or contact AECOJOY customer support directly.
Customer Support
For any questions, missing parts, assembly assistance, or warranty claims, please contact AECOJOY-US customer support. They can provide further assistance and guidance.
- Returns: This product is eligible for 30-day easy returns.
- Contact: Refer to your purchase documentation or the AECOJOY official website for the most current customer service contact information.
Related documents12090GR

Ask a question about this manual
Ask about setup, troubleshooting, compatibility, parts, safety, or missing instructions. Manuals+ will review the question and use this page’s manual context to help answer it.