
Jalann MT02
Jalann WiFi Extender User Manual
Model: MT02
1. Introduction
Thank you for choosing the Jalann WiFi Extender. This device is designed to expand your existing wireless network coverage, eliminate Wi-Fi dead zones, and provide a stable, high-speed internet connection throughout your home or office. It supports 2.4G wireless communication with speeds up to 300Mbps and offers both Repeater and Access Point (AP) modes, along with a convenient WPS function for easy setup.
2. Safety Information
- Do not expose the device to water, moisture, or high humidity.
- Avoid placing the device near heat sources or in direct sunlight.
- Use only the power adapter supplied with the device.
- Do not attempt to disassemble or repair the device yourself. Refer all servicing to qualified personnel.
- Ensure proper ventilation around the device to prevent overheating.
- Keep the device out of reach of children.
3. Package Contents
Please check the package contents carefully. If any item is missing or damaged, contact your retailer.
- Jalann WiFi Extender (MT02)
- Ethernet Cable
- Quick Installation Guide

Image: The Jalann WiFi Extender, an Ethernet cable, and the quick installation guide, illustrating the typical package contents.
4. Product Overview
Familiarize yourself with the physical features and indicators of your WiFi Extender.

Image: A detailed diagram of the WiFi Extender, highlighting its power supply switch, WiFi indicator, signal strength indicators (2.4G), RJ45 network port (LAN), and WPS button.
LED Indicators:
- Power Indicator: Indicates if the device is powered on.
- WiFi Indicator: Shows the status of the WiFi connection.
- 2.4G Signal Indicators: Displays the strength of the 2.4G WiFi signal from the upper-level router. Multiple lights indicate a stronger signal.
- LAN Indicator: Lights up when an Ethernet cable is connected to the LAN port.
- WPS Indicator: Flashes during WPS pairing, solid when connected via WPS.
Ports and Buttons:
- LAN Port (RJ45): For connecting wired devices or for AP mode setup.
- Reset Button: Press and hold for 5-8 seconds to restore factory default settings.
- WPS Button: For quick and secure connection to your router without entering passwords.
5. Setup
The WiFi Extender can be set up using two methods: WPS (Wi-Fi Protected Setup) or via a web browser.
5.1. WPS Setup (Recommended for quick setup)
- Plug the WiFi Extender into a power outlet near your main router.
- Wait for the Power LED to turn solid.
- Press the WPS button on the WiFi Extender. The WPS LED will start flashing.
- Within 2 minutes, press the WPS button on your main router.
- Wait for the WPS LED on the extender to turn solid, indicating a successful connection.
- Unplug the extender and relocate it to a desired location within your router's WiFi range. Ensure the signal indicators show a good connection.

Image: A visual guide demonstrating the three steps for WPS setup: pressing the extender's WPS button, pressing the router's WPS button, and then placing the repeater in the desired location.
5.2. Web Browser Setup
- Plug the WiFi Extender into a power outlet.
- On your computer or mobile device, connect to the WiFi network named "Wi-Fi Repeater" (or similar, without a password).
- Open a web browser and enter
http://ap.setupor192.168.11.1in the address bar. - Log in using the default username and password (usually "admin" for both).
- Select "Repeater Mode" from the setup options.
- The extender will scan for available WiFi networks. Select your home WiFi network from the list.
- Enter the password for your home WiFi network.
- Confirm the settings and wait for the extender to restart.
- Once restarted, the extender will broadcast a new WiFi network (e.g., "YourNetworkName_EXT"). Connect your devices to this new network.

Image: A six-step visual guide for configuring the WiFi Extender via a web browser, showing connection to the extender's network, logging into the setup page, selecting Repeater Mode, choosing the target network, completing installation, and connecting to the new extended network.
6. Operating Modes
The Jalann WiFi Extender supports two main operating modes:
6.1. Repeater Mode
In Repeater Mode, the extender wirelessly connects to your existing router and amplifies its signal, extending the coverage area. This is ideal for eliminating Wi-Fi dead zones and improving signal strength in areas with weak coverage.
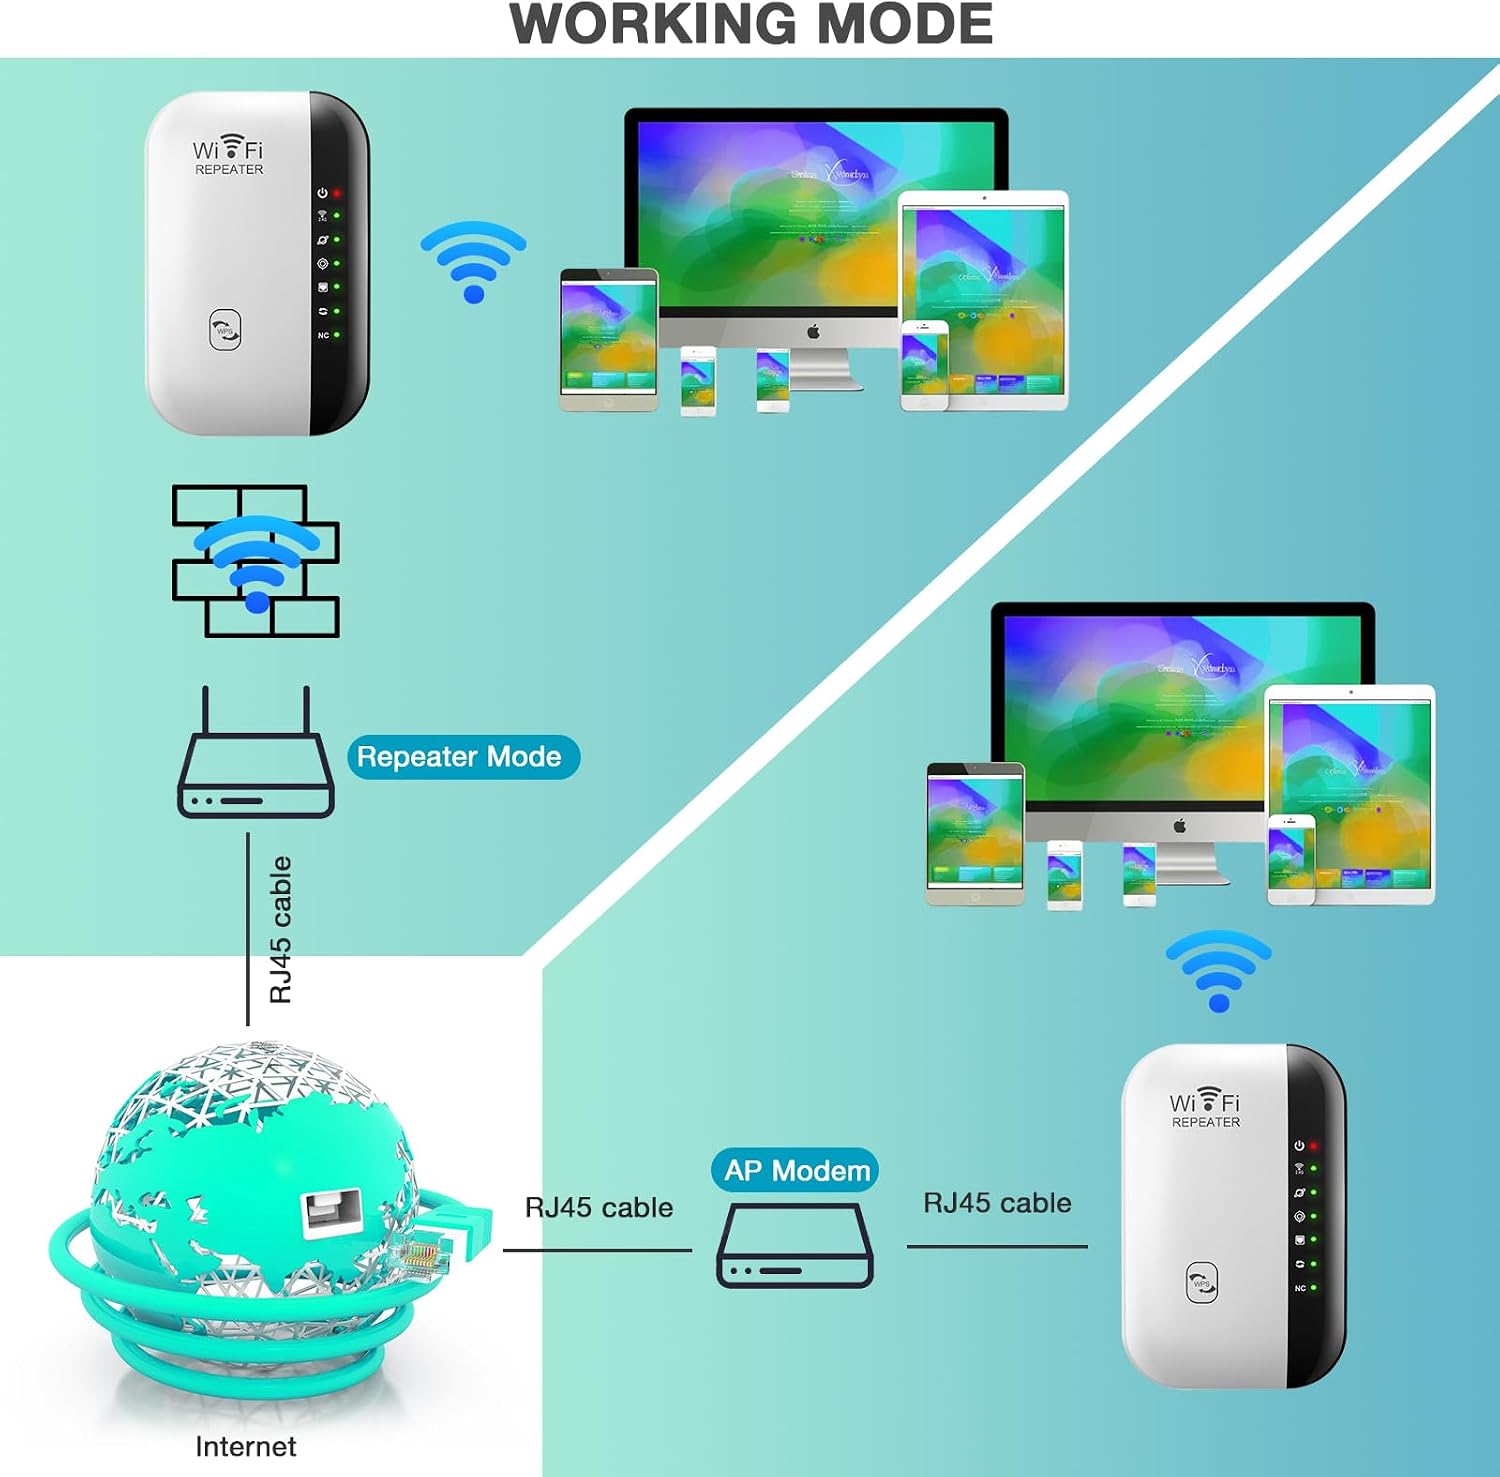
Image: A diagram showing the two working modes. On the left, Repeater Mode illustrates the extender wirelessly connecting to a router to extend its signal. On the right, AP Mode shows the extender connected via an RJ45 cable to an internet source (like a modem) to create a new wireless network.
6.2. Access Point (AP) Mode
In AP Mode, the extender connects to your wired network (e.g., via an Ethernet cable from your router or modem) and transforms the wired internet connection into a new wireless network. This is useful for adding Wi-Fi capability to a wired-only network or creating a separate Wi-Fi network.
- Connect an Ethernet cable from your router/modem to the LAN port of the WiFi Extender.
- Follow the web browser setup steps (Section 5.2) and select "AP Mode" during configuration.
7. Maintenance
- Cleaning: Use a soft, dry cloth to clean the device. Do not use liquid or aerosol cleaners.
- Placement: For optimal performance, place the extender in a central location between your router and the area needing extended coverage. Avoid obstructions like thick walls or large metal objects.
- Firmware Updates: Periodically check the manufacturer's website for firmware updates to ensure optimal performance and security.
8. Troubleshooting
8.1. No Internet Access After Setup
- Check Signal Strength: Ensure the extender is placed within a good signal range of your main router. The signal indicators on the extender should show a strong connection.
- Verify Password: During setup, ensure you entered the correct WiFi password for your main router.
- Restart Devices: Try restarting your main router, the extender, and your connected devices.
- Reset and Reconfigure: If issues persist, perform a factory reset on the extender (press and hold the Reset button) and reconfigure it.
8.2. Slow Connection Speed
- Optimal Placement: Relocate the extender to a position that minimizes obstacles and is roughly halfway between your router and the desired coverage area.
- Interference: Avoid placing the extender near devices that emit strong electromagnetic interference (e.g., microwaves, cordless phones).
- Network Congestion: If many devices are connected to the network, it can affect speed.
8.3. Cannot Access Web Management Page
- Correct IP/URL: Ensure you are using the correct address:
http://ap.setupor192.168.11.1. - Connected to Extender: Make sure your device is connected to the extender's WiFi network (e.g., "Wi-Fi Repeater") and not your main router's network.
- Clear Browser Cache: Try clearing your browser's cache or using a different browser.
9. Specifications
| Model Number | MT02 |
| Wireless Standard | 802.11bgn |
| Data Transfer Rate | Up to 300Mbps (2.4G) |
| Frequency Band | 2.4 GHz |
| Ports | 1 x RJ45 LAN Port |
| Special Features | Integrated Antennas, Access Point Mode, WPS Function |
| Product Dimensions | 5.84 x 5.33 x 8.38 cm |
10. Warranty and Support
The Jalann WiFi Extender comes with a standard manufacturer's warranty. Please refer to the warranty card included in your package or contact your point of purchase for specific warranty terms and conditions.
For technical support or further inquiries, please contact Jalann customer service through the contact information provided on the product packaging or the official Jalann website.
Ask a question about this manual
Ask about setup, troubleshooting, compatibility, parts, safety, or missing instructions. Manuals+ will review the question and use this page’s manual context to help answer it.