
1. Introduction
Thank you for purchasing the Vissani 1.5 cu. ft. Countertop Convection Microwave Oven. This appliance combines the convenience of a microwave with the versatility of a convection oven and air fryer, offering multiple cooking functions including sensor cook. To ensure safe and efficient operation, please read this manual thoroughly before using the appliance and retain it for future reference.
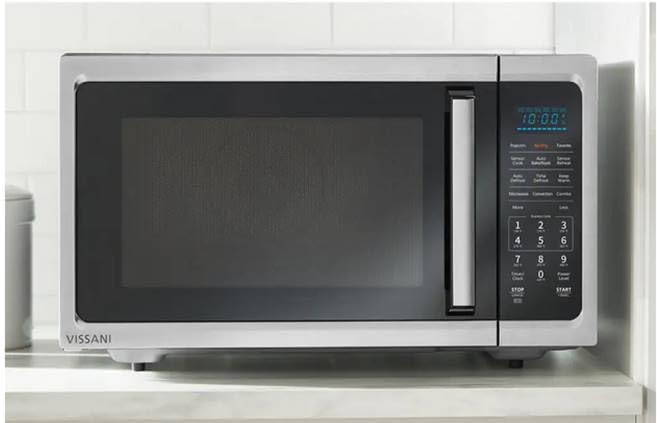
Image 1.1: Front view of the Vissani 1.5 cu. ft. Countertop Convection Microwave Oven.
2. Important Safety Instructions
When using electrical appliances, basic safety precautions should be followed, including the following:
- Read all instructions before using the appliance.
- Do not operate the oven if the door is damaged, or if the oven is malfunctioning.
- Do not attempt to service or repair the oven yourself. Contact qualified service personnel.
- Ensure proper ventilation. Do not block any ventilation openings.
- Do not use corrosive chemicals or vapors in this appliance.
- Do not heat liquids or other foods in sealed containers as they are liable to explode.
- Always use oven mitts when handling hot items from the oven, especially during convection or air fry modes.
- Metallic items should not be used in microwave mode.
3. Setup and Installation
3.1 Unpacking
Carefully remove the oven from its packaging. Remove all packing materials, including any protective film or tape. Inspect the oven for any damage. If any damage is observed, do not operate the oven and contact customer service.
3.2 Placement
Place the oven on a flat, stable surface that can support its weight. Ensure there is adequate space around the oven for proper ventilation:
- Minimum 4 inches (10 cm) of clearance on the top, back, and sides.
- Do not place the oven near heat sources or in areas with high humidity.
3.3 Turntable Assembly
The oven comes with a glass turntable and a turntable ring. Assemble them as follows:
- Place the turntable ring securely in the center of the oven cavity.
- Carefully place the glass turntable on top of the ring, ensuring it sits properly in the center support.
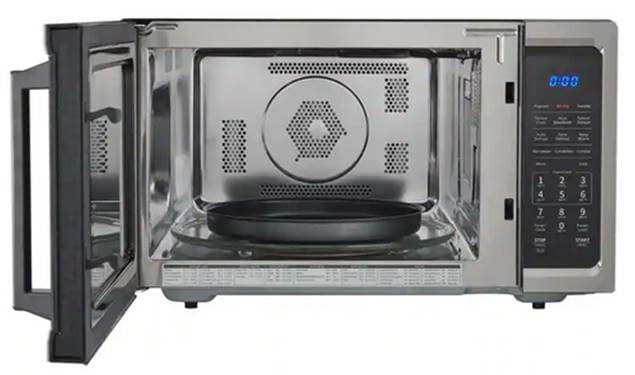
Image 3.1: Interior view showing the turntable and rack placement.
3.4 Power Connection
Plug the power cord into a grounded electrical outlet. Ensure the voltage matches the specifications of the oven.
4. Operating Instructions
4.1 Control Panel Overview
Familiarize yourself with the control panel buttons and display. The panel includes numeric keys, function buttons (Popcorn, Air Fry, Sensor Cook, Convection, etc.), and control buttons (Start, Stop/Cancel, Timer/Clock, Power Level).
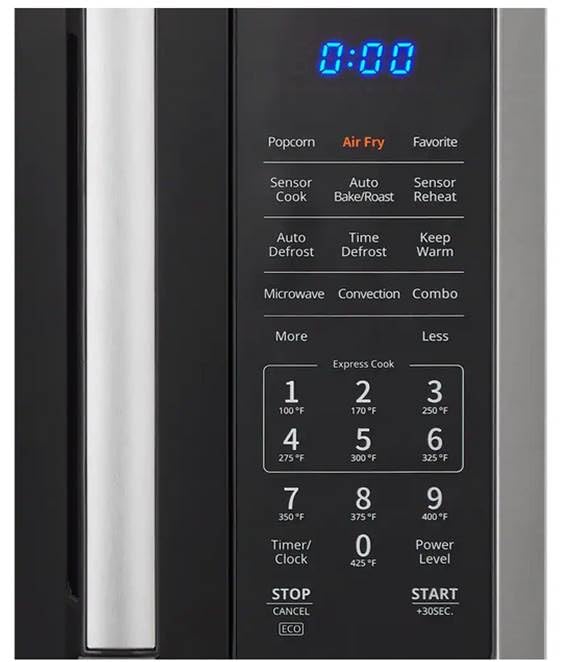
Image 4.1: Detailed view of the control panel.
4.2 Setting the Clock
- Press the Timer/Clock button once.
- Use the number pad to enter the current time (e.g., 1-2-3-0 for 12:30).
- Press Timer/Clock again to confirm.
4.3 Microwave Cooking
- Place food in a microwave-safe container on the turntable.
- Enter the desired cooking time using the number pad.
- To adjust power level, press Power Level and then enter a number from 1 to 10 (10 being 100% power). Skip this step for full power.
- Press Start/+30Sec. to begin cooking.
4.4 Convection Cooking
Convection cooking uses a heating element and fan to circulate hot air, similar to a traditional oven.
- Place food on the metal rack provided (if applicable for convection).
- Press the Convection button.
- Use the number pad to select the desired temperature (e.g., 3-5-0 for 350°F).
- Press Start/+30Sec. to preheat. The oven will beep when preheated.
- Place food inside, close the door, enter cooking time, and press Start/+30Sec. again.
4.5 Air Fry Function
The Air Fry function uses high-speed hot air circulation for crispy results.
- Place food in an air fry basket or on a suitable rack.
- Press the Air Fry button.
- Select the desired air fry preset or temperature using the number pad.
- Enter the cooking time.
- Press Start/+30Sec. to begin.
4.6 Sensor Cook/Reheat
These functions automatically adjust cooking time based on the food's moisture and temperature.
- Place food in the oven.
- Press Sensor Cook or Sensor Reheat.
- Press Start/+30Sec. The oven will detect and cook automatically.
4.7 Auto Defrost/Time Defrost
Use these functions to defrost food efficiently.
- Auto Defrost: Press Auto Defrost, select food type/weight, and press Start/+30Sec.
- Time Defrost: Press Time Defrost, enter defrosting time, and press Start/+30Sec.
4.8 Keep Warm
To keep cooked food warm, press Keep Warm and then Start/+30Sec.
4.9 Child Lock (Control Lock)
To activate the child lock, press and hold Stop/Cancel for 3 seconds. The display will show a lock indicator. To deactivate, press and hold Stop/Cancel again for 3 seconds.
5. Maintenance and Cleaning
Regular cleaning helps maintain the performance and longevity of your oven.
5.1 Exterior Cleaning
Wipe the exterior surfaces with a soft, damp cloth. For stainless steel finishes, use a non-abrasive stainless steel cleaner. Avoid harsh chemicals or abrasive pads.
5.2 Interior Cleaning
Clean the interior cavity with a mild detergent and a soft cloth. For stubborn food splatters, place a bowl of water with lemon slices inside and microwave on high for 2-3 minutes to loosen residue, then wipe clean. Ensure the oven is cool before cleaning.
5.3 Turntable and Ring
The glass turntable and turntable ring can be removed and washed in warm, soapy water or in the dishwasher. Ensure they are completely dry before placing them back in the oven.
6. Troubleshooting
If you encounter issues with your oven, refer to the following table for common problems and solutions.
| Problem | Possible Cause | Solution |
|---|---|---|
| Oven does not start | Power cord unplugged; Door not closed properly; Fuse blown or circuit breaker tripped. | Ensure power cord is plugged in; Close door firmly; Check household fuse/circuit breaker. |
| Food not cooking evenly | Food not stirred or rotated; Incorrect power level/cooking time; Turntable not rotating. | Stir or rotate food during cooking; Adjust power level/time; Check turntable assembly. |
| Excessive noise during operation | Turntable or roller ring not positioned correctly; Foreign object in cavity. | Re-position turntable and ring; Remove any foreign objects. |
| Display shows an error code | Internal malfunction. | Unplug the oven for 1 minute, then plug back in. If error persists, contact customer service. |
If the problem persists after attempting these solutions, please contact Vissani customer support for assistance.
7. Specifications
This section provides technical details for your Vissani Convection Microwave Oven.
| Feature | Detail |
|---|---|
| Brand | Vissani |
| Model Number | EC042A2KJ |
| Capacity | 1.5 cubic feet |
| Dimensions (D x W x H) | 61.5 cm x 57.5 cm x 37.5 cm (24.2 in x 22.6 in x 14.8 in) |
| Wattage (Microwave) | 1000 Watts |
| Material | Stainless Steel (Exterior and Interior) |
| Power Levels | 10 |
| Heating Method | Convection and Microwave Radiation |
| Installation Type | Countertop |
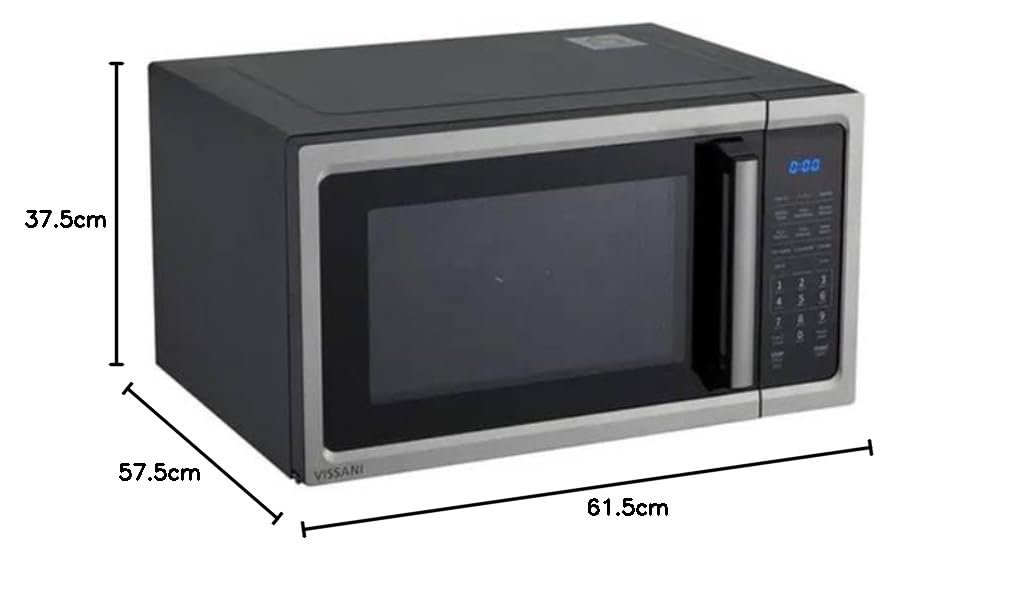
Image 7.1: Product dimensions for placement reference.
8. Warranty and Support
For warranty information and customer support, please refer to the warranty card included with your product or visit the official Vissani website. Keep your purchase receipt as proof of purchase for any warranty claims.
If you require technical assistance or have questions regarding the operation of your oven, please contact Vissani customer service.


