
Festnight DRR5277795814959LH
Festnight Garden Pergola Instruction Manual
Model: DRR5277795814959LH
1. Introduction
This manual provides comprehensive instructions for the assembly, operation, maintenance, and troubleshooting of your Festnight Metal Garden Pergola. Please read this manual carefully before assembly and use to ensure safe and correct operation and to maximize the lifespan of your product.
The Festnight Garden Pergola is designed to provide shade and a comfortable outdoor living space for your garden or patio. Its retractable canopy allows for adjustable sun protection.
2. Safety Instructions
Always adhere to the following safety guidelines to prevent injury or damage to the product:
- Ensure all components are present and undamaged before beginning assembly.
- Assemble the pergola on a flat, stable surface.
- Use appropriate tools and follow all assembly steps in the correct order.
- Do not attempt to assemble the pergola during strong winds or adverse weather conditions.
- Securely anchor the pergola to the ground to prevent tipping, especially in windy conditions.
- Regularly inspect all connections and fasteners to ensure they remain tight.
- Do not hang heavy objects from the pergola frame.
- Retract the canopy during strong winds, heavy rain, or snow to prevent damage.
- Keep children and pets away from the assembly area.
3. Setup and Assembly
Before starting, ensure you have all parts listed in the packing list and the necessary tools (e.g., wrench, screwdriver). Assembly typically requires two people.
3.1. Unpacking and Part Identification
Carefully unpack all components. Lay them out on a clean, soft surface to prevent scratches. Identify each part using the provided parts list.
3.2. Frame Assembly
Begin by assembling the main support posts and crossbeams. Ensure all connections are finger-tight before fully tightening.

Image: Initial assembly of the pergola frame, showing the four main posts and the top crossbeams.
Connect the horizontal support beams to the vertical posts. Pay attention to the orientation of each piece as indicated in the diagrams.

Image: A view of the pergola frame, highlighting the connection points and the overall structure before the canopy is installed.
3.3. Canopy Rail Installation
Install the rails along which the retractable canopy will slide. Ensure they are level and securely fastened to the main frame.

Image: The pergola frame with the upper rails in place, ready for the canopy fabric to be attached.
3.4. Canopy Fabric Attachment
Attach the waterproof canopy fabric to the sliding mechanism. Follow the instructions to ensure the fabric is correctly aligned and secured.

Image: A detailed view of the corner joint and the mechanism for the retractable canopy, showing the rope and pulley system.
3.5. Final Tightening and Anchoring
Once all components are in place, systematically tighten all bolts and screws. Anchor the pergola to the ground using the provided hardware or suitable alternatives for your surface type.

Image: The Festnight pergola fully assembled and installed in an outdoor environment, demonstrating its intended use.
4. Operating Instructions
4.1. Retracting the Canopy
To retract the canopy and expose the area to sun, gently pull the rope handle (visible in images) to slide the fabric sections along the rails. Guide the fabric smoothly to prevent snagging.
Image: A detailed view of the corner joint and the mechanism for the retractable canopy, showing the rope and pulley system used for operation.
4.2. Extending the Canopy
To extend the canopy for shade, gently pull the rope in the opposite direction, allowing the fabric sections to unfold and cover the desired area. Ensure the fabric is fully extended for maximum coverage.
Image: The pergola with its canopy partially extended, illustrating the sliding mechanism.
Always operate the canopy smoothly and avoid sudden jerks to prevent damage to the mechanism or fabric.
5. Maintenance
- Cleaning the Frame: Clean the metal frame with a soft cloth and mild soap and water. Rinse thoroughly and dry to prevent water spots. Avoid abrasive cleaners.
- Cleaning the Canopy: The waterproof canopy can be cleaned with a soft brush or cloth and mild soapy water. Do not use harsh chemicals or bleach. Allow the canopy to dry completely before retracting it for storage to prevent mildew.
- Seasonal Care: In regions with heavy snow or strong winds, it is recommended to retract and secure the canopy, or disassemble and store the pergola during the off-season to prolong its life.
- Fastener Check: Periodically check all bolts, screws, and connections to ensure they are tight. Re-tighten as necessary.
6. Troubleshooting
| Problem | Possible Cause | Solution |
|---|---|---|
| Canopy difficult to retract/extend | Rails are dirty or obstructed; mechanism is stiff; fabric is misaligned. | Clean the rails and sliding mechanism. Apply a silicone-based lubricant if necessary. Check fabric alignment and adjust. |
| Pergola feels unstable/wobbly | Bolts are loose; not properly anchored; uneven ground. | Check and tighten all bolts. Ensure the pergola is securely anchored to a level surface. |
| Water pooling on canopy | Canopy not fully extended or pitched correctly; excessive rain. | Ensure canopy is fully extended and taut. If pooling persists, consider a slight adjustment to the pitch if possible, or retract during heavy rain. |
7. Specifications
| Feature | Detail |
|---|---|
| Product Dimensions | 400 x 300 x 225 cm (Length x Width x Height) |
| Material | Metal (Frame), Waterproof Fabric (Canopy) |
| Water Resistance | Waterproof |
| Assembly Required | Yes |
| Model Number | DRR5277795814959LH |
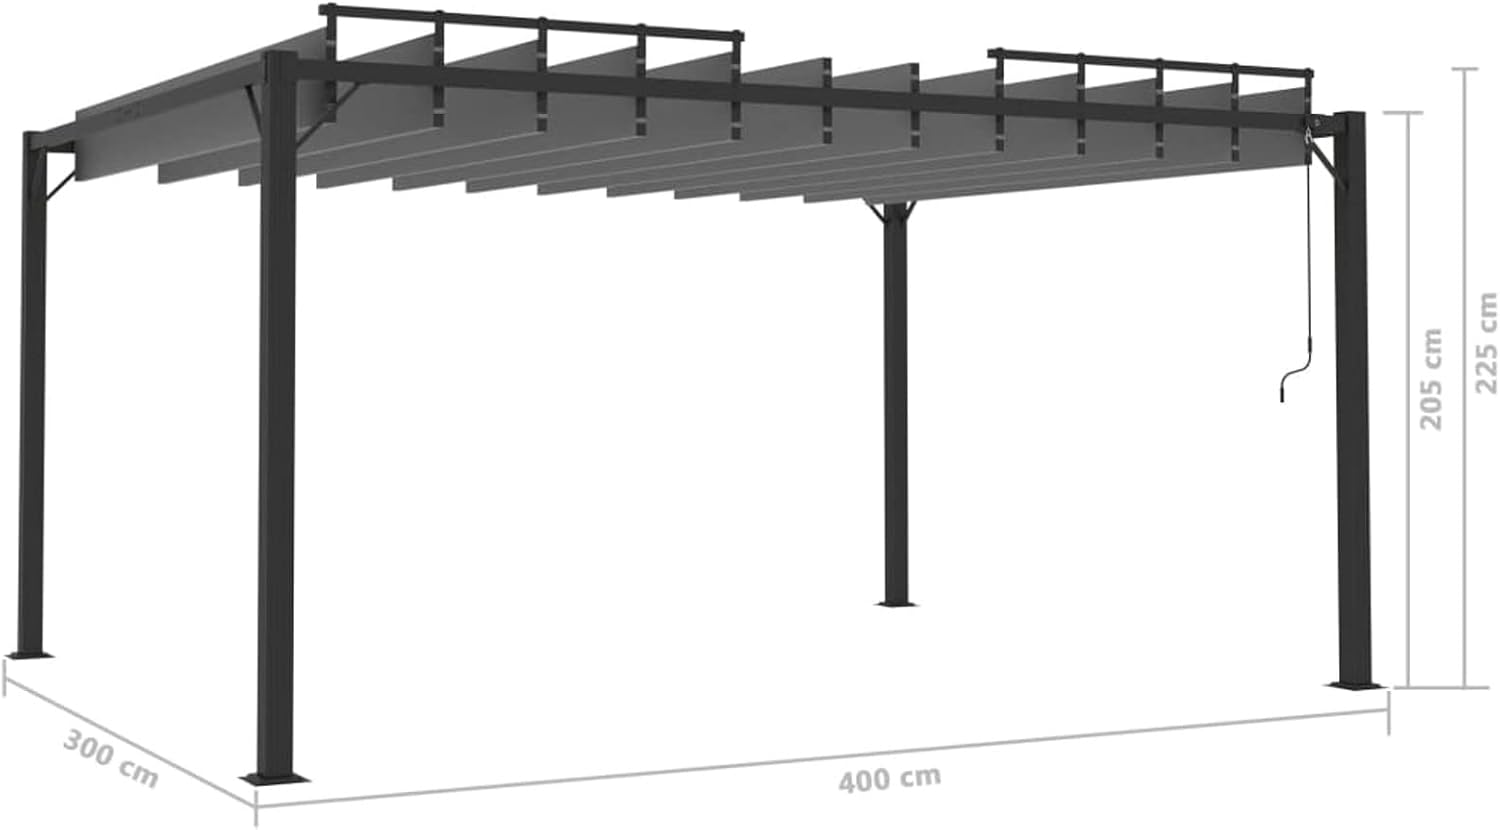
Image: A diagram illustrating the key dimensions of the pergola: 400 cm length, 300 cm width, and 225 cm height.
8. Warranty and Support
Festnight products are manufactured to high-quality standards. For specific warranty details, please refer to the warranty card included with your purchase or visit the official Festnight website. Keep your proof of purchase for any warranty claims.
For technical support, missing parts, or any inquiries regarding your Festnight Garden Pergola, please contact Festnight customer service through their official website or the retailer from whom you purchased the product. Provide your model number (DRR5277795814959LH) and purchase date when contacting support.
You can visit the Festnight store on Amazon: Festnight Store
Ask a question about this manual
Ask about setup, troubleshooting, compatibility, parts, safety, or missing instructions. Manuals+ will review the question and use this page’s manual context to help answer it.