Introduction
This manual provides comprehensive instructions for the assembly, painting, and finishing of your Italeri 2518 Macchi MC.202 1:32 scale model kit. Please read all instructions carefully before beginning assembly. Familiarize yourself with the parts and the overall construction process to ensure a successful build.

Image: A fully assembled Italeri Macchi MC.202 model, painted in a desert camouflage pattern. The engine cowling is open, revealing the detailed engine bay. The model features Italian Air Force markings and a propeller.
Safety Information
WARNING: CHOKING HAZARD - SMALL PARTS. Not for children under 3 years. This model kit contains small parts which may pose a choking hazard. Adult supervision is recommended during assembly, especially for younger builders (recommended age 12 years and up).
Always use appropriate tools and adhesives in a well-ventilated area. Keep all glues, paints, and thinners out of reach of small children and pets. Dispose of waste materials responsibly.
Kit Contents
Your Italeri 2518 Macchi MC.202 1:32 Model Kit includes the following components:
- Plastic sprues containing all aircraft components.
- Clear plastic parts for canopy and lights.
- Photo-etched (PE) parts for enhanced detailing.
- Decal sheet for various markings and insignia (8 versions).
- Instruction booklet.
Please inspect all parts upon opening the box. If any parts are missing or damaged, contact your retailer or Italeri customer support.
Assembly Instructions
Follow these steps for the construction of your Macchi MC.202 model. Refer to the diagrams in the included instruction booklet for detailed part placement.
1. Preparation
- Carefully remove parts from the sprues using a hobby knife or sprue cutters.
- Clean any flash or mold lines from the parts using a hobby knife or fine sandpaper.
- Test fit parts before applying adhesive to ensure proper alignment.
2. Cockpit Assembly
Assemble the super-detailed cockpit components. This includes the instrument panel, control stick, seat, and side consoles. Use the provided photo-etched parts for additional detail where indicated.
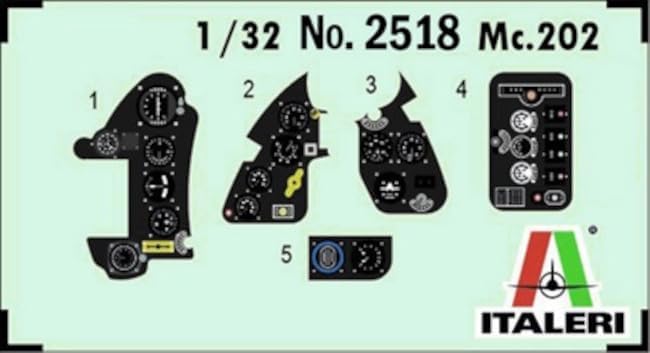
Image: A decal sheet specifically for cockpit instruments, featuring multiple small dials, gauges, and control panel elements. These are applied to the plastic instrument panel parts.
3. Engine Assembly
Construct the finely detailed engine. Pay close attention to the placement of all engine components, including cylinders, exhaust manifolds, and ancillary equipment. This kit allows for the engine bay to be displayed open.
4. Fuselage Assembly
Integrate the assembled cockpit and engine into the fuselage halves. Ensure proper alignment before gluing the fuselage sections together. Allow sufficient drying time for the adhesive.
5. Wing and Tail Assembly
Assemble the main wings, ensuring the correct dihedral. The kit features moveable wings and tail ailerons, and options for open or closed flaps. Attach the horizontal and vertical stabilizers, including the two types of tail ailerons if applicable to your chosen version.
6. Landing Gear Assembly
Assemble the detailed landing gear components. This includes the main landing gear struts, wheels, and tail wheel assembly. Ensure the landing gear is securely attached and aligned for a stable model.
7. Final Details
Attach smaller components such as the propeller, antenna, pitot tube, and any other external details. Install the clear canopy parts. Consider masking and painting the canopy frames before attachment.
Painting and Decals
Painting is crucial for achieving a realistic finish. Refer to the painting guide in your instruction booklet for color schemes corresponding to the 8 decal versions. The kit includes realistic panel lines to aid in weathering and detailing.

Image: A camouflage pattern guide sheet, displaying numerous numbered irregular shapes on a blue background. These shapes correspond to specific paint colors for creating the aircraft's camouflage.
Apply decals after painting and a gloss clear coat. Cut each decal carefully, dip it in water, and slide it onto the model. Use decal setting solutions for better adhesion and to conform to surface details. The super decals sheet includes various markings and realistic smoke rings decals.

Image: The main decal sheet for the Macchi MC.202 model kit. It features a variety of markings including Italian national insignia, squadron numbers, unit badges, and stencils for different aircraft versions.
Specifications
- Model: Macchi MC.202 Folgore
- Kit Number: 2518
- Brand: Italeri
- Scale: 1:32
- Material: Plastic
- Recommended Age: 12 years and up
- Approximate Dimensions (L x W x H): 10.87 x 14.57 x 3.94 inches (box dimensions)
- Special Features: Super-detailed cockpit, finely detailed engine, detailed landing gear, PE parts for detailing, realistic panel lines, moveable wings and tail ailerons, open or closed flaps, two types of tail ailerons, super decals sheet for 8 versions, realistic smoke rings decals.
Troubleshooting
- Part Fit Issues: If parts do not fit perfectly, gently sand or trim edges. Use small amounts of filler if gaps remain.
- Decal Silvering: Apply decals to a glossy surface. Use decal setting solutions to help decals conform and eliminate air bubbles.
- Paint Adhesion: Ensure parts are clean and free of oils or mold release agents before painting. Use a primer for best results.
- Broken Parts: Small broken plastic parts can often be re-attached with plastic cement. For delicate parts, consider reinforcing with a small pin.
Maintenance
Once assembled and painted, your model requires minimal maintenance:
- Keep the model in a dust-free environment, such as a display case.
- Clean gently with a soft brush or a dry, lint-free cloth. Avoid using water or cleaning solutions, as these may damage paint or decals.
- Avoid direct sunlight to prevent fading of paint and decals over time.
Warranty and Support
This model kit is intended for hobbyists and is not covered by a typical product warranty for functional defects. However, if you encounter missing or defective parts upon initial inspection, please contact the retailer where you purchased the kit or Italeri customer support directly. Keep your proof of purchase.
For further assistance or inquiries, please visit the official Italeri website or contact their customer service department.


