Introduction
Thank you for purchasing the iTOMA 728 DAB & FM Radio Alarm Clock. This device combines a digital radio with an alarm clock, offering features such as Bluetooth connectivity, dual alarms, a sleep timer, dimmer control, a USB charging port, and a headphone jack. This manual provides detailed instructions for setup, operation, and maintenance to ensure optimal performance and longevity of your product.
Safety Information
- Read all instructions carefully before use and retain for future reference.
- Do not expose the unit to dripping or splashing liquids.
- Do not place objects filled with liquids, such as vases, on the apparatus.
- Ensure proper ventilation; do not block any ventilation openings.
- Use only the power adapter supplied with the unit.
- Keep the unit away from direct sunlight, heat sources, and strong magnetic fields.
- Clean the unit only with a soft, dry cloth.
Package Contents
- 1 × iTOMA 728 DAB & FM Radio Alarm Clock
- 1 × Power Adapter
- 1 × User Manual (Six Languages)
Product Overview
The iTOMA 728 features a clear LCD display and intuitive controls located on the top panel. Familiarize yourself with the buttons and ports for easy operation.
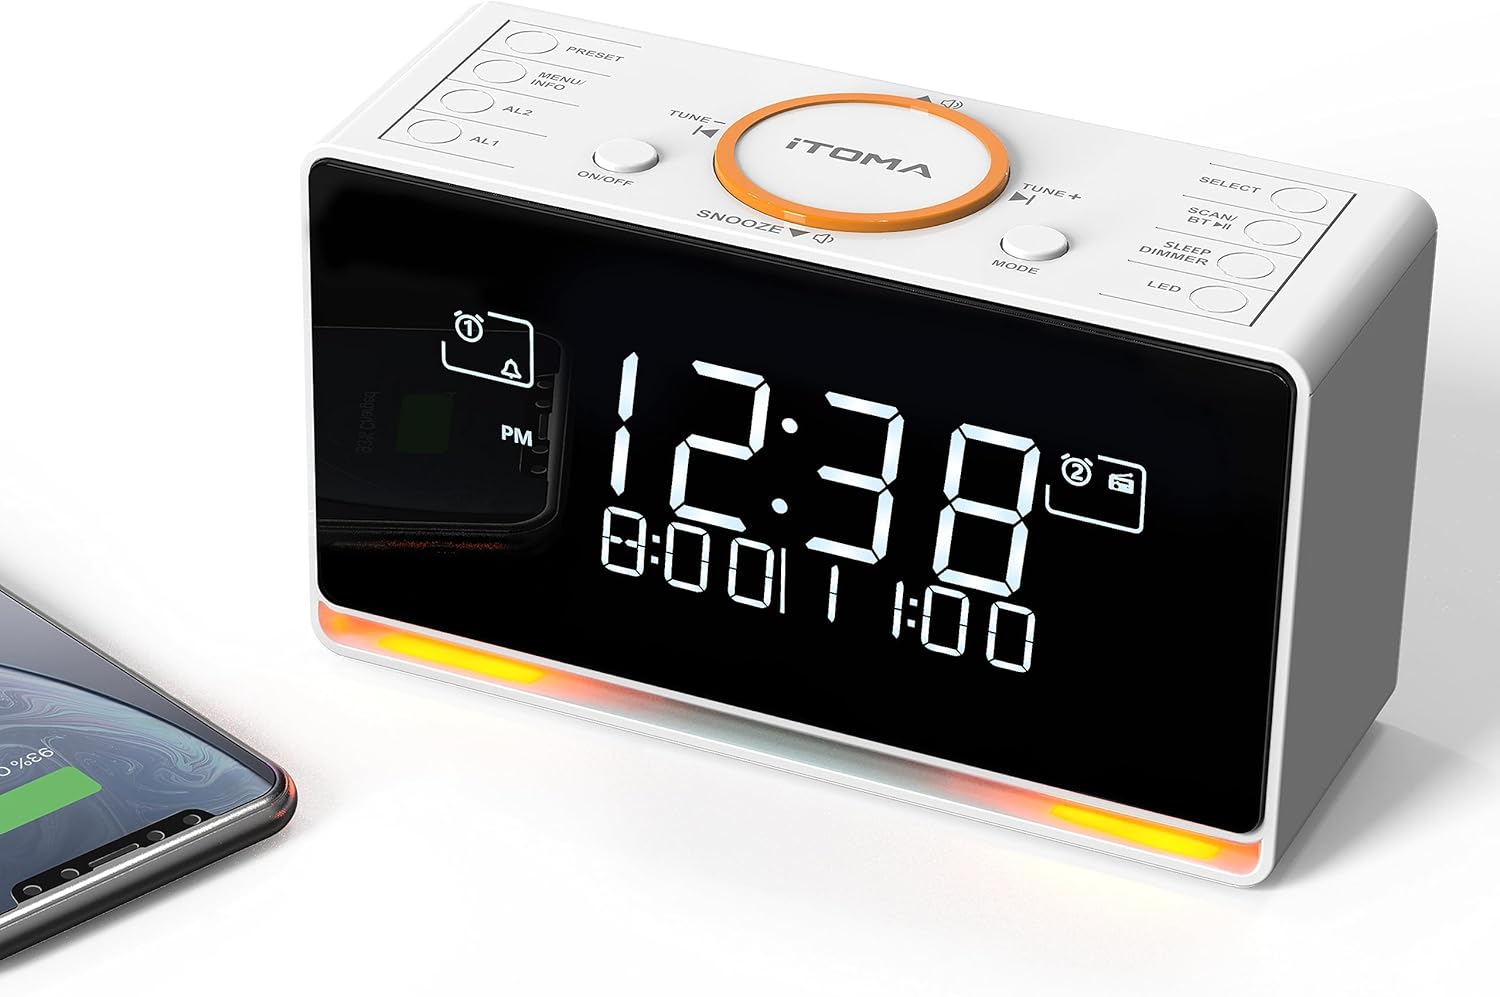
Image Description: A white iTOMA 728 DAB & FM Radio Alarm Clock is shown from a slightly elevated angle, highlighting its digital display and the control buttons on its top surface. The display shows '12:38' prominently, with smaller text below indicating alarm times. A smartphone is partially visible on the left, connected to the clock, suggesting its charging capability. The base of the clock emits a soft orange glow, indicating the night light feature.
Control Panel Layout
- PRESET: Access and save radio presets.
- MENU/INFO: Access menu options or display information.
- AL1/AL2: Set and activate Alarm 1 and Alarm 2.
- ON/OFF: Power the unit on or off.
- SNOOZE: Temporarily silence an active alarm.
- TUNE - / TUNE +: Adjust radio frequency or navigate menu options.
- MODE: Switch between DAB, FM, and Bluetooth modes.
- SELECT: Confirm selections in the menu.
- SCAN/BT: Initiate radio scan or activate Bluetooth pairing.
- SLEEP/DIMMER: Set sleep timer or adjust display brightness.
- LED: Control the night light feature.
Setup
1. Initial Power-On
- Connect the provided power adapter to the DC IN port on the back of the unit and then to a wall outlet.
- The unit will power on automatically.
2. Time and Date Setting
Upon initial power-on and connection to a DAB radio station, the time and date will automatically update. Manual time setting is also possible via the menu if needed.
3. Antenna Adjustment
For optimal DAB and FM radio reception, fully extend the telescopic antenna located on the back of the unit. Adjust its position to achieve the clearest signal.
Operating Instructions
Power On/Off
- Press the ON/OFF button to turn the unit on or off.
DAB & FM Radio
The radio supports both DAB and FM bands, allowing you to save up to 40 preset stations (20 DAB, 20 FM).

Image Description: The iTOMA 728 alarm clock is placed on a wooden bedside table, displaying 'BBC-RADIO' on its screen. Above the clock, large orange icons represent DAB and FM radio signals. Below the clock, smaller icons highlight key features: DAB & FM Radio, Adjustable Volume, Sleep Timer, and DAB+ compatibility.
- Switching Modes: Press the MODE button to cycle between DAB and FM radio.
- Automatic Scan: In DAB or FM mode, press and hold the SCAN button to automatically scan for available stations.
- Manual Tuning: Use the TUNE - or TUNE + buttons to manually adjust the frequency.
- Saving Presets:
- Tune to your desired station.
- Press and hold the PRESET button.
- Use TUNE - or TUNE + to select a preset number (1-20 for DAB, 1-20 for FM).
- Press SELECT to confirm.
- Recalling Presets: Press the PRESET button repeatedly to cycle through saved stations.
- Volume Control: Use the dedicated volume buttons (often integrated with TUNE +/- or separate) to adjust the 16-level radio volume.
Bluetooth Function
Connect your smartphone or tablet wirelessly to play audio through the alarm clock.

Image Description: A person's hand holds a smartphone displaying a music playback screen, with the iTOMA 728 alarm clock visible in the background on a white surface. The image emphasizes the ability to stream music via Bluetooth from a mobile device to the alarm clock.
- Press the MODE button until 'BT' or 'Bluetooth' appears on the display. The unit will enter pairing mode, indicated by a flashing Bluetooth icon.
- On your mobile device, enable Bluetooth and search for 'iTOMA 728' (or similar).
- Select the device to pair. Once connected, a steady Bluetooth icon will appear on the clock's display.
- You can now play audio from your device through the alarm clock.
Dual Alarm Settings
Set two independent alarms with various wake-up sounds and scheduling options.

Image Description: The iTOMA 728 alarm clock is shown with its display indicating two alarm times. An infographic next to it details the 'DUAL ALARM' feature with '3 Modes': All-7-Day, Weekday, and Weekend, showing which days each alarm can be set for. Above, icons represent 'WAKE-UP MODES' including FM/DAB radio, Vibration, and Buzzer. A person is shown sleeping with an eye mask, illustrating the alarm clock's function.
- Setting Alarm 1 or 2: Press and hold the AL1 or AL2 button.
- Use TUNE - or TUNE + to set the desired wake-up time, then press SELECT.
- Wake-Up Mode: Select your preferred wake-up sound: DAB radio, FM radio, Buzzer, or Vibration. Press SELECT.
- Alarm Volume: Adjust the alarm volume (for radio alarms) using TUNE - or TUNE +, then press SELECT.
- Alarm Week Modes: Choose from 'Every day', 'Weekdays only', or 'Weekends only'. Press SELECT to confirm.
- Activating/Deactivating: Briefly press AL1 or AL2 to toggle the alarm on or off. An alarm icon will appear on the display when active.
- Snooze Function: When an alarm sounds, press the SNOOZE button to temporarily silence it for a set duration (typically 9 minutes).
Sleep Timer
Set a timer for the radio to automatically turn off after a specified period.
- While the radio is playing, press the SLEEP/DIMMER button repeatedly to cycle through sleep timer options (e.g., 5, 15, 30, 60, 90, 120 minutes, or OFF).
- The radio will automatically turn off after the selected duration.
Display Dimmer Control & Night Light
Adjust the display brightness and activate the integrated night light.

Image Description: The iTOMA 728 alarm clock is shown in two scenarios: one in a brightly lit room and another in a dim environment, illustrating its auto-dimmer function. Below this, four separate images of the clock demonstrate the '4 LEVEL MANUAL DIMMER' settings: High (L-3), Medium (L-2), Low (L-1), and Off, showcasing the adjustable brightness of the LCD display.

Image Description: The iTOMA 728 alarm clock is positioned on a dark surface in a dimly lit room, with its integrated orange night light glowing softly from its base. The digital display shows the time '12:38' and alarm settings, highlighting the clock's functionality in low-light conditions.
- Display Brightness: Press the SLEEP/DIMMER button (when not setting sleep timer) to cycle through 4 brightness levels (L3-L2-L1-OFF).
- Automatic Dimming: The unit features an automatic dimming control function that adjusts display brightness based on ambient light.
- Night Light: Press the LED button to activate the 2-level orange night light. Press again to cycle through brightness levels or turn off.
USB Charging Port
The integrated USB port allows you to charge your mobile devices.
- Connect your device's USB charging cable (not included) to the USB port on the back of the alarm clock.
- Ensure the alarm clock is powered on for charging functionality.
Headphone Jack
For private listening, connect headphones to the 3.5mm headphone jack.

Image Description: The iTOMA 728 alarm clock is shown on a white desk, with a magnified inset highlighting the headphone jack on its side. A pair of white headphones rests near the clock, indicating the private listening feature. The clock's display shows the time and alarm settings.
- Plug your 3.5mm headphones into the headphone jack located on the side of the unit.
- Audio will automatically switch from the speaker to the headphones.
Maintenance
- Cleaning: Wipe the unit with a soft, dry, lint-free cloth. Do not use abrasive cleaners, waxes, or solvents.
- Storage: If storing the unit for an extended period, disconnect it from the power source and store it in a cool, dry place.
Troubleshooting
| Problem | Possible Cause | Solution |
|---|---|---|
| No power | Power adapter not connected or faulty outlet. | Ensure the power adapter is securely connected to the unit and a working power outlet. |
| Poor radio reception | Antenna not extended or poor signal area. | Fully extend and adjust the telescopic antenna. Try repositioning the unit. |
| Bluetooth device cannot pair | Bluetooth not in pairing mode or device too far. | Ensure the alarm clock is in Bluetooth pairing mode. Move your device closer to the alarm clock. |
| Alarm does not sound | Alarm not activated or volume too low. | Check if the alarm icon is displayed. Ensure alarm volume is set appropriately. |
| USB charging is slow or not working | Cable incompatibility or device requires higher power. | Try a different USB cable. Note that the USB port is for basic charging and may not support fast charging for all devices. |
Specifications
- Brand: iTOMA
- Model: 728
- Display Type: White LCD Display
- Power Source: Corded Electric (AC Adapter: 100-240V~50/60Hz)
- Radio Bands: DAB & FM
- Presets: 40 (20 DAB, 20 FM)
- Connectivity: Bluetooth, 3.5mm Earphone Jack
- Alarm Features: Dual Alarm, Snooze, 4 Wake-up Sounds (Vibration, Buzzer, DAB, FM), 3 Week Modes
- Timer: Sleep Timer (5-120 minutes)
- Lighting: 4-level Dimmer Control, 2-level Orange Night Light
- Charging: USB Charging Port (cable not included)
- Product Dimensions: 6 x 3.81 x 9.1 cm
- Item Weight: 650 Grams
Warranty and Support
For warranty information or technical support, please refer to the documentation included with your purchase or contact iTOMA customer service through their official website or the retailer where the product was purchased.


