1. Setup
1.1 Unboxing and Components
Your Godox XProII-S Flash Trigger and X1R-S Receiver Kit includes the following items:
- 1x Godox XProII-S TTL Wireless Flash Trigger
- 2x Godox X1R-S TTL Wireless Flash Receiver

Image: The Godox XProII-S Flash Trigger and two X1R-S Receivers included in the kit.
1.2 Battery Installation
The XProII-S trigger and X1R-S receivers typically use AA batteries (not included). Refer to the battery compartment markings for correct polarity.
1.3 Mounting the XProII-S Trigger
- Slide the XProII-S trigger onto your Sony camera's hotshoe.
- Secure the trigger by rotating the quick-release lock until it is firmly attached.

Image: Close-up of the XProII-S trigger's quick-release lock mechanism, ensuring secure attachment to the camera hotshoe.
1.4 Attaching X1R-S Receiver to Flash
- Slide the X1R-S receiver onto your compatible flash unit's hotshoe.
- Secure the receiver using its locking mechanism.

Image: The Godox X1R-S Flash Receiver for Sony, designed to be mounted on a flash unit.
1.5 Power On/Off
Press and hold the power button on both the XProII-S trigger and X1R-S receivers to turn them on or off. Ensure all units are powered on for wireless communication.
2. Operating
2.1 Basic Controls (XProII-S)
The XProII-S features a large LCD screen and intuitive buttons for navigation and settings adjustment. The main dial is used to change values, while the SET button confirms selections.

Image: The Godox XProII-S Flash Trigger displaying its LCD screen and various control buttons.
2.2 Setting Channels and IDs
To prevent interference and ensure reliable communication, set the same channel and ID on both the XProII-S trigger and all connected X1R-S receivers. The XProII-S can scan for the clearest channel.
Video: Demonstrates setting channels and IDs on the Godox XProII-S trigger and a connected flash unit, including the channel scanning function.
2.3 Flash Modes (TTL, Manual, Multi)
The XProII-S supports various flash modes:
- TTL Autoflash: Automatically adjusts flash output for correct exposure.
- Manual Flash (M): Allows precise manual control over flash power output.
- Multi Flash: Fires a series of rapid flashes for stroboscopic effects.
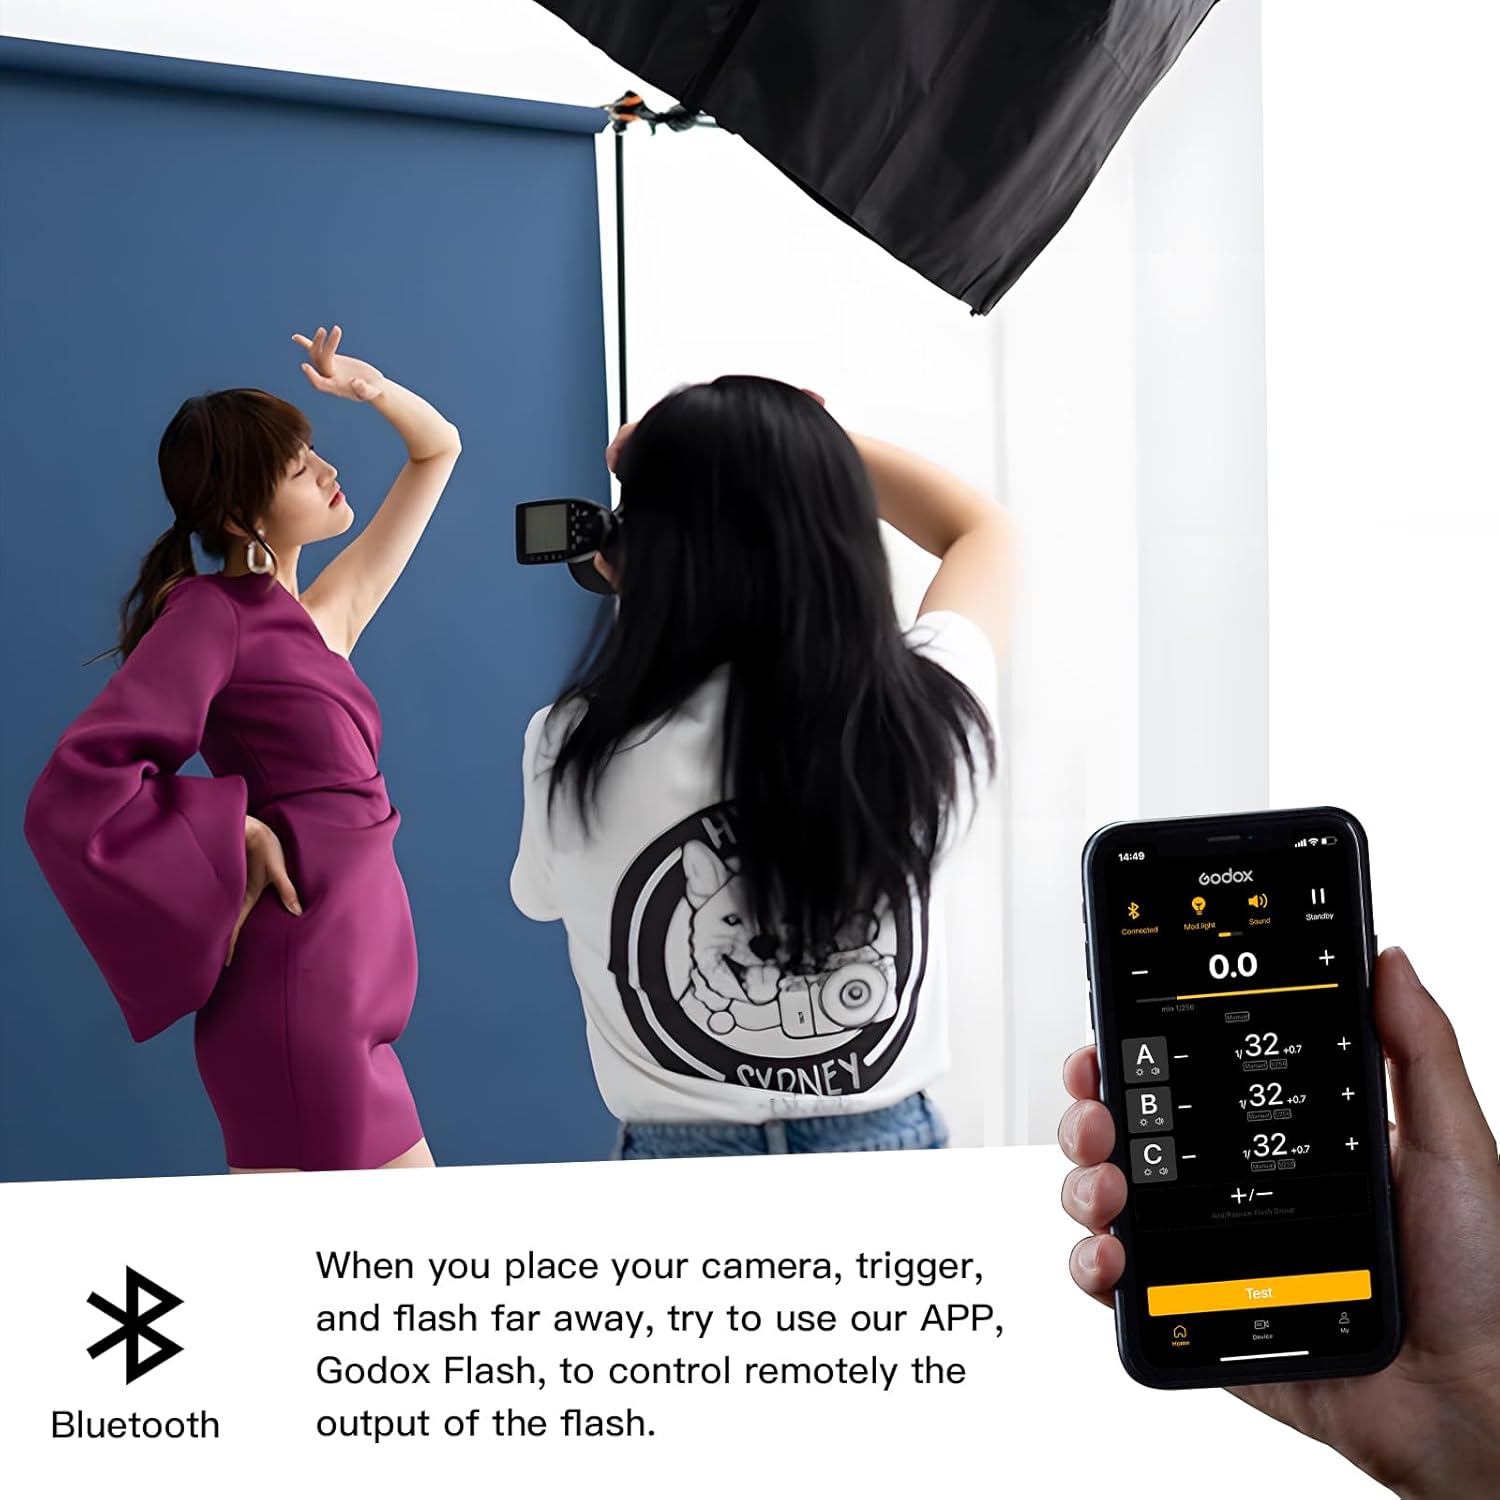
Image: Examples of the XProII-S display showing TTL, Multi, and Manual flash mode settings.
2.4 High-Speed Sync (HSS)
HSS allows the flash to synchronize with shutter speeds up to 1/8000s, enabling the use of wide apertures in bright conditions.
2.5 Flash Exposure Compensation (FEC)
Adjust the flash output relative to the TTL metered exposure to fine-tune lighting. This can be set directly on the trigger.
2.6 TCM Transform Function
The TCM (TTL Convert Manual) function allows you to convert a TTL flash value into a manual power setting. This provides a starting point for manual adjustments, saving time during setup.
Video: Demonstrates the TCM (TTL Convert Manual) function, showing how TTL settings can be used as a reference for manual flash adjustments.
2.7 Bluetooth and App Control
The XProII-S features Bluetooth connectivity, allowing you to control lighting parameters remotely using the Godox app on your smartphone or tablet. This offers a flexible and intuitive control experience.
- Enable Bluetooth on your XProII-S trigger.
- Open the Godox app on your mobile device.
- Search for and connect to your XProII-S device.
- Adjust flash settings directly from the app.

Image: A smartphone displaying the Godox app interface, controlling flash settings remotely via Bluetooth with the XProII-S trigger.
Video: Illustrates the process of connecting the Godox XProII-S trigger to a smartphone via Bluetooth and adjusting flash settings using the Godox app.
2.8 L-858 Mode (Light Meter Integration)
The XProII-S can integrate with the Sekonic L-858 light meter, allowing the light meter to prioritize control over your lights. This streamlines the process of setting flash values based on precise light measurements.
Video: Shows the XProII-S operating in L-858 mode, demonstrating how it integrates with a Sekonic L-858 light meter to control flash output.
2.9 Single Contact Triggering
This feature enhances burst mode performance by allowing faster flash triggering in rapid succession, reducing the interval between each flash.
Video: Illustrates the Single Contact Triggering feature, showing its effect on burst mode performance for faster flash synchronization.
2.10 Group Control
The XProII-S allows you to control multiple flash units in different groups (A, B, C, D, E). Each group can have independent flash mode and power settings, providing versatile lighting control.
3. Maintenance
3.1 Cleaning
Regularly clean the exterior of the trigger and receivers with a soft, dry cloth. For hotshoe contacts, use a clean, dry cotton swab. Avoid using harsh chemicals or abrasive materials.
3.2 Storage
When not in use for extended periods, remove batteries from both the trigger and receivers to prevent leakage. Store the units in a cool, dry place away from direct sunlight and extreme temperatures.
3.3 Firmware Updates
Godox periodically releases firmware updates to improve performance and add new features. Check the official Godox website for the latest firmware for your XProII-S and X1R-S units and follow the provided instructions for updating.
4. Troubleshooting
If you encounter issues with your Godox XProII-S and X1R-S kit, refer to the following common problems and solutions:
4.1 Flash Not Firing
- Check Batteries: Ensure batteries in both the trigger and receiver are fully charged and correctly inserted.
- Power On: Verify that both the trigger and receiver are powered on.
- Channel/ID Mismatch: Confirm that the trigger and receiver are set to the same channel and ID.
- Hotshoe Connection: Ensure the trigger is securely mounted on the camera's hotshoe and the receiver on the flash. Clean contacts if necessary.
- Camera Settings: Check your camera's flash settings to ensure external flash is enabled.
4.2 Incorrect Exposure
- Flash Mode: If in Manual mode, adjust the power output. If in TTL, check for Flash Exposure Compensation (FEC) settings.
- Distance: Ensure the flash-to-subject distance is appropriate for the flash power setting.
- Ambient Light: Consider the impact of ambient light on your exposure.
4.3 Bluetooth Connection Issues
- Enable Bluetooth: Ensure Bluetooth is enabled on both the trigger and your mobile device.
- App Permissions: Verify that the Godox app has necessary Bluetooth permissions on your device.
- Restart Devices: Try restarting the trigger, your mobile device, and the Godox app.
5. Specifications
| Feature | Specification |
|---|---|
| Model | Godox XProII-S (Trigger), Godox X1R-S (Receiver) |
| Compatibility | Sony Cameras |
| Wireless System | Godox 2.4G Wireless X System |
| Flash Modes | TTL Autoflash, Manual Flash, Multi Flash |
| High-Speed Sync (HSS) | Up to 1/8000s |
| Flash Exposure Compensation (FEC) | Supported |
| TCM Function | TTL to Manual Conversion |
| Bluetooth | Supported (for Godox App control) |
| Channels | 32 |
| Groups | 5 (A, B, C, D, E) |
| Wireless Range | Approx. 100 meters |
| Power Source | AA Batteries (not included) |
| Package Dimensions | 6.93 x 5.24 x 4.41 inches |
| Item Weight | 1.32 pounds |
6. Warranty & Support
6.1 Warranty Information
This Godox product is covered by a manufacturer's warranty against defects in materials and workmanship. The specific duration and terms of the warranty may vary by region and retailer. Please retain your proof of purchase for warranty claims.
6.2 Customer Support
For technical assistance, troubleshooting beyond this manual, or warranty inquiries, please contact Godox customer support or your authorized retailer. You can find contact information on the official Godox website (www.godox.com).


