1. Introduction
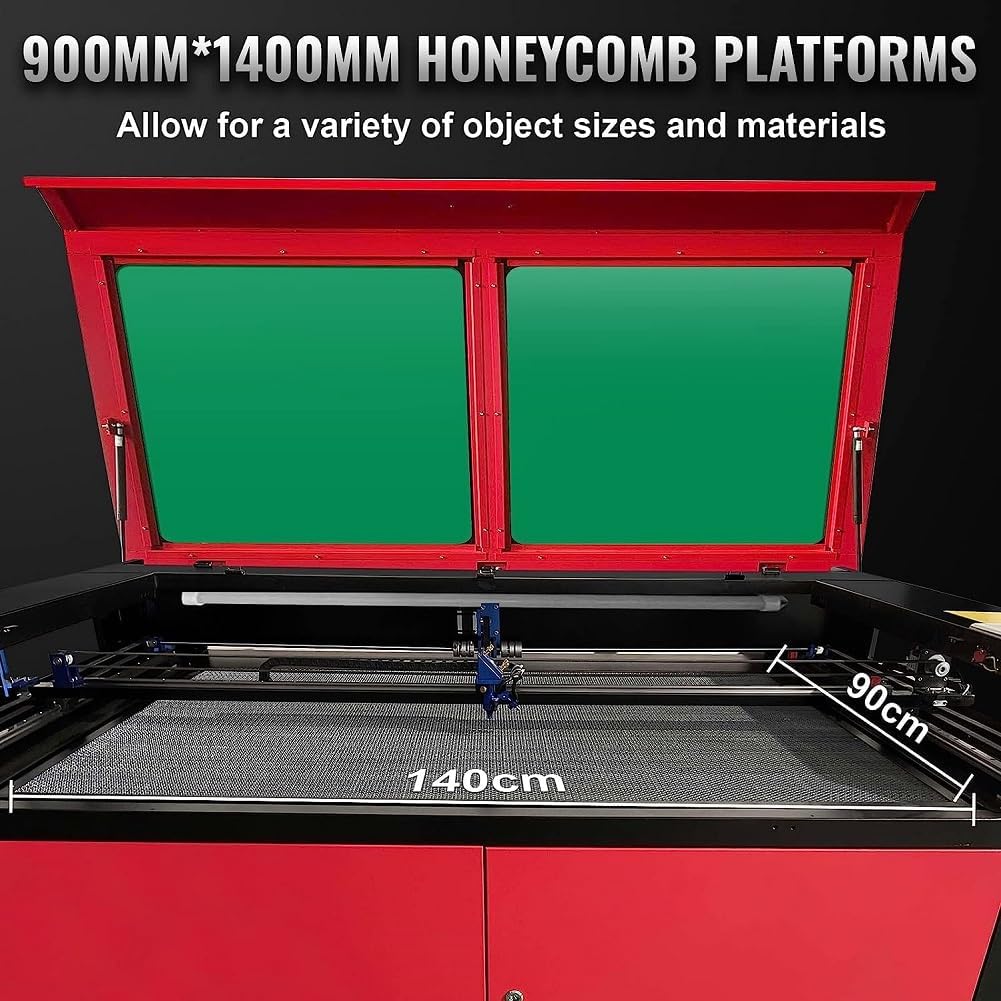
This manual provides essential information for the safe and efficient operation of your Sihao 130W CO2 Laser Engraver Machine. This high-precision machine is designed for engraving and cutting various non-metallic materials, offering a large working area of 1400mm x 900mm and powerful performance for creative and industrial applications.

The machine features a 130-140W laser power, engraving speeds of 1-1000mm/s, and cutting speeds of 1-400mm/s. It is equipped with a Ruida digital control system, compatible with software like CorelDraw and AutoCAD, and supports various file formats including JPG, AI, PDF, and BMP. A rotary axis is included for engraving cylindrical objects.
2. Safety Information
Operating a laser engraving machine requires strict adherence to safety protocols to prevent injury and damage. Always read and understand all safety instructions before use.
2.1 Electrical Safety
- Ensure the machine is properly grounded. Connect the earth wire to prevent static electricity discharge and electrical hazards.
- Verify that the power supply matches the machine's requirements (220V AC).
- Do not operate the machine with wet hands or in damp conditions.
- Disconnect power before performing any maintenance or inspection.

2.2 Laser Safety
- Never look directly into the laser beam. Always use appropriate laser safety glasses.
- Keep the machine's lid closed during operation to contain the laser beam.
- Ensure proper ventilation to remove fumes and smoke generated during engraving/cutting.
- Do not engrave or cut materials that produce toxic fumes or are highly flammable without adequate safety measures.
2.3 General Safety
- Keep the work area clean and free of clutter.
- Do not leave the machine unattended during operation.
- Keep children and unauthorized personnel away from the machine.
- Familiarize yourself with emergency stop procedures.
3. Setup and Installation
3.1 Unboxing and Components
Carefully unpack all components from the shipping crate. Verify that all items listed below are present and undamaged.

3.2 Water Cooling System Setup
The CO2 laser tube requires a continuous flow of cooling water to operate correctly and prevent overheating. Follow these steps to set up the water cooling system:
- Connect the water circulation pump to one end of the water tube.
- Place the water pump into a bucket filled with clean water.
- Connect the other end of the water tube to the water inlet of the laser machine.
- Ensure the tube is securely fastened to prevent leaks.

3.3 Air Assist and Exhaust System Setup
Proper air assist and exhaust are crucial for clean cuts, preventing flare-ups, and removing harmful fumes.
- Connect the air pump's outlet to the machine's air inlet tube.
- Connect one end of the exhaust pipe to the air inlet of the exhaust fan.
- Connect the other end of the exhaust pipe from the fan's discharge port to the machine's smoke discharge port.
- Ensure all exhaust pipes are securely fixed with clamps to prevent detachment and ensure efficient fume extraction.

3.4 Electrical and USB Connections
Connect the machine to the power supply and your computer for control.
- Connect the main power cable to the machine's power input and then to a grounded 220V AC outlet.
- If applicable, connect the exhaust fan's power separately as its power consumption can be high.
- After installing the necessary software (e.g., RDWorks V8) on your computer, connect one end of the USB cable to your computer's USB port and the other end to the machine's USB input port.

4. Operation Guide
4.1 Control Panel Overview
The machine is controlled via a Ruida digital control panel, which features an LCD screen and various buttons for navigation and parameter adjustment.

4.2 Software Compatibility
The machine utilizes the RDWorks V8 system and is compatible with popular design software such as CorelDraw and AutoCAD. It supports various file formats including JPG, AI, GIF, JPEG, PDF, PNG, PLT, DXF, SVG, NC, DST, OSD, UD5, and BMP.
4.3 Laser Guidance System
A red-beam laser guidance system allows for easy pre-tracing of your project materials. This feature helps in adjusting the engraving point of contact for precise cutting and engraving, ensuring accurate placement of your designs.

4.4 Engraving and Cutting Parameters
The machine offers a wide range of adjustable parameters:
- Engraving Speed: 1-1000mm/s
- Cutting Speed: 1-400mm/s
- Laser Power: Adjustable from 130W to 140W for various material requirements.
- Engraving Area: 1400mm x 900mm, providing ample space for large projects.
The included rotary axis allows for engraving on cylindrical and circular objects such as cups, bottles, and bowls.
4.5 Supported Materials and Applications
This laser engraver is suitable for a wide range of non-metallic materials:
- Wood, Plywood, Cork
- Rubber, Acrylic, Plastic
- Fabric, Leather
- Paper, Cardboard
- Glass, Ceramic Tiles, Marble
Note: This machine is not designed for cutting metal.

5. Maintenance
Regular maintenance ensures the longevity and optimal performance of your laser engraver.
5.1 Cleaning
- Work Area: Regularly clean the honeycomb platform and the interior of the machine to remove debris and dust.
- Lenses and Mirrors: Carefully clean the optical lenses and mirrors with specialized lens cleaning solution and wipes to maintain laser beam quality.
- Exhaust System: Inspect and clean the exhaust fan and ducts to ensure efficient fume extraction.
5.2 Water Cooling System
- Regularly check the water level in the cooling bucket and refill as needed.
- Change the cooling water periodically (e.g., every 1-2 weeks) to prevent algae growth and maintain cooling efficiency.
- Ensure the water pump is free from obstructions.
5.3 Laser Tube
The 130W RECI CO2 sealed laser tube has an estimated service life of 8000 hours. Monitor its performance and consider replacement when output power significantly diminishes.

6. Troubleshooting
This section provides general guidance for common issues. For complex problems, contact customer support.
6.1 No Laser Output
- Check if the laser tube is powered on and the water cooling system is running.
- Verify that the laser power settings in the software are correct.
- Inspect the laser tube for any visible damage or cracks.
6.2 Poor Engraving/Cutting Quality
- Ensure the material is flat and properly secured on the honeycomb platform.
- Check the focus of the laser beam. Adjust if necessary.
- Clean the lenses and mirrors as dust or debris can degrade beam quality.
- Adjust engraving/cutting speed and power settings for the specific material.
6.3 Machine Not Responding
- Check all power connections and ensure the machine is receiving power.
- Verify the USB connection between the computer and the machine.
- Restart the machine and the controlling software.
7. Technical Specifications
| Feature | Specification |
|---|---|
| Manufacturer | Sihao |
| Model Number | Graveur Laser CO2 |
| Laser Power | 130-140W |
| Engraving Area | 1400mm x 900mm |
| Engraving Speed | 1-1000mm/s |
| Cutting Speed | 1-400mm/s |
| Control System | Ruida (RDWorks V8) |
| Compatible Software | CorelDraw, AutoCAD, LightBurn |
| Power Supply | 220V (AC) |
| Material | Stainless Steel |
| Dimensions (Package) | 200 x 150 x 114 cm |
| Item Weight | 360 kg |
| Included Components | Laser Engraving Machine, Rotary Roller |
8. Warranty Information
The Sihao 130W CO2 Laser Engraver Machine comes with a two-year quality warranty. This warranty covers manufacturing defects and ensures the product meets specified quality standards. Please retain your proof of purchase for warranty claims.
9. Customer Support
For any questions, technical assistance, or support needs, our professional customer service team is available to provide 7x24 online assistance. Please contact our team through the Amazon message system for prompt support.


