
1. Important Safety Instructions
Please read all instructions carefully before operating the safe. Keep this manual for future reference.
- Do not store emergency keys inside the safe. Keep them in a secure, separate location.
- Ensure the safe is placed on a stable, level surface or securely mounted to prevent tipping.
- Keep children away from the safe and its contents.
- Do not attempt to force the safe open if the battery is dead or the code is forgotten. Use the emergency key.
- Use only the specified battery type (4 AA batteries).
2. Package Contents
Verify that all items are present in the package:
- 1 x Mitlvge Home Security Safe
- 2 x Emergency Keys
- 1 x Fireproof Document Pouch (A4 size)
- 1 x External Battery Case
- 4 x Expansion Bolts (for mounting)
- 1 x User Manual (this document)
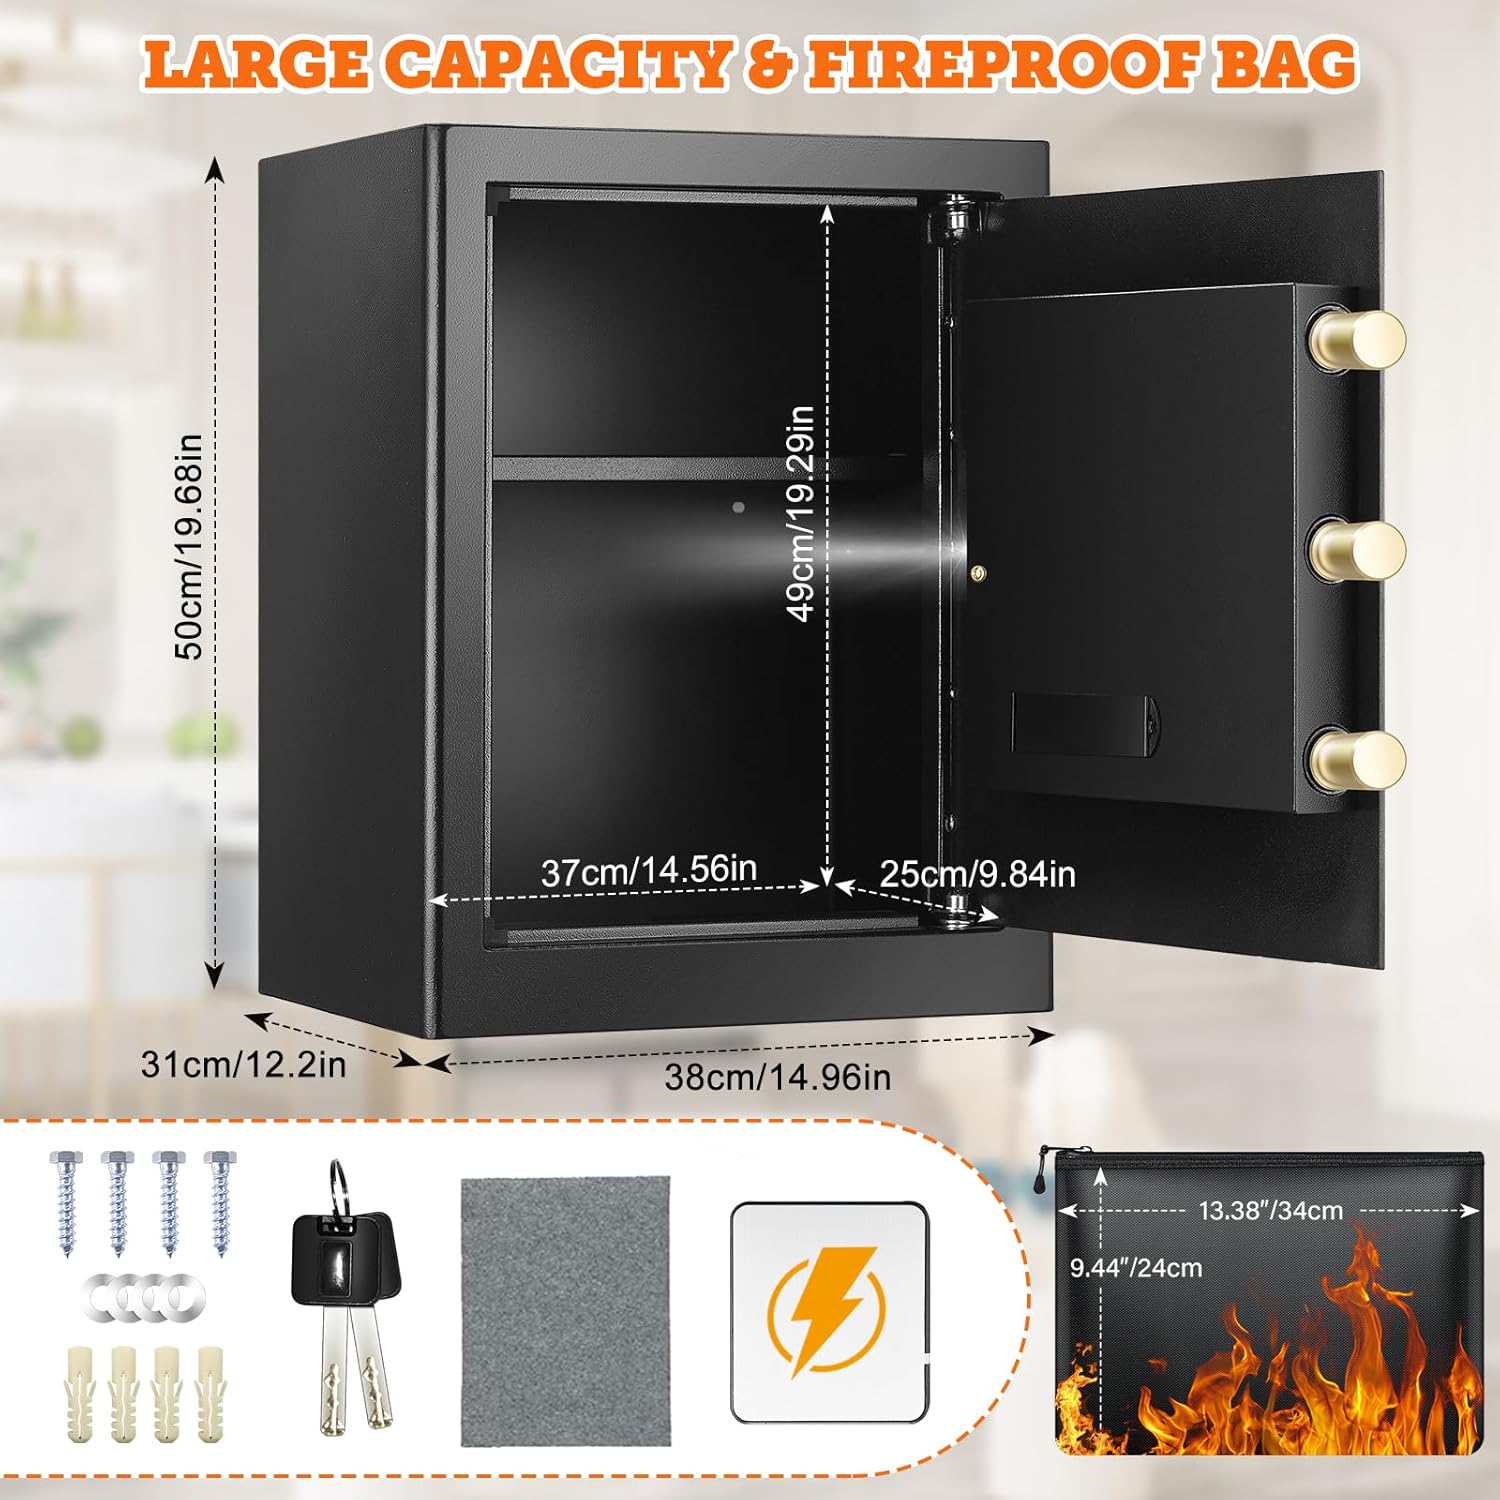
Image: Contents of the Mitlvge Home Security Safe package, showing the safe, emergency keys, fireproof document bag, and expansion bolts for installation.
3. Product Overview
3.1 Key Features
- Robust Construction: Made from low carbon alloy steel with an ultra-thick 68mm steel door and 3 live locking bolts for enhanced security.
- Digital Keypad Access: Features a programmable electronic keypad for secure and convenient access.
- Emergency Access: Includes two emergency keys for manual override in case of forgotten code or dead batteries.
- Fireproof & Waterproof: Designed to protect valuables from fire and water damage, complemented by an included A4 fireproof document pouch.
- Anti-Theft Alarm System: Activates an alarm after multiple incorrect password attempts and offers a silent mode option.
- Flexible Storage: Equipped with a removable steel shelf to accommodate items of various sizes.
- Mounting Options: Can be securely installed to a wall, closet, or floor using the provided expansion bolts.

Image: The Mitlvge Home Security Safe with its door open, revealing the interior storage space and a fireproof document bag placed next to it.

Image: A detailed view of the safe's door, highlighting its 68mm thickness and the three 30mm anti-pry locking bolts, demonstrating its robust construction.

Image: Two views of the safe's interior, one with the removable shelf installed and another without, illustrating the flexible storage options for different item sizes.
4. Setup
4.1 Battery Installation
- Locate the battery compartment on the back of the keypad.
- Insert 4 new AA batteries (not included) into the compartment, ensuring correct polarity (+/-).
- Close the battery compartment cover securely.
4.2 Initial Password Setup
The initial password is 159. You must change this immediately for security.
- Open the safe using the emergency key. Insert the key into the emergency keyhole, turn it clockwise, and then turn the knob to open the door.
- With the door open, locate the red reset button on the inside of the door, near the hinge.
- Press the red reset button. The keypad will beep, and the indicator light will flash.
- Enter your new 3-8 digit password on the keypad.
- Press the "#" button to confirm. The safe will beep to confirm the new password has been set.
- Test the new password with the door open before closing it.

Image: A visual guide illustrating the three methods to open the safe: using the digital keypad for daily access, the emergency key for initial setup or forgotten codes, and the external battery box for dead batteries.
5. Operation
5.1 Opening the Safe (Daily Use)
- Enter your programmed 3-8 digit password on the keypad.
- Press the "#" button to confirm.
- Within 5 seconds, turn the knob clockwise to open the door.
5.2 Closing the Safe
Close the door firmly and turn the knob counter-clockwise until it locks securely.
5.3 Emergency Opening (Forgotten Code / Dead Batteries)
- Locate the emergency keyhole, usually hidden behind a cover on the keypad panel.
- Insert the emergency key and turn it clockwise.
- While holding the key turned, rotate the knob clockwise to open the safe.
- If batteries are dead, you can also connect the external battery case to the emergency power port (usually next to the keyhole) to power the keypad temporarily.
5.4 Anti-Theft Alarm System
- If an incorrect password is entered 3 consecutive times, the system will lock for 20 seconds.
- If an incorrect password is entered 6 consecutive times, the system will lock for 5 minutes.
5.5 Silent Mode
To activate or deactivate silent mode (mute keypad beeps), refer to the specific instructions provided on the keypad or a dedicated button if available. This feature allows for discreet operation.

Image: A diagram showing the anti-theft alarm system's functionality, including the silent mode feature, alongside illustrations of how the safe can be mounted to a wall or within a closet.
6. Installation (Mounting)
The safe can be securely mounted to a wall, closet, or floor for added security.
- Choose a suitable location for installation. Ensure the surface is solid and can support the weight of the safe.
- Open the safe door and locate the pre-drilled mounting holes on the back or bottom panel.
- Mark the drilling points on the wall/floor through the mounting holes.
- Drill holes at the marked points using an appropriate drill bit for your wall/floor material.
- Align the safe with the drilled holes and insert the expansion bolts through the safe's mounting holes into the wall/floor.
- Tighten the expansion bolts securely to fix the safe in place.
7. Maintenance
- Regularly check the battery level and replace batteries when low to avoid being locked out.
- Keep the keypad clean and free from dust or debris. Use a soft, dry cloth for cleaning.
- Do not use abrasive cleaners or solvents on the safe's surface.
- Periodically check the locking bolts and hinges for smooth operation.
- Store emergency keys in a safe, accessible location outside the safe.
8. Troubleshooting
| Problem | Possible Cause | Solution |
|---|---|---|
| Safe does not open with code. | Incorrect code entered; Dead batteries. | Re-enter code carefully. Replace batteries or use external battery case. Use emergency key. |
| Keypad is unresponsive. | Dead batteries; Keypad malfunction. | Replace batteries. If issue persists, contact customer support. |
| Alarm sounds frequently. | Multiple incorrect code attempts. | Ensure correct code is used. Wait for lockout period to end. |
| Door does not close/lock properly. | Obstruction; Misalignment. | Check for any obstructions. Ensure door is aligned before closing. |
9. Specifications
| Brand | Mitlvge |
| Model Number | 50SP |
| Material | Alloy Steel |
| Color | Black |
| Exterior Dimensions (L x W x H) | 38 x 32.99 x 49.99 cm (14.96 x 12.99 x 19.68 inches) |
| Interior Dimensions (L x W x H) | 37 x 25 x 49 cm (14.56 x 9.84 x 19.29 inches) |
| Capacity | 2.3 Cubic Feet |
| Item Weight | 13.61 kg (30 pounds) |
| Power Source | 4 x AA Batteries (not included) |
| Lock Type | Digital Keypad with Emergency Key |
| Special Features | Fireproof, Waterproof, Anti-theft Alarm, Removable Shelf |
10. Warranty and Support
The Mitlvge Home Security Safe comes with a 12-month hassle-free warranty from the date of purchase.
If you encounter any issues or have questions regarding your safe, please contact Mitlvge customer support. We believe that good communication can resolve 100% of problems.
For support, please refer to the contact information provided on the product packaging or the official Mitlvge website.
