
OMBAR M572
OMBAR Dash Cam M572 User Manual
Model: M572
Introduction
Thank you for choosing the OMBAR M572 Dash Cam. This device is designed to provide comprehensive front and rear vehicle surveillance, capturing high-resolution video footage to enhance driving safety and provide crucial evidence in case of incidents. This manual will guide you through the setup, operation, and maintenance of your new dash cam.
Package Contents
Please verify that all items listed below are included in your package:
- OMBAR M572 Dash Cam (Front Unit)
- Rear Camera (6m/19ft cable)
- Type-C Cigarette Lighter Power Cable (3.5m/11.5ft)
- Mounting Bracket (Magnetic)
- Adhesive Pads
- Cable Clips
- User Manual (this document)

Image: All components included in the OMBAR M572 Dash Cam package.
Key Features
4K Dual Channel Recording
The M572 dash cam records simultaneously from the front and rear. The front camera supports 4K (3840*2160P), 2K (2560*1440P), or 1080P (1920*1080P) resolution, while the rear camera records in 1080P. The front camera offers a 170° wide-angle view, and the rear camera provides a 150° view, ensuring comprehensive coverage.
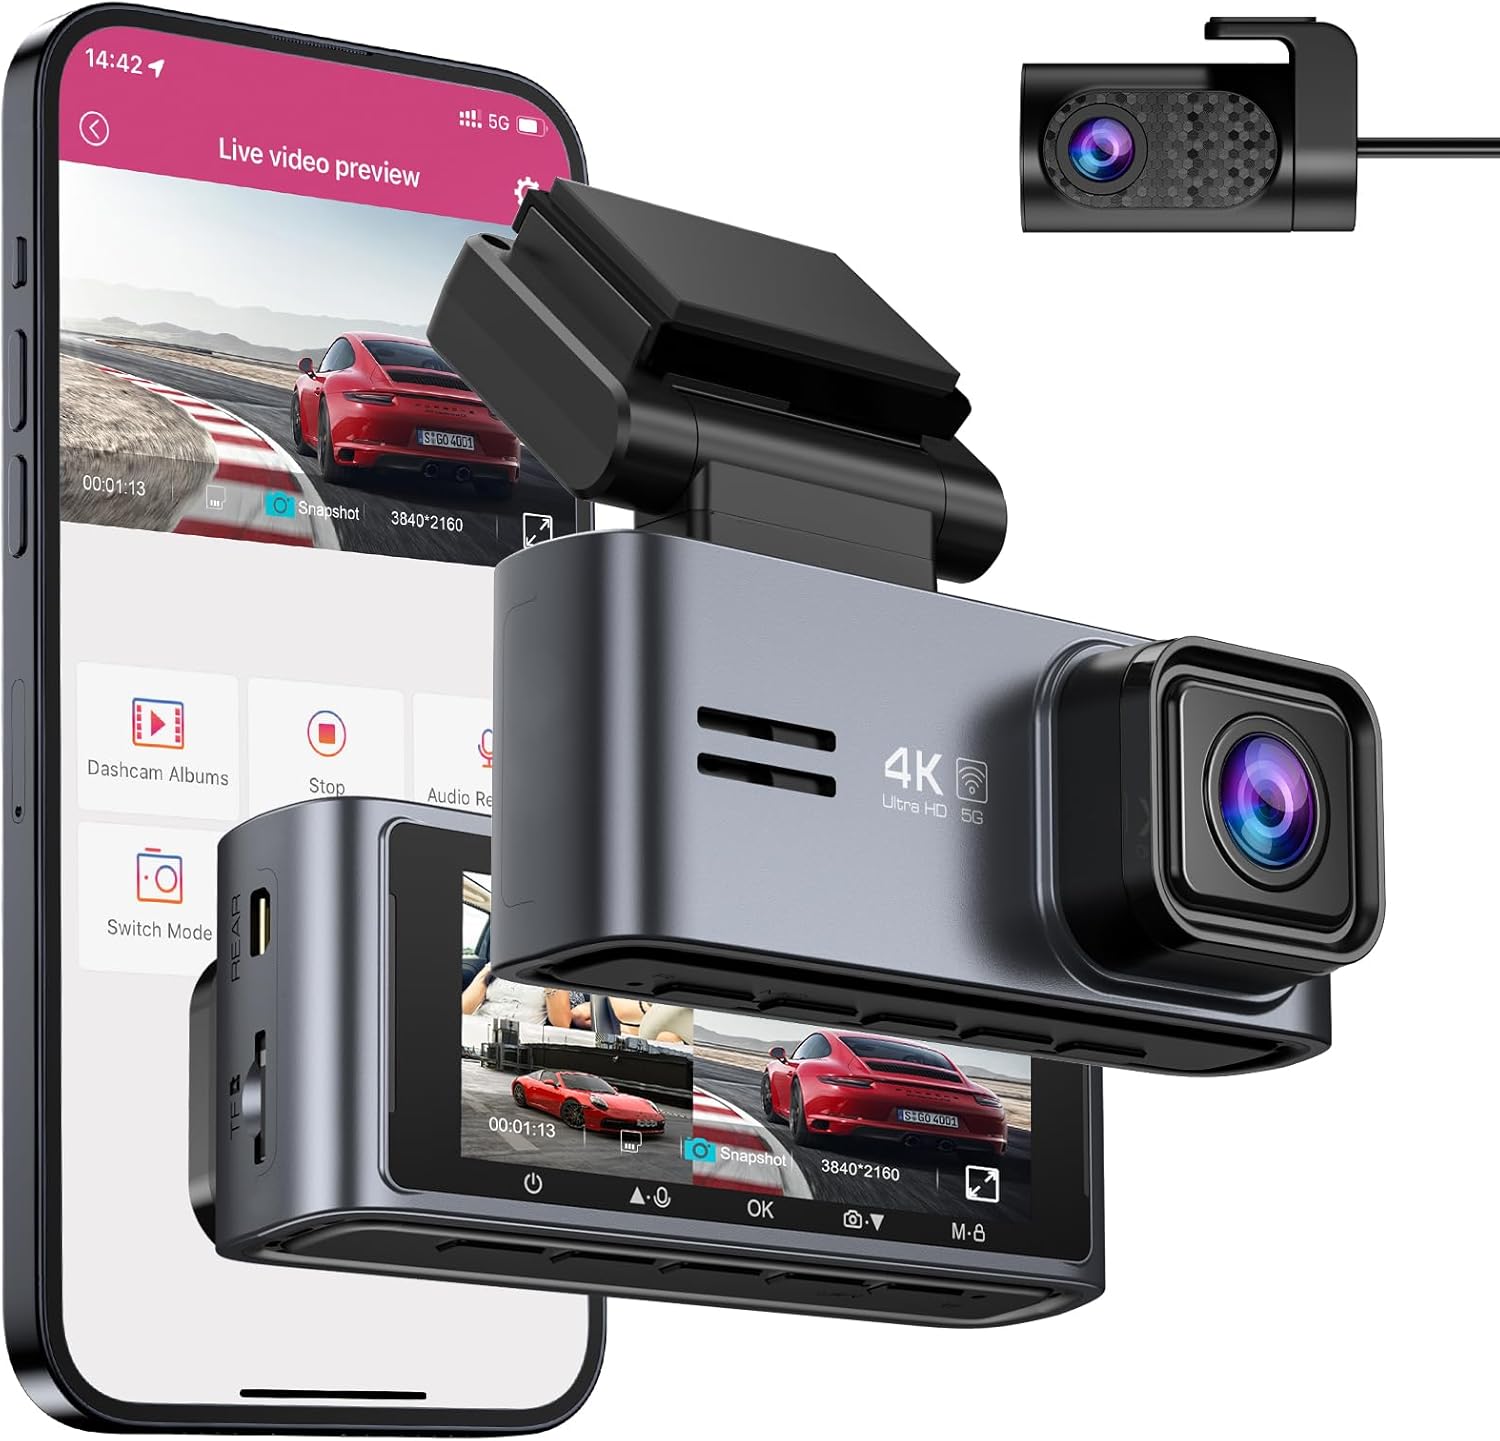
Image: The OMBAR M572 Dash Cam with its front and rear cameras, demonstrating its dual recording capability.

Image: Visual representation of the dash cam's 2-channel recording, highlighting the wide-angle coverage.
Built-in 5G WiFi & App Control
The dash cam features built-in Dual-Band WiFi (2.4GHz & 5.0GHz) for faster data transfer speeds. Connect to the "Oncam" app on your iPhone or Android device to easily control the dash camera, view live footage, download recorded videos, and share them. Note that the effective WiFi signal range is approximately 25ft and does not support remote live viewing from home.

Image: Illustration of the 5G WiFi and app control capabilities, showing how users can interact with the dash cam via a smartphone.
Super Capacitor for Extreme Temperatures
Equipped with a built-in super capacitor instead of a traditional battery, the M572 dash cam can withstand extreme temperatures ranging from -4°F (-20°C) to 158°F (70°C). This design enhances durability, heat resistance, and overall service life, preventing issues like overheating or explosion common with lithium batteries.

Image: The dash cam operating reliably in both cold and hot environments, thanks to its super capacitor.
WDR Night Vision Technology
The dash cam incorporates Wide Dynamic Range (WDR) technology, an f/1.8 aperture, and a 6-layer lens to enhance image clarity in low-light conditions. This ensures clear video capture at night, including legible license plates, providing reliable evidence around the clock.

Image: Examples of clear night vision footage captured by the dash cam using WDR technology.
G-Sensor & Loop Recording
The built-in G-sensor automatically detects sudden collisions or impacts, locking the current video file to prevent it from being overwritten. Loop recording ensures continuous recording by automatically overwriting the oldest unlocked video files when the SD card is full, maximizing storage efficiency.

Image: Visual explanation of G-Sensor and Loop Recording functions.
24H Parking Modes
The M572 offers two parking surveillance modes for 24/7 protection (requires optional 3-Lead Hardwire Kit, not included):
- Time-Lapse 1fps Parking Mode: Records continuously at one frame per second to maximize recording quantity over extended periods.
- Collision Detection Parking Mode: Automatically initiates a 1-minute recording when the G-sensor detects a collision while parked.

Image: Overview of the 24-hour parking monitoring features.
Setup Guide
1. Installing the Dash Cam
- Mounting the Front Unit: The dash cam features a magnetic bracket for easy installation and removal. Attach the bracket to your windshield using the provided adhesive pad. Ensure the mounting location does not obstruct your view or interfere with airbags.
- Adjusting the Angle: The bracket allows for a 135° rotatable angle, enabling flexible up-and-down adjustment to achieve the ideal recording angle.
- Installing the Rear Camera: Mount the rear camera on your rear windshield. The rear camera supports 360° flexible rotation for optimal positioning.

Image: Magnetic bracket and detachable design for convenient installation.

Image: Adjustable angle and detachable design for optimal camera positioning.
2. Inserting the SD Card
An SD card is required for recording and is not included in the package. Please purchase a Class 10, U3 Speed micro-SD card (e.g., OMBAR Asin: B0CBRG16X4) with a maximum capacity of 256GB. Before first-time use, you must format the SD card in the dash cam's settings.

Image: Reminder that an SD card is not included and requires formatting.
3. Power Connection
The OMBAR M572 dash cam must be powered by the cigarette lighter port using the provided cable. It requires constant power to operate. The car charger also includes an extra USB charging port for your phone or other electronic devices.

Image: The car charger with an additional USB port for convenience.
Operating Instructions
Basic Button Functions
The dash cam features several buttons for direct control:
- Power Button (1): Press once to turn ON/OFF the screen. Press and hold while the camera is ON to turn OFF the camera.
- Up Button (2): Press once while recording to shift camera display mode. Press and hold to turn ON/OFF audio recording.
- OK Button (3): Press once to start/stop video recording. Press once in playback mode to play/pause video.
- Down Button (4): Press once to take a photo. Press and hold to turn ON/OFF WiFi.
- M Button (5): Press once while recording to manually lock the video. Press once while unrecording to enter/quit menu settings.
- R Button (6): To reset to default settings, poke the dash cam's R button one time with a pin.

Image: Detailed view of the dash cam's buttons and their functions.
Using the Oncam App
The "Oncam" app allows for convenient control and management of your dash cam via your smartphone. Download the app from the App Store (iOS) or Google Play Store (Android).
- Connecting via WiFi: Turn on WiFi on your dash cam (using button 4). Connect your phone to the dash cam's WiFi network (SSID and password usually displayed on the dash cam screen).
- App Features: Once connected, you can view live video, replay recorded footage, download videos to your phone, and share them directly.

Image: Faster transfer speeds with 5G WiFi and app pairing process.

Image: The Oncam app interface for managing dash cam footage.
Recording Modes
- Loop Recording: The dash cam records in 1/2/3 minute segments. When the SD card is full, the oldest unlocked video will be automatically overwritten to ensure continuous recording.
- G-Sensor Emergency Recording: In the event of a collision or sudden impact, the G-Sensor will trigger, automatically locking the current video file. These locked files are protected from being overwritten by the loop recording function.
- Parking Modes: As detailed in the Key Features section, the dash cam supports Time-Lapse and Collision Detection parking modes for 24-hour surveillance when hardwired.

Image: Explanation of continuous loop recording and storage capacity.

Image: How the dash cam automatically records and locks emergency footage.

Image: Detailed view of the 24-hour parking modes.
Screen Settings
You can configure the display behavior of the dash cam screen:
- Screen Always On: The display remains active.
- Screen Saver On After 1 Min: The screen will turn off after 1 minute of inactivity, displaying basic information like time and speed.
- Screen Off After 1 Min: The screen will completely turn off after 1 minute of inactivity.
Note: The screen saver function will be disabled when connected to the mobile app and will return to normal after disconnecting the app.

Image: Various screen display options for the dash cam.
Fatigue Driving Reminder
The dash cam can be set to provide a fatigue driving reminder, notifying you after 2, 3, or 4 hours of continuous driving to take a rest and ensure safe travel.

Image: The fatigue driving reminder feature to promote safe driving habits.
Maintenance
SD Card Management
To ensure optimal performance and prevent data corruption, it is recommended to format your SD card regularly (e.g., once a month) directly through the dash cam's settings. This helps maintain the card's health and ensures smooth recording.
Temperature Considerations
The dash cam is designed to operate in temperatures from -4°F (-20°C) to 158°F (70°C). The normal working temperature of the dash cam itself is between 30℃ and 50℃. It is normal for the camera to feel slightly warm during operation.

Image: The dash cam's resilience to extreme temperatures due to its super capacitor.
Troubleshooting
- Rear Camera Disconnection: Do not plug or unplug the rear camera while the dash cam is in use. Always disconnect the dash cam's power first before connecting or disconnecting the rear camera.
- SD Card Not Recognized/Recording Issues: Ensure the SD card is formatted before first-time use. Only use recommended Class 10, U3 Speed micro-SD cards. Avoid using "SanDisk Ultra" or generic "Class 10" cards from third-party sellers, as they may not support the required high write/read speeds.
- WiFi Connection Issues: Remember that WiFi is for connection between your phone and the dash cam for viewing/downloading videos, not for wireless operation of the dash cam itself. The dash cam must always be connected to power.
- Buttons Unresponsive with App Connected: When the dash cam is connected to the mobile app via WiFi, its physical buttons may become unresponsive. Disconnect from the app to regain normal button control.
- Dash Cam Feels Warm: It is normal for the dash camera to run slightly hot, as its working temperature is typically between 30℃ and 50℃. This is due to the super capacitor design and is not an indication of malfunction.
Technical Specifications
| Feature | Specification |
|---|---|
| Model Number | M572 |
| Front Camera Resolution | 4K (3840*2160P) / 2K (2560*1440P) / 1080P (1920*1080P) |
| Rear Camera Resolution | 1080P |
| Front View Angle | 170° |
| Rear View Angle | 150° (360° Rotatable) |
| Display Screen | 3.18" LCD |
| Connectivity | Built-in 5G WiFi (2.4GHz & 5.0GHz) |
| Storage | Supports up to 256GB Micro SD Card (Class 10, U3 recommended, not included) |
| Power Source | Cigarette Lighter Port (must be continuously powered) |
| Capacitor Type | Super Capacitor (no internal battery) |
| Operating Temperature | -4°F to 158°F (-20°C to 70°C) |
| Special Features | G-Sensor, Loop Recording, WDR Night Vision, 24H Parking Modes (requires hardwire kit), Fatigue Driving Reminder, Built-In GPS |
| Product Dimensions | 0.39 x 0.39 x 0.39 inches |
| Item Weight | 0.018 ounces |
Warranty and Support
The OMBAR M572 Dash Cam is covered by a complete 12-month assurance from the date of purchase. This warranty covers manufacturing defects and ensures the product meets its specified performance.
For any questions, concerns, or support needs regarding your purchase, please contact OMBAR customer service through Amazon. We are committed to providing timely service and support.

Image: OMBAR's commitment to timely customer service and warranty support.
Related documentsM572


Ask a question about this manual
Ask about setup, troubleshooting, compatibility, parts, safety, or missing instructions. Manuals+ will review the question and use this page’s manual context to help answer it.