
1. Product Overview
The POWERWIN MPPT 50A Solar Charge Controller is designed to efficiently manage power flow from your solar panels to your battery system. It features advanced Maximum Power Point Tracking (MPPT) technology to maximize solar charging speed and optimize energy collection.

Image: Front view of the POWERWIN MPPT 50A Solar Charge Controller with LCD display and connection terminals.
- 12V/24V Adaptive: Automatically adjusts to 12V or 24V battery systems, providing essential charge and discharge information via multiple indicators. Ensure adequate battery voltage for correct identification during initial use.
- Lightweight & Efficient: Weighs less than 1 pound, offering up to 99% tracking efficiency and 96% conversion efficiency. Includes a lithium battery wake-up function.
- Multiple Charging Options: Supports USB 5V/2.5A and DC input/output, allowing direct connection of DC and USB devices to optional load terminals for power consumption monitoring.
- Intelligent Protections: Equipped with comprehensive safety features including over-current, open-circuit, short-circuit, reverse polarity, and device protection. The regulator automatically shuts down if battery voltage drops below 11.5V to protect battery life.
- Optimized Charging Speed: Designed to track and concentrate charging functions, maximizing solar charging speed by collecting energy from solar panels.
2. Setup Guide
2.1 Initial Battery Identification
Before connecting, ensure your battery has sufficient voltage for the solar charge regulator to correctly identify its type (12V or 24V). The controller will automatically adapt.
2.2 Connecting Your System
Follow these steps to connect your solar charge controller. Always connect the battery first, then the solar panels, and finally the load.
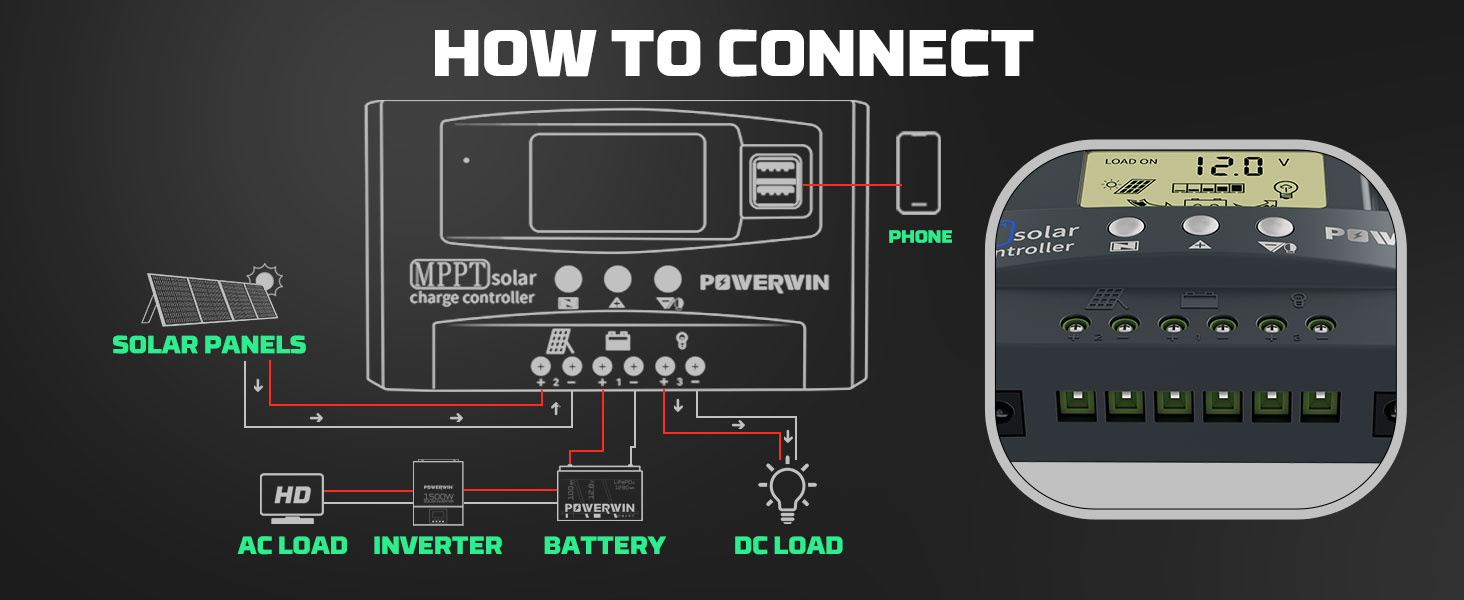
Image: Connection diagram illustrating the wiring sequence for solar panels, battery, and DC/AC loads to the MPPT solar charge controller.
- Connect Battery: Connect the battery to the battery terminals on the controller. Ensure correct polarity (+ to + and - to -).
- Connect Solar Panels: Connect your solar panels to the PV input terminals. Again, observe correct polarity.
- Connect Load (Optional): If using the controller's load output, connect your DC load or inverter to the load terminals.
2.3 Setting Up Battery Type
The controller supports Lead Acid (b1), Li-ion (b2), and LiFePO4 (b3) batteries. Follow the steps below to select the correct battery type for optimal charging.

Image: Visual guide for selecting battery type (Lead Acid, Li-ion, LiFePO4) using the controller's buttons.
- Click the Menu key to switch to the battery type interface.
- Hold the Menu key until the number blinks.
- Click the Up or Down key to switch battery mode (b1, b2, or b3).
- Press the Menu key again to confirm and save.
3. Operating Instructions
3.1 LCD Display and Button Functions
The LCD display provides real-time information about your solar system. The buttons allow navigation and adjustment of settings.

Image: Detailed view of the controller's interface, labeling the Menu, Up, Down keys, USB output, Battery Interface, PV Input, and DC5521 Output ports.
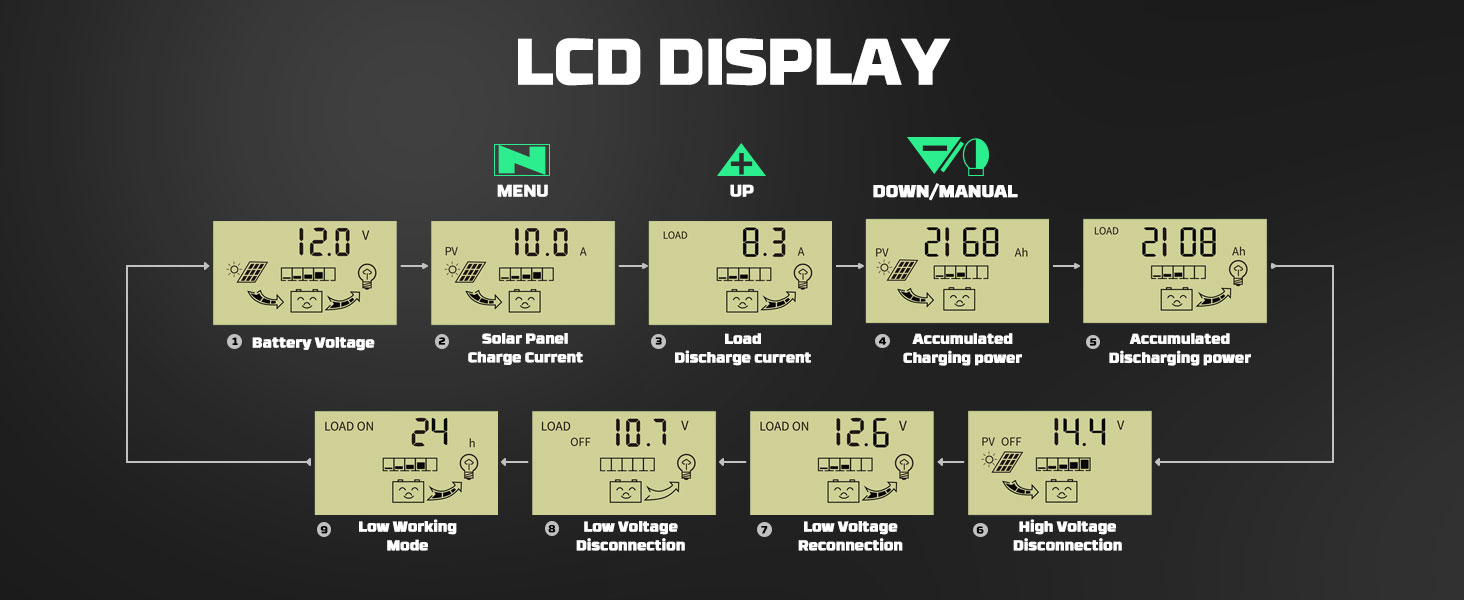
Image: Overview of the LCD display screens, showing Battery Voltage, Solar Panel Charge Current, Load Discharge Current, Accumulated Charging Power, Accumulated Discharging Power, Low Working Mode, Low Voltage Disconnection, Low Voltage Reconnection, and High Voltage Disconnection.
3.2 Adjusting Lithium Battery Parameters
For LiFePO4 and Lithium batteries, you can adjust specific parameters like discharge recovery, charging cutoff, and discharge cutoff voltages.
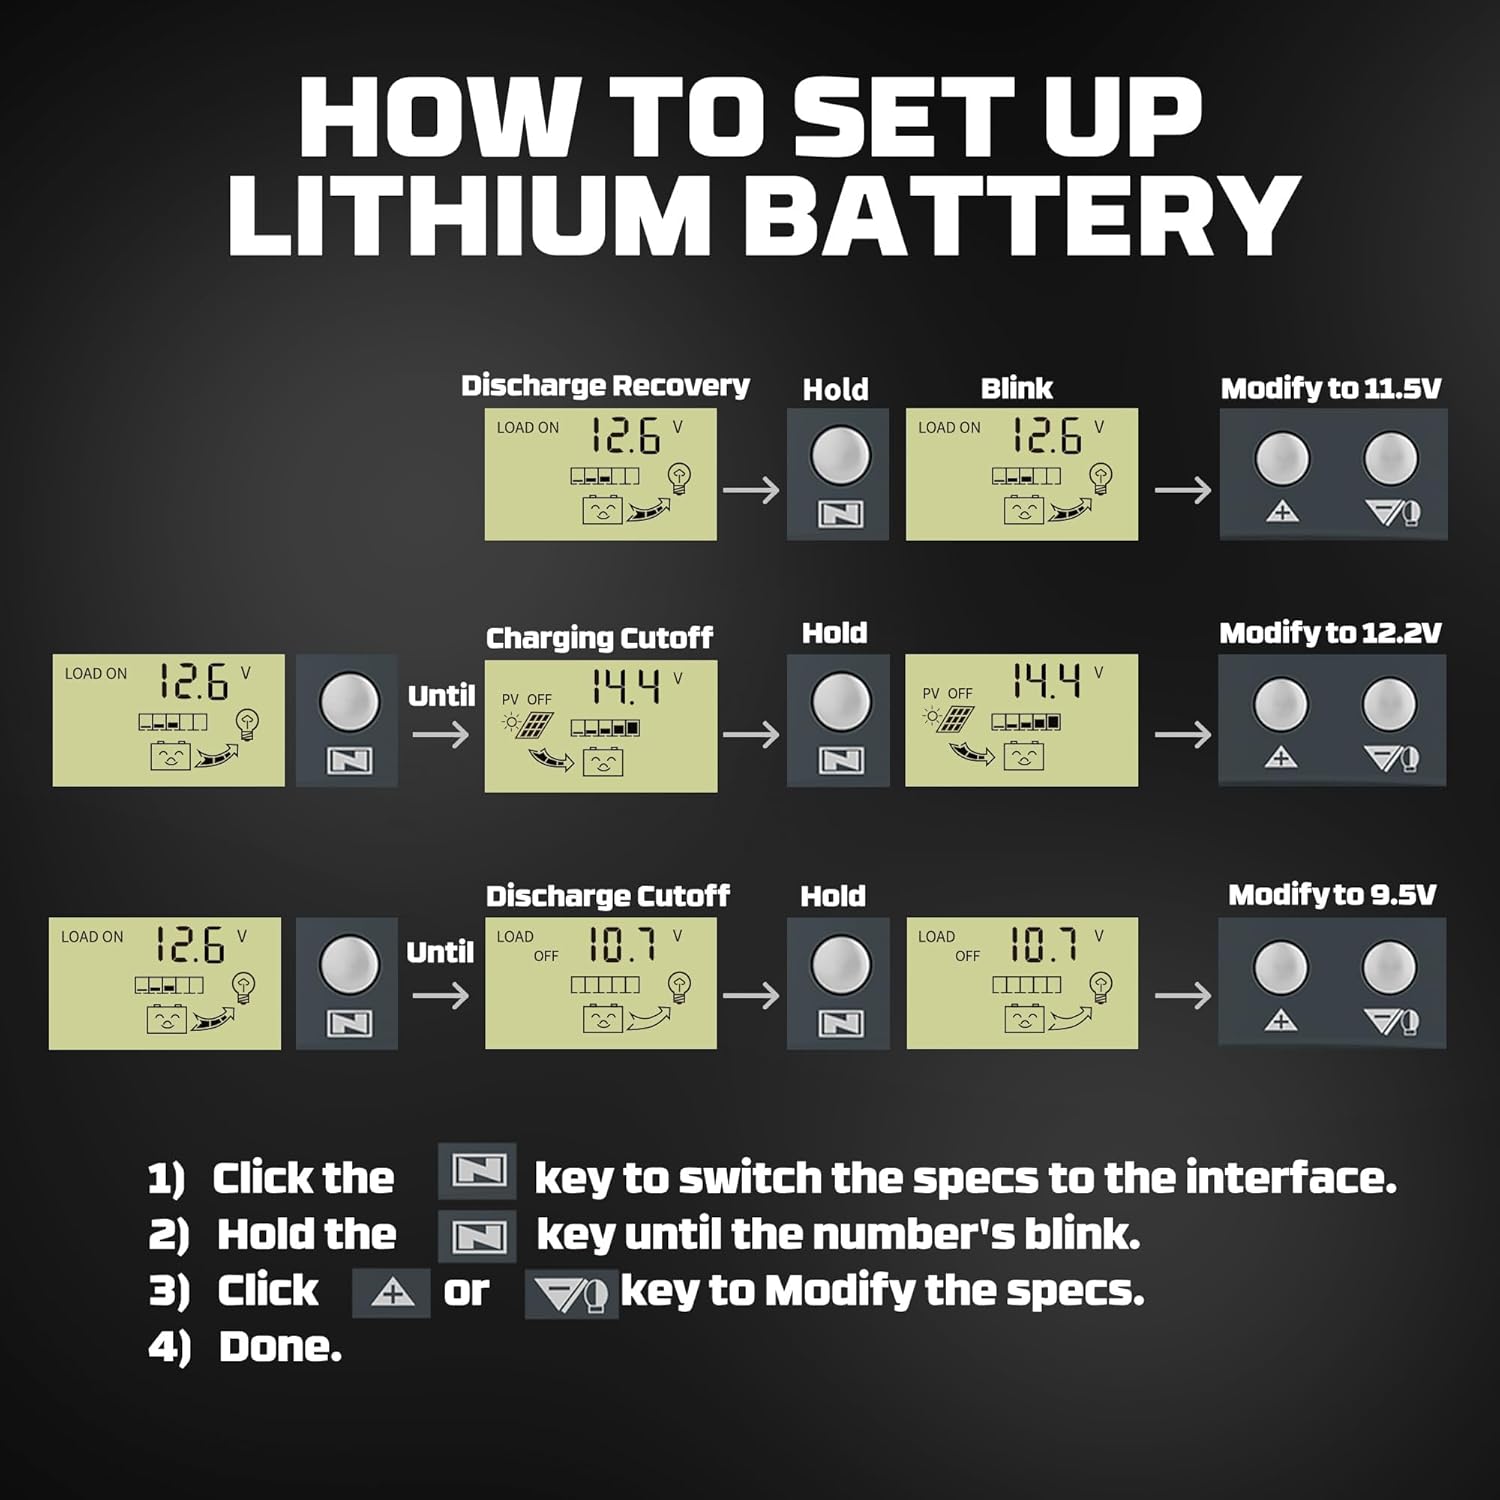
Image: Step-by-step guide to modify lithium battery parameters such as Discharge Recovery, Charging Cutoff, and Discharge Cutoff voltages.
- Click the Menu key to switch to the desired specification interface (e.g., Discharge Recovery, Charging Cutoff, Discharge Cutoff).
- Hold the Menu key until the displayed number blinks.
- Click the Up or Down key to modify the blinking value.
- Press the Menu key again to confirm and save the new setting.
3.3 How to Reboot/Reset the Controller
If you need to reset the controller to its factory default settings, follow the procedure shown in the video below. This can resolve certain operational issues.
Video: Demonstrates the process of resetting the solar charge controller to its default settings. Hold the menu button for 10 seconds until "FF" appears, indicating a successful reset.
4. Maintenance
Regular maintenance ensures the longevity and optimal performance of your solar charge controller.
- Inspect Connections: Periodically check all wiring connections (solar panels, battery, load) to ensure they are secure and free from corrosion. Loose connections can lead to power loss or overheating.
- Clean Controller: Keep the controller clean and free from dust, dirt, and debris. Use a soft, dry cloth for cleaning. Do not use abrasive cleaners or solvents.
- Ventilation: Ensure the controller has adequate ventilation to prevent overheating. Do not block the ventilation holes.
- Environmental Check: Verify that the operating environment remains within the specified temperature and humidity ranges.
5. Troubleshooting
This section addresses common issues you might encounter with your solar charge controller.
| Problem | Possible Cause | Solution |
|---|---|---|
| LCD Screen Blank | No power from battery or solar panels; internal fault. | Check battery connections and voltage. Ensure solar panels are receiving sunlight. Try resetting the unit (refer to Section 3.3). If the issue persists, contact customer support. |
| Battery Not Charging / Low Amps | Insufficient solar input; incorrect battery type setting; faulty connections; controller malfunction. | Verify solar panel output. Confirm correct battery type setting (Section 2.3). Check all wiring for secure connections and correct polarity. Ensure panels are not shaded. |
| Controller Overheating / Melting | Overload; inadequate ventilation; internal short circuit; undersized controller for the system. | Reduce load. Ensure proper ventilation around the controller. Verify that the total current from solar panels and load does not exceed the controller's rated amperage (50A). If overheating persists, discontinue use and contact customer support. |
| Incorrect Voltage Reading | Loose connections; calibration issue; faulty sensor. | Check all wiring connections. Compare readings with a multimeter. If discrepancies persist, a factory reset (Section 3.3) might help. |
If you encounter problems not listed here or if the suggested solutions do not resolve the issue, please contact POWERWIN customer support for assistance.
6. Product Specifications
| Feature | Detail |
|---|---|
| Manufacturer | POWERWIN |
| Model Number | MPPT50 |
| Item Weight | 10.5 ounces |
| Product Dimensions | 7.48 x 3.86 x 1.77 inches |
| Size | 50A |
| Charging Port Type | USB and DC input |
| Power Source | Battery Powered, Corded Electric |
| Amperage Capacity | 30 Amps (Note: Product title states 50A, but specifications list 30 Amps. User should verify actual capacity from product packaging or direct inquiry if critical.) |
| Voltage | 12V/24V Auto Adaptation (24 Volts listed as a specific value, but product is adaptive) |
| Display Type | LCD |
| Color | Black |
| UPC | 732767197272 |
Note: Some specifications may vary slightly. Always refer to the product packaging for the most accurate and up-to-date information.
7. Warranty and Support
The POWERWIN MPPT Solar Charge Controller comes with a two-year warranty from the date of purchase. This warranty covers defects in materials and workmanship under normal use.
For any issues, questions, or warranty claims, please contact POWERWIN customer service. You can typically find contact information on the product packaging, the seller's page (TOPTECH AE on Amazon), or the official POWERWIN website.
When contacting support, please have your product model number (MPPT50) and proof of purchase readily available to expedite the process.


