
1. Product Overview
The Prichor FAN28R is a replacement receiver designed to control ceiling fan speed and light functions. It allows for separate control of fan speeds (High, Medium, Low, Off) and light brightness (On, Off, Dimming) for compatible ceiling fans. This receiver is intended for use with ceiling fans that utilize a remote control system.

Figure 1: Front view of the FAN28R receiver, showing the wiring diagram and DIP switches for code setting.
The receiver features a robust design with a rated power of 240W, supporting multiple light bulbs and enhancing product longevity. It incorporates upgraded relays for improved dimming functionality compared to traditional thyristor components.
2. Compatibility
The FAN28R receiver is compatible with 110V 3-speed AC ceiling fans, including models from brands such as Hampton Bay, Harbor Breeze, and Hunter. It is a direct replacement for FAN-28R and FAN18R receivers.
2.1 Compatible Remote Models
This receiver is compatible with various remote control models. Please verify the FCC ID or Model number on the back of your existing remote to ensure compatibility. Compatible remote models include:
- FAN-53T (FCC ID: 2AAZPFAN53T)
- FAN-11T (FCC ID: L3HFAN11T, KUJCE9103)
- Fan-HD (FCC ID: L3H2010FANHD, L3H2014FANHD, FAN-HD5)
- FAN-35T (FCC ID: 2AAZPFAN35TI, L3HFAN35T, L3HFAN35T1)
- UC7030T (FCC ID: CHQ7030T)
- RR7079T (Standard)
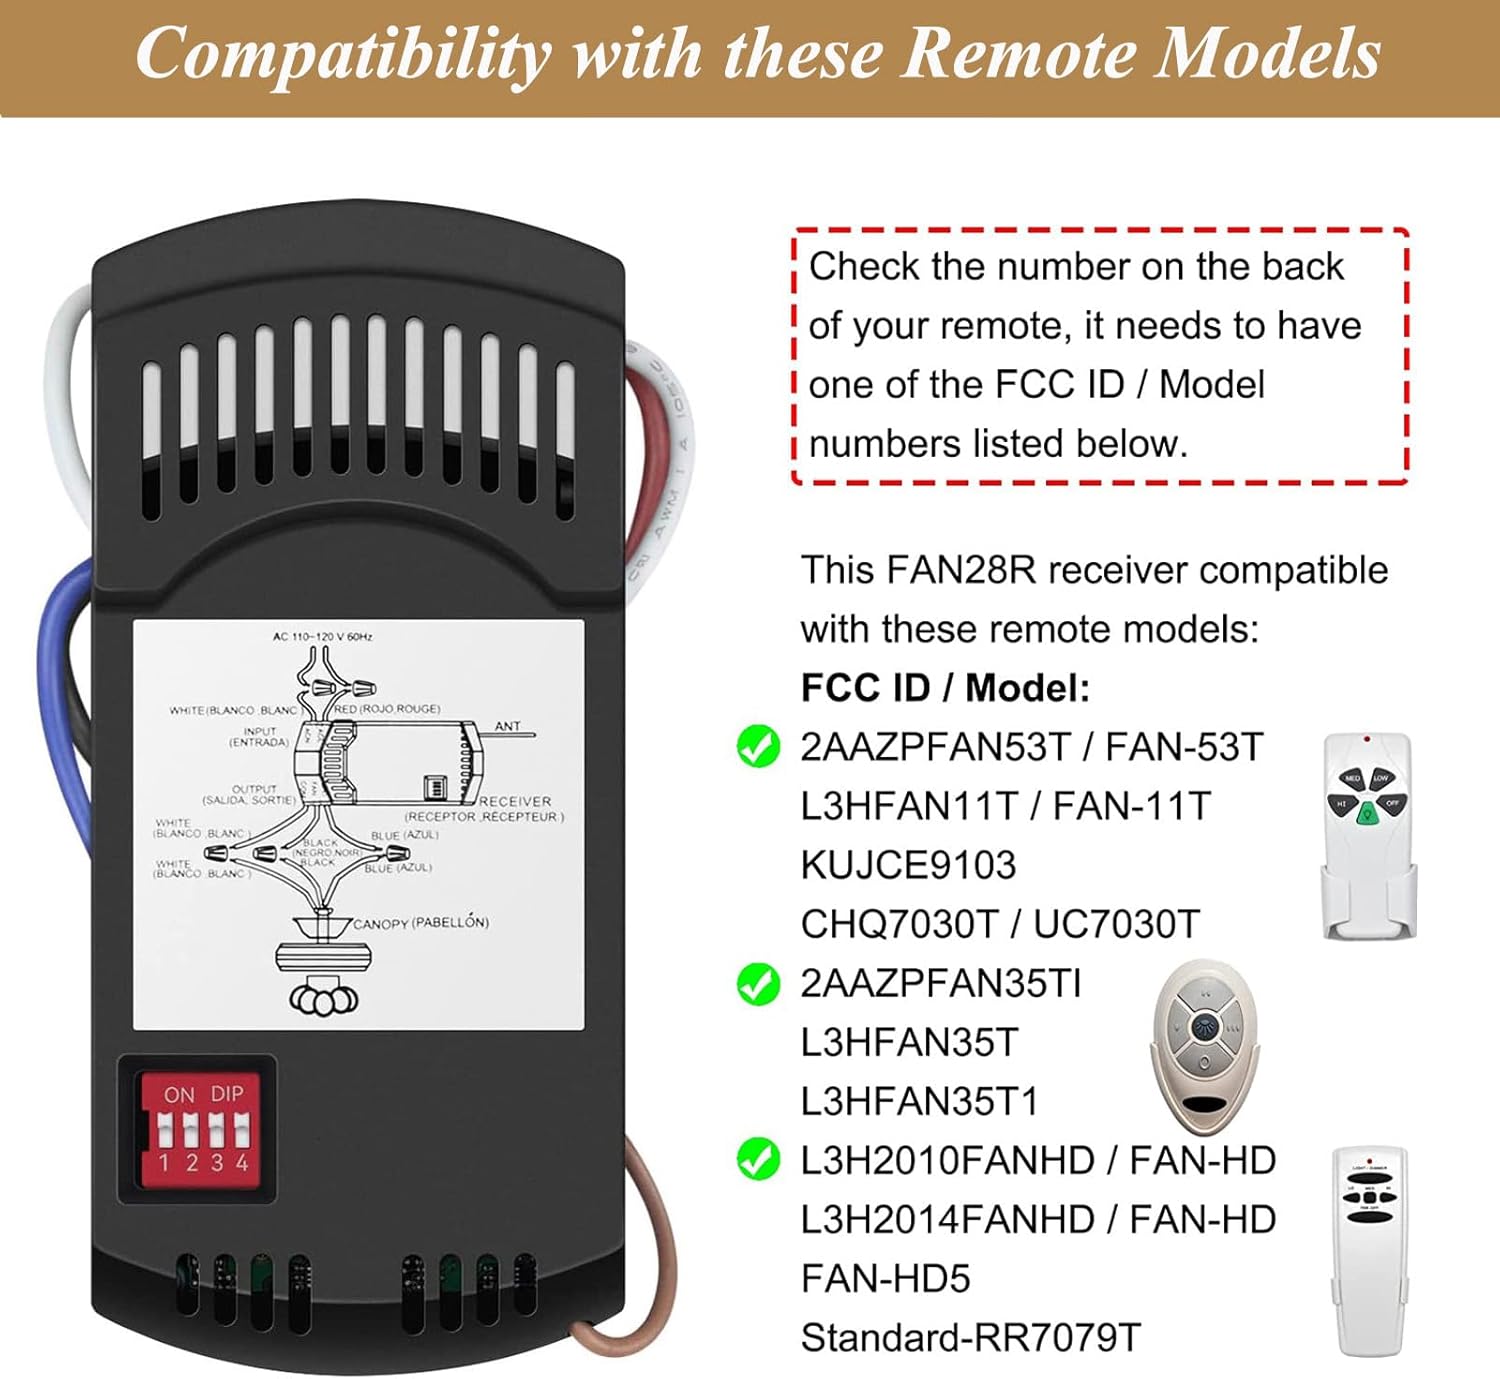
Figure 2: Visual guide to compatible remote control models for the FAN28R receiver.
2.2 Compatible Fan and Light Types
The FAN28R receiver is compatible with most 3-speed AC downrod style ceiling fans. It is not recommended for use with wall-mounted fans or exhaust-type fans.
For lighting, the receiver's dimmer function is compatible with incandescent light bulbs and some dimmable LED lamps. Please note the following:
- Most LED lights and all CFL lamps are non-dimmable. In such cases, the light dimmer will only support the ON/OFF function.
- Using the dimming function with non-dimmable LED or CFL lights may cause flickering.
- Do not use this receiver with solid-state fans.

Figure 3: Compatibility overview for fan types and light bulb types.
3. Installation
Safety Warning: Before beginning installation, ensure the power supply to the ceiling fan is completely disconnected at the circuit breaker to prevent electrical shock.
3.1 Pre-Installation Check
Before installation, measure the canopy of your ceiling fan to ensure there is sufficient space for the FAN28R receiver. The receiver dimensions are approximately 4.7 x 2.1 x 0.8 inches (12 cm x 5.4 cm x 2 cm).

Figure 4: Dimensions of the FAN28R receiver.
3.2 Wiring Instructions
- Disconnect Power: Turn off the power to the ceiling fan at the main circuit breaker.
- Access Wiring: Carefully lower the ceiling fan canopy to expose the existing wiring.
- Disconnect Old Receiver (if applicable): If replacing an old receiver, disconnect its wiring from the fan and house wiring.
- Connect New Receiver: Follow the wiring diagram provided on the receiver and below. Use the included wire connectors to secure all connections.
- Input (AC 110-120V 60Hz):
- White wire from receiver to White (Neutral) house wire.
- Black wire from receiver to Black (Live) house wire.
- Output to Fan:
- White wire from receiver to White (Light Neutral) fan wire.
- Blue wire from receiver to Blue (Light Live) fan wire.
- Black wire from receiver to Black (Fan Live) fan wire.
- Input (AC 110-120V 60Hz):
- Secure Receiver: Carefully tuck the wired receiver into the fan canopy, ensuring no wires are pinched.
- Reattach Canopy: Securely reattach the fan canopy to the ceiling.
- Restore Power: Turn the power back on at the circuit breaker.

Figure 5: Installation steps and wiring diagram for the FAN28R receiver.
4. Initial Setup (DIP Switches)
The FAN28R receiver uses 4 code DIP switches to establish communication with your remote control. For proper operation, the DIP switch settings on the receiver must match the settings on your remote control.
- Locate DIP Switches: The DIP switches are located on the side of the FAN28R receiver (visible in Figure 1). On your remote control, they are typically found inside the battery compartment.
- Match Settings: Adjust the 4 switches on the FAN28R receiver to match the exact ON/OFF positions of the switches on your remote control. There are 16 different frequency combinations possible.
- Default Setting: The default setting is usually "0000" (all switches OFF), but it is not recommended to rely on this default. Always match your remote's setting.

Figure 6: Matching DIP switch settings between the receiver and remote control.
Note: The remote control and 9V battery are typically not included with the receiver. This product is for the receiver only.
5. Operation
Once the FAN28R receiver is correctly installed and its DIP switches are matched with your remote control, you can operate your ceiling fan and light using the remote.
The receiver allows for the following functions:
- Fan Speed Control: Adjust fan speed to High (HI), Medium (MED), Low (LOW), or turn the fan Off (OFF).
- Light Control: Turn the light On (ON), Off (OFF), or Dim (DIMMING) the light brightness (for compatible dimmable bulbs).
Refer to your specific remote control's user manual for detailed button functions and layout.
6. Maintenance
The FAN28R receiver requires minimal maintenance. Ensure the fan canopy remains securely fastened and that no wires are exposed or damaged. Periodically check the remote control's battery and replace it as needed to ensure consistent operation.
For cleaning, ensure power is disconnected to the fan. Wipe the exterior of the receiver (if accessible) with a dry, soft cloth. Do not use liquid cleaners or solvents.
7. Troubleshooting
| Problem | Possible Cause | Solution |
|---|---|---|
| Fan or Light does not respond to remote. |
|
|
| Light flickers when dimming. | Non-dimmable LED or CFL bulbs are being used with the dimming function. |
|
| Fan operates but light does not, or vice versa. | Incorrect wiring for fan or light output. | Re-check the specific fan and light output wiring connections (refer to Section 3.2). |
| Receiver does not fit into fan canopy. | Canopy space is too small for receiver dimensions. | Verify receiver dimensions against canopy space before purchase/installation (refer to Section 3.1). This receiver may not be suitable for your fan. |
8. Specifications
| Model Number | FAN28R |
| Brand | Prichor |
| Product Dimensions | 4.7 x 0.79 x 2.1 inches (12 cm x 2 cm x 5.4 cm) |
| Item Weight | 3.52 ounces (100 grams) |
| Input Voltage | AC 110-120V, 60Hz |
| Max Fan Motor Amps | 1.0A |
| Max Light Watts | 240W |
| Fan Speeds Supported | 3 (High, Medium, Low) + Off |
| Light Control | On/Off, Dimming (for compatible bulbs) |
| Frequency | 303.9MHz |
| Color | Black |
9. Warranty Information
Specific warranty details are not provided in the product information. For warranty inquiries, please contact Prichor customer support or refer to the product packaging for any included warranty cards or documentation.
10. Customer Support
For technical assistance, troubleshooting beyond this manual, or general inquiries, please contact Prichor customer support. While direct contact information is not provided here, you can typically find support details on the manufacturer's official website or through the retailer where the product was purchased.
You may also visit the Prichor Store on Amazon for more information and product resources.