
1. Product Overview
The Crompton CHAMP PLUS I is a 1 HP single-phase residential water pump designed for efficient water transfer in various domestic applications. This self-priming regenerative pump incorporates advanced features for reliable and consistent performance.

Image: Crompton CHAMP PLUS I water pump shown alongside its retail packaging.
Key Features
- Performance: 1 HP (0.75 kW) motor with a high flow rate of 2700 Litres per hour and a maximum head of 34 meters.
- ADDS (Drip Proof Adapter): Provides enhanced protection against water dripping, ensuring durability.
- Anti-Jam Winding: Features high starting torque winding to prevent pump jamming, ensuring smooth operation.
- Thermal Overload Protection: Integrated system to prevent motor winding failure due to high temperatures.
- F Class Insulation: Utilizes high-grade F Class Insulation paper for superior reliability and motor longevity.
- Easy Maintenance: Designed with a simple construction, allowing for easy replacement of wear and tear parts.

Image: Visual representation of key features including ADDS, Anti Jam Winding, Wide Voltage Design, F Class Insulation, Thermal Overload Protection, and Easy Maintenance.

Image: Product dimensions of the Crompton CHAMP PLUS I pump: 24.9 cm (L) x 13.5 cm (W) x 19.8 cm (H).
2. Safety Instructions
Read and understand all safety warnings and instructions before installing or operating the pump. Failure to follow these instructions may result in electric shock, fire, serious injury, or property damage.
- Electrical Safety: Always disconnect the power supply before performing any installation, maintenance, or repair work. Ensure the pump is properly grounded to prevent electric shock.
- Water Source: Do not operate the pump dry. Running the pump without water can cause severe damage to the motor and internal components.
- Installation Environment: Install the pump in a dry, well-ventilated area, protected from direct sunlight, rain, and extreme temperatures.
- Piping: Ensure all pipe connections are secure and leak-free to maintain pump efficiency and prevent water damage.
- Children and Pets: Keep children and pets away from the pump during operation and maintenance.
3. Installation
Proper installation is crucial for the pump's performance and longevity. Follow these steps carefully.
3.1 Unpacking
Carefully remove the pump and all accessories from the packaging. Inspect the pump for any visible damage that may have occurred during transit. Report any damage to your supplier immediately.
3.2 Site Selection
- Choose a firm, level, and dry surface for installation.
- Position the pump as close as possible to the water source to minimize suction lift and pipe friction.
- Ensure adequate ventilation around the pump to prevent overheating.
- Protect the pump from direct weather exposure.
- Place rubber pads under the pump to absorb vibrations and reduce noise.
3.3 Piping Connection
Refer to the typical installation diagram for guidance.
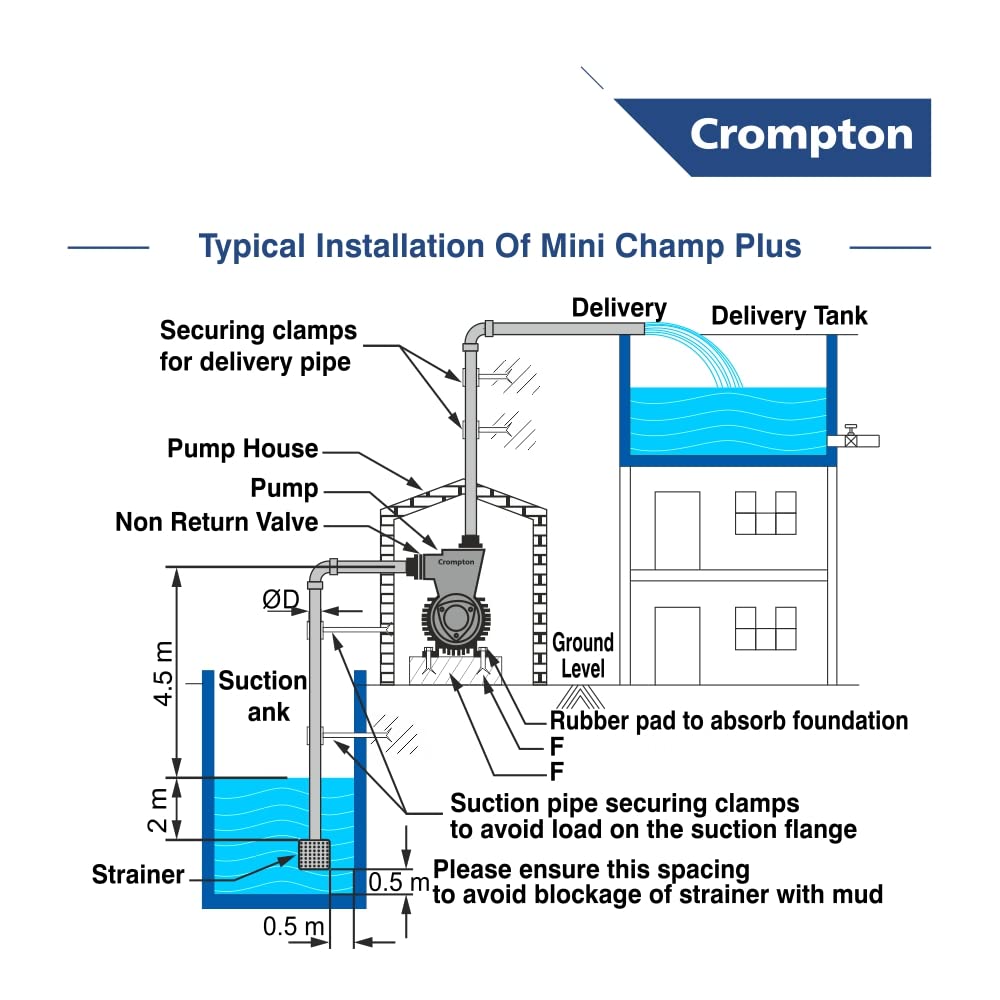
Image: A detailed diagram illustrating the typical installation of a mini water pump, including suction tank, strainer, non-return valve, pump house, delivery pipe, and delivery tank connections.
- Suction Pipe: Connect the suction pipe to the pump's inlet. Ensure all joints are airtight to prevent air ingress, which can cause the pump to lose prime. If the water source is below the pump, install a non-return valve at the end of the suction pipe in the water.
- Strainer: Always use a strainer at the end of the suction pipe to prevent debris from entering the pump. Ensure a minimum spacing of 0.5 meters from the bottom of the suction tank to avoid blockage of the strainer with mud.
- Delivery Pipe: Connect the delivery pipe to the pump's outlet and route it to the desired delivery tank or point of use.
- Securing Clamps: Use appropriate securing clamps for both suction and delivery pipes to provide stability and prevent strain on the pump connections.
4. Operation
4.1 Initial Start-up (Priming)
Before the first use or after the pump has been drained, it must be primed:
- Ensure all pipe connections are secure and leak-free.
- Locate the priming port (usually a cap on top of the pump casing).
- Unscrew the priming cap and slowly fill the pump casing with clean water until it overflows.
- Replace the priming cap securely.
- Open the delivery valve (if present) to allow water to flow freely.
- Connect the pump to the power supply. The pump should start and begin pumping water.
4.2 Normal Operation
Once primed, the pump will operate automatically when connected to power. Monitor the pump for any unusual noises, vibrations, or leaks during operation. The pump is designed for continuous duty within its specified limits.
4.3 Shutting Down
To turn off the pump, simply disconnect it from the power supply. If the pump will not be used for an extended period, follow the winterization steps in the Maintenance section.
5. Maintenance
Regular maintenance ensures optimal performance and extends the life of your pump. Always disconnect power before performing any maintenance.

Image: The pump is designed for easy maintenance, featuring simple construction and easily replaceable wear and tear parts.
5.1 Regular Checks
- Inspect all pipe connections for leaks. Tighten as necessary.
- Check the power cord for any signs of damage or wear.
- Listen for unusual noises or vibrations, which may indicate a problem.
5.2 Cleaning
- Keep the pump exterior clean and free from dust and debris to ensure proper heat dissipation.
- Regularly clean the strainer on the suction pipe to prevent blockages and maintain optimal flow.
5.3 Winterization (for cold climates)
If the pump is installed in an area subject to freezing temperatures and will not be used, it must be drained to prevent damage:
- Disconnect the pump from the power supply.
- Drain all water from the pump casing and pipes.
- Store the pump in a warm, dry place if possible, or ensure it is completely dry and protected from freezing.
6. Troubleshooting
This section provides solutions to common problems you might encounter. For issues not listed here, please contact customer support.
| Problem | Possible Cause | Solution |
|---|---|---|
| Pump does not start | No power supply Blown fuse/tripped breaker Motor jammed | Check power connection Replace fuse/reset breaker Contact service for inspection |
| Pump runs but no water or low flow | Pump not primed Air leak in suction line Clogged strainer Low water level in source | Re-prime the pump Check and tighten all suction connections Clean the strainer Ensure adequate water in source |
| Excessive noise or vibration | Loose mounting bolts Foreign object in pump Cavitation (air in suction) | Tighten mounting bolts Disconnect power and inspect impeller (if accessible and safe) Check suction line for leaks, ensure proper priming |
| Pump overheats and shuts off | Poor ventilation Motor overload Low voltage | Ensure adequate airflow around pump Check for blockages, ensure pump is not running dry Verify power supply voltage is within specified range |

Image: The pump is equipped with Thermal Overload Protection to safeguard the motor from high temperatures.

Image: The Anti-Jam Insert, made of SS, ensures reliability against pump jam and consistent performance.

Image: The pump offers high suction capacity, with instant suction up to 8.0 meters suction lift.
7. Technical Specifications
Detailed specifications for the Crompton CHAMP PLUS I water pump.
| Specification | Value |
|---|---|
| Brand | Crompton |
| Model Number | CHAMP PLUS I |
| Power | 1 HP (0.75 kW) |
| Rated Voltage | 220 Volts |
| Rated Frequency | 50 Hz |
| Voltage Range | 180V-260V (1PH) |
| Pipe Size | 25mm X 25mm |
| Maximum Head | 34 Metres |
| Maximum Discharge / Flow Rate | 2700 LPH (8 Liters Per Minute) |
| Liquid Type | Clear & Cold Water |
| Material | Aluminium, Cast Iron, Plastic, Stainless Steel |
| Item Weight | 7.23 Kilograms |
| Product Dimensions (L x W x H) | 24.9L x 13.5W x 19.8H Centimeters |
| Included Components | Water pump |
8. Warranty and Support
Your Crompton CHAMP PLUS I water pump comes with a manufacturer's warranty and dedicated customer support.
8.1 Warranty Information
This product is covered by a 1-year manufacturer's warranty from the date of purchase. Please retain your purchase receipt for warranty claims. The warranty covers manufacturing defects under normal use conditions.
8.2 Customer Support
For any assistance, service registration, or queries, please contact Crompton Customer Care:

Image: Crompton Customer Care information, including phone number, WhatsApp, and web registration QR codes.
- Toll-Free Number: 1800-419-0505 (Available from 9:00 AM to 7:00 PM, Monday to Saturday)
- WhatsApp Support: For instant assistance, message us at 7428-713-838
- Web Registration: For warranty registration or service requests, scan the QR code or visit Crompton's official website.