1. Product Overview
The DARKROCK MH200 is a mid-tower PC computer case designed for Micro ATX and Mini ITX motherboards. It features a high-airflow design with mesh front and side panels, providing excellent cooling performance. The case supports various cooling options, including up to 280mm radiators and multiple fans. It also includes modern connectivity with a Type-C port and USB 3.0 ports on the I/O panel.

Figure 1.1: Front-left view of the DARKROCK MH200 PC Computer Case, showcasing its sleek black design and mesh panels.
Key Features:
- High-Airflow Design: Front and side mesh panels for enhanced ventilation.
- Dust Filtration: Magnetic mesh dust filters on top and bottom panels.
- Spacious Interior: Supports CPU coolers up to 165mm and GPUs up to 330mm.
- Modern I/O: Top-mounted Type-C and USB 3.0 ports.
- Cooling Versatility: Accommodates up to 8 fans and 280mm radiators.
- Pre-installed Fan: One ARGB LED 120mm fan included in the rear.
2. Safety Information
Please read all safety instructions carefully before installing or operating the DARKROCK MH200 PC Computer Case. Failure to follow these instructions may result in damage to the product, personal injury, or voiding of the warranty.
- Always disconnect power from all components before installation or maintenance.
- Handle components with care to avoid static discharge. Consider using an anti-static wrist strap.
- Keep the case away from liquids and excessive humidity.
- Ensure proper ventilation around the case to prevent overheating.
- Do not attempt to modify the case structure or components.
- Keep out of reach of children.
3. Setup and Installation
This section provides step-by-step instructions for setting up your DARKROCK MH200 PC Computer Case and installing your components.
3.1 Unpacking the Case
- Carefully remove the case from its packaging.
- Inspect the case for any signs of damage during transit. Contact your retailer immediately if damage is found.
- Remove all protective films and internal packaging materials.
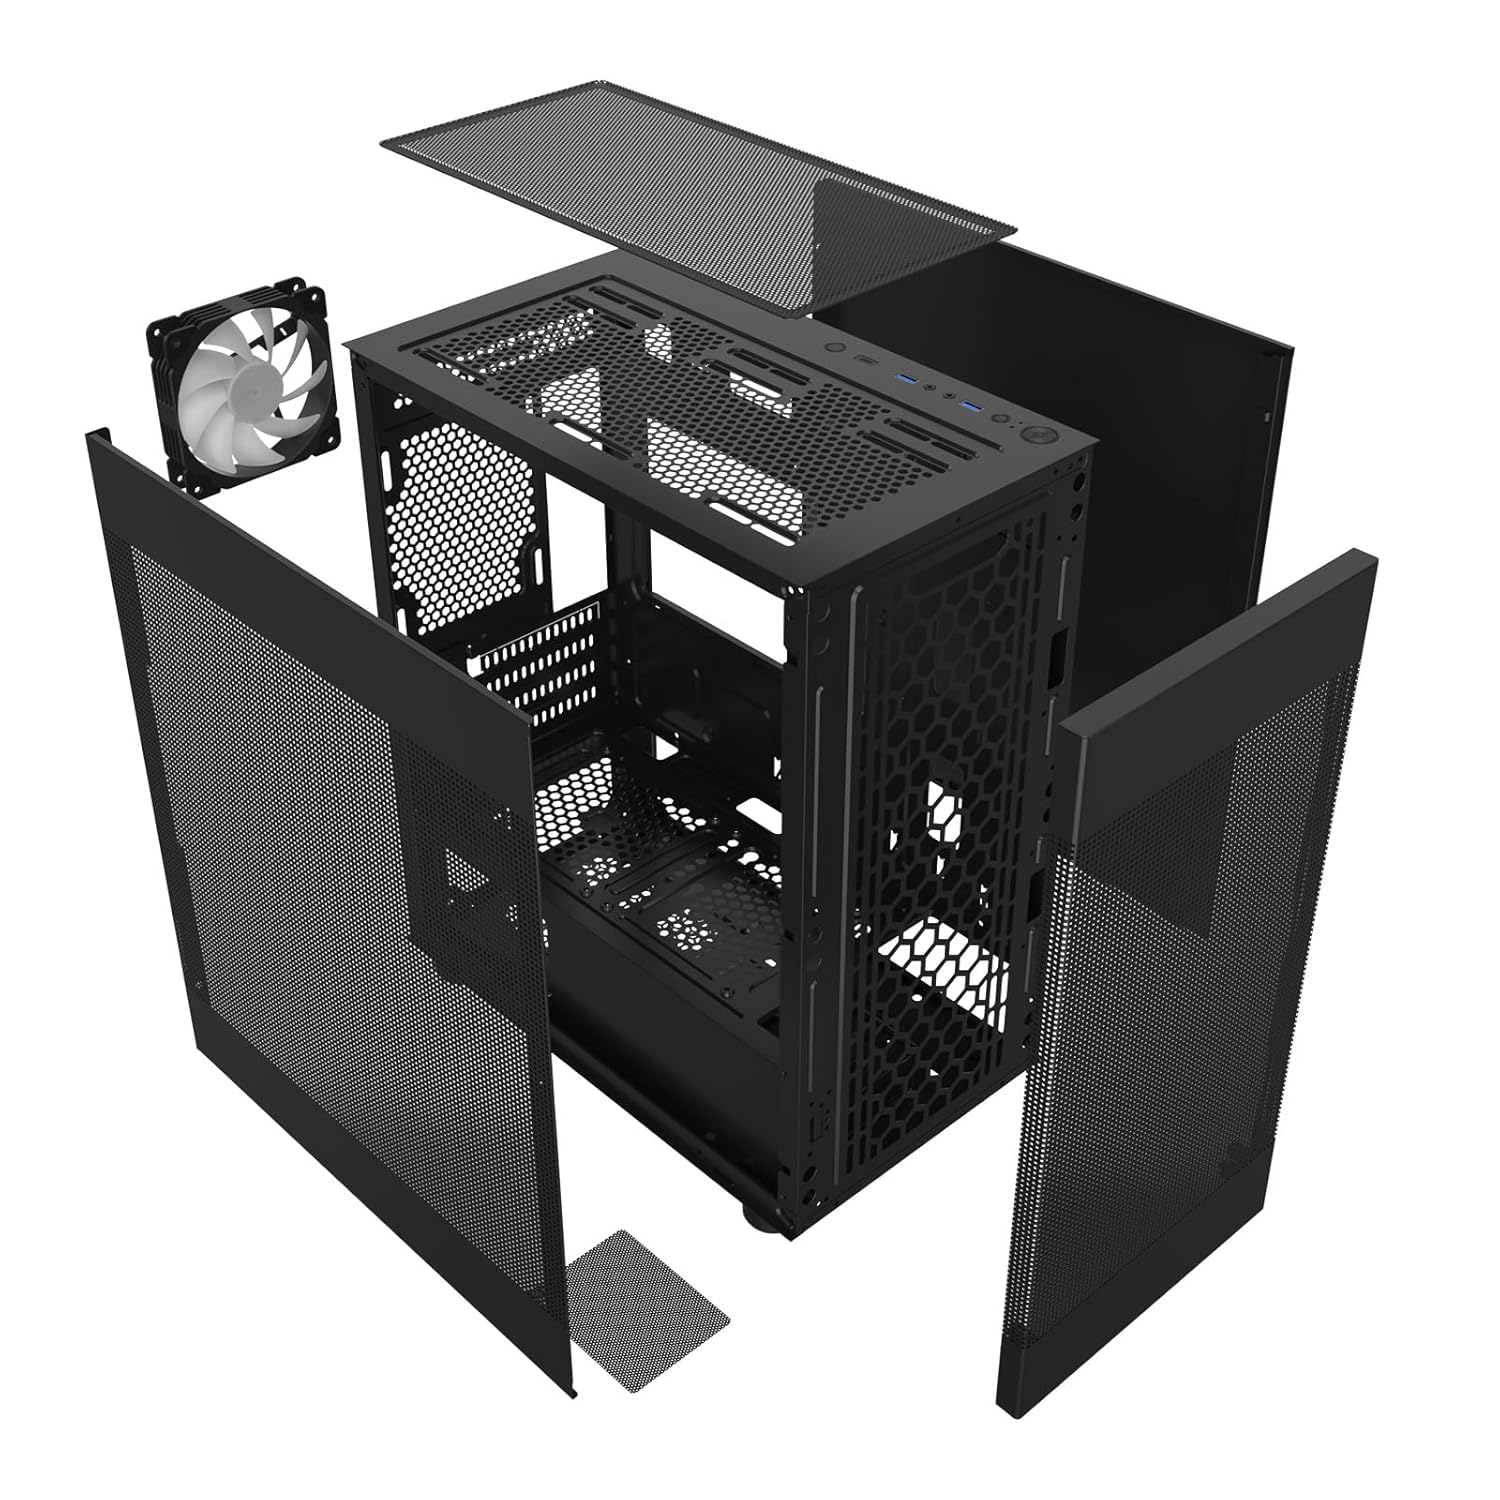
Figure 3.1: Exploded view showing the removable panels and internal structure of the MH200 case, including the fan and dust filters.
3.2 Panel Removal
The MH200 features easily removable panels for convenient access during installation.
- Side Panels: Gently pull the side panels from the rear of the case to detach them.
- Front Panel: The front mesh panel can be carefully detached by pulling it away from the chassis.
- Top Panel: The top panel, which includes a magnetic dust filter, can be lifted off.

Figure 3.2: The dual mesh panel design of the MH200, illustrating how the front and side panels can be removed for access.
3.3 Component Installation
- Motherboard Installation: Align your Micro ATX or Mini ITX motherboard with the standoffs inside the case. Secure it with the provided screws.
- Power Supply Unit (PSU) Installation: Install your PSU into the dedicated compartment at the bottom rear of the case. Ensure the fan faces the correct direction for optimal airflow. The case supports PSUs up to 180mm in length.
- Storage Drive Installation:
- 2.5" SSDs: Mount SSDs to the designated SSD trays behind the motherboard tray.
- 3.5" HDDs: Install HDDs into the removable drive cage located near the PSU compartment.
- Graphics Card (GPU) Installation: Install your graphics card into the appropriate PCIe slot on your motherboard. The case supports GPUs up to 330mm in length.
- CPU Cooler Installation: Install your CPU cooler. The case accommodates CPU coolers up to 165mm in height.
- Fan and Radiator Installation:
- The case supports up to 8 fans.
- Top: Supports up to 2x 120mm or 2x 140mm fans, or a 240mm/280mm radiator.
- Front: Supports up to 3x 120mm fans.
- Rear: Supports 1x 120mm fan (one ARGB 120mm fan pre-installed).
- Bottom: Supports up to 2x 120mm fans.
- Cable Management: Utilize the space behind the motherboard tray for routing and managing cables to ensure optimal airflow and a clean build.
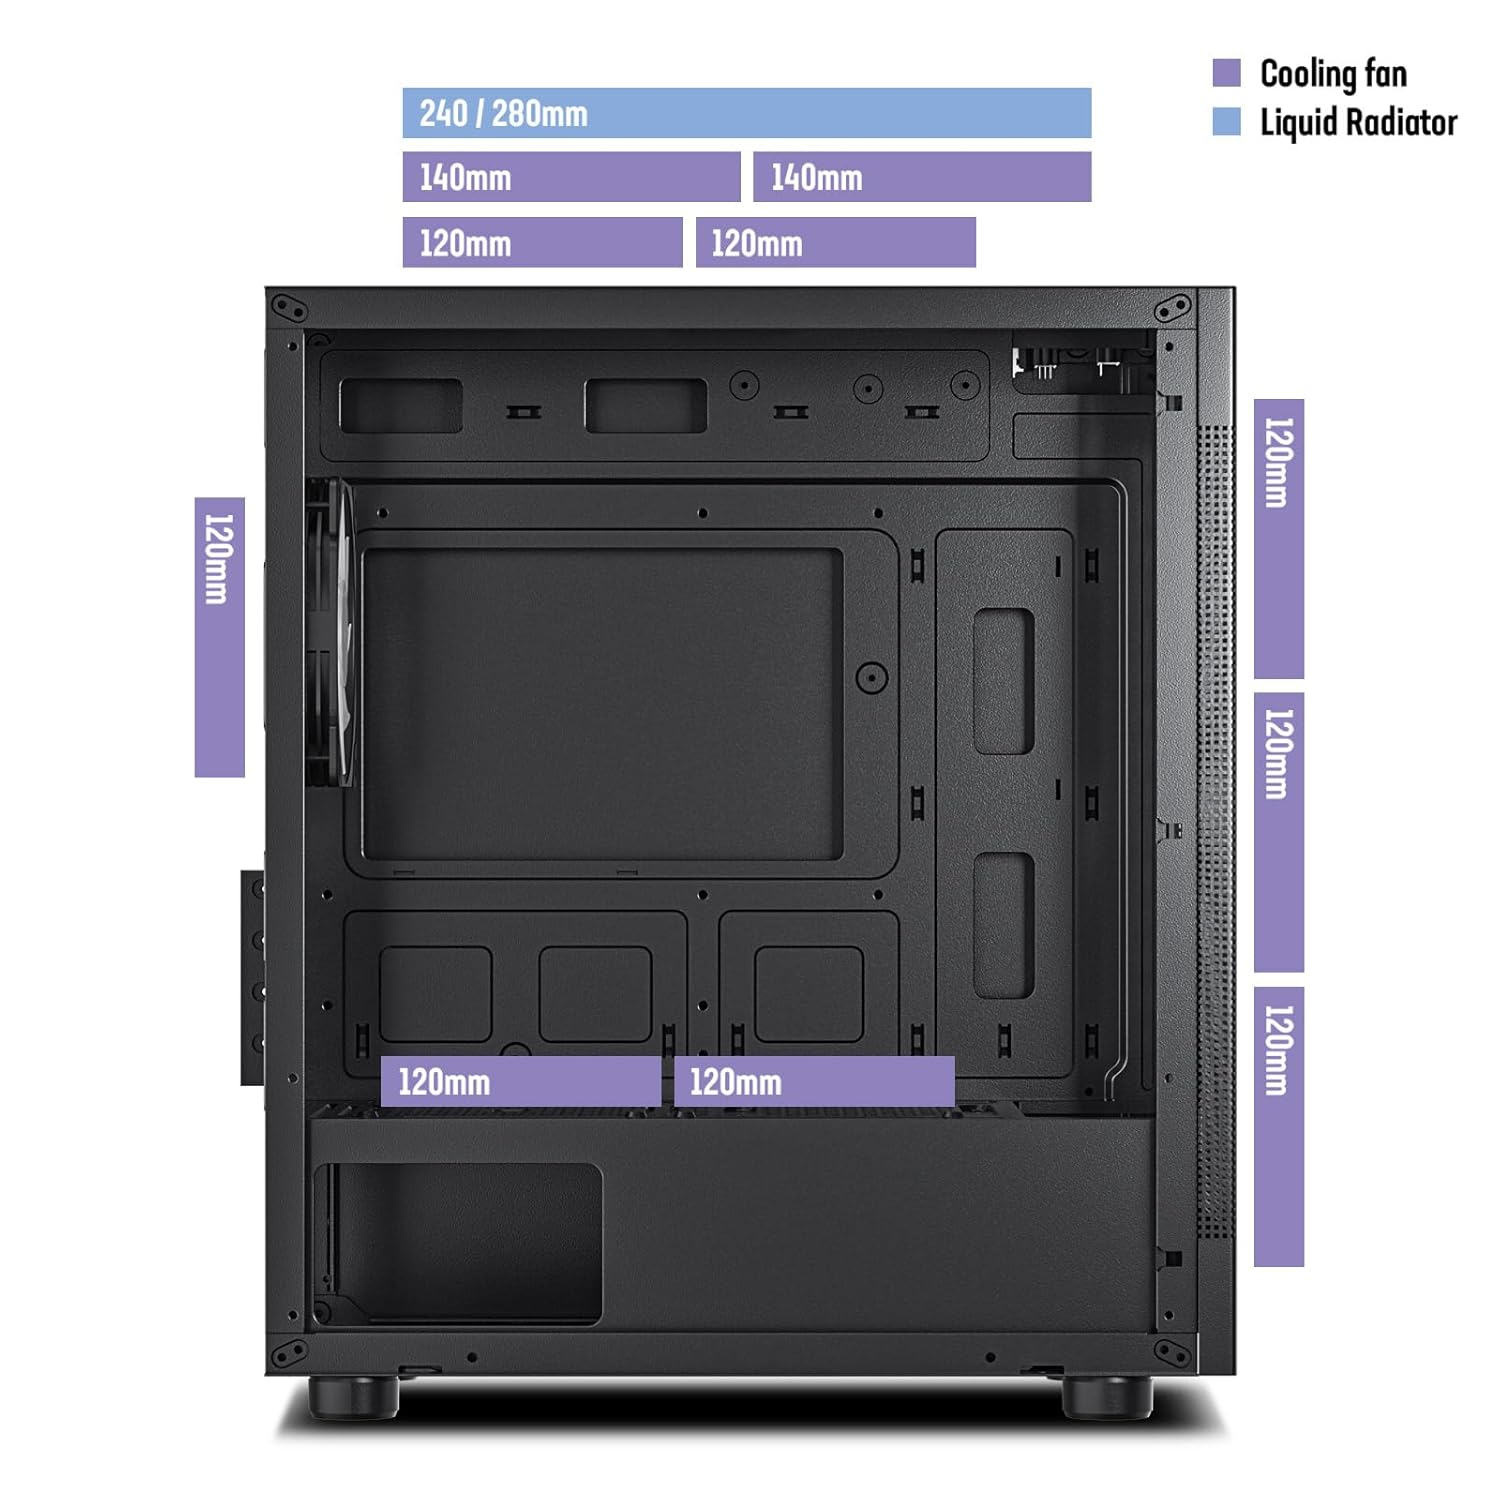
Figure 3.3: Diagram illustrating the various fan and liquid radiator mounting options and sizes supported within the MH200 case.

Figure 3.4: Diagram indicating the maximum CPU cooler height (165mm) and GPU length (330mm) supported by the MH200 case for M-ATX and ITX motherboards.

Figure 3.5: Diagram detailing the overall dimensions of the MH200 case, along with locations for SSDs, HDDs, and the maximum PSU length (180mm).
3.4 Connecting Front I/O Cables
Connect the front panel I/O cables to the corresponding headers on your motherboard.
- USB 3.0: Connect the USB 3.0 cable to your motherboard's USB 3.0 header.
- Type-C: Connect the Type-C cable to your motherboard's Type-C header (if available).
- Audio: Connect the HD Audio cable to your motherboard's audio header.
- Front Panel Connectors: Connect the Power SW, Reset SW, HDD LED, and Power LED cables to the appropriate pins on your motherboard's front panel header. Refer to your motherboard manual for pinout details.
- ARGB LED: Connect the ARGB fan cable to a compatible ARGB header on your motherboard or a dedicated ARGB controller.

Figure 3.6: Detailed view of the MH200's top-mounted I/O panel, showing the LED button, Type-C port, USB 3.0 ports, audio jacks, reset button, and power button.
4. Operating the Case
Once all components are installed and connected, you can power on your system.
- Press the Power button on the top I/O panel to turn on your computer.
- The pre-installed ARGB fan will illuminate upon power-on. If connected to a motherboard ARGB header, you can control its lighting effects via your motherboard's software.
- Utilize the front panel USB 3.0 and Type-C ports for connecting peripherals and external storage devices.
4.1 Airflow and Cooling
The MH200 is designed for optimal airflow. Ensure that fans are installed to create a positive or negative pressure system that suits your cooling needs.

Figure 4.1: Illustration of the high-airflow design of the MH200 case, showing air intake through the front and side mesh panels and exhaust from the top and rear.
5. Maintenance
Regular maintenance helps ensure the longevity and optimal performance of your PC case and components.
- Dust Filter Cleaning: The top and bottom panels are equipped with magnetic dust filters. Regularly remove and clean these filters by rinsing them with water or using a soft brush. Ensure they are completely dry before reattaching.
- Interior Dust Removal: Periodically open the side panels and use compressed air to remove dust buildup from internal components and fan blades.
- Exterior Cleaning: Wipe the exterior of the case with a soft, damp cloth. Avoid abrasive cleaners or solvents.
6. Troubleshooting
This section addresses common issues you might encounter with your PC case.
| Problem | Possible Cause | Solution |
|---|---|---|
| System does not power on. | Power button cable not connected correctly to motherboard. | Check the Power SW connection on your motherboard. Refer to your motherboard manual. |
| Front USB ports not working. | USB 3.0 or Type-C cable not connected to motherboard. | Ensure the USB 3.0 and Type-C cables are securely connected to the correct headers on your motherboard. |
| No audio from front audio jacks. | HD Audio cable not connected to motherboard. | Verify the HD Audio cable is properly connected to your motherboard's audio header. |
| ARGB fan not lighting up. | ARGB cable not connected or incorrect header. | Check the ARGB cable connection to your motherboard's ARGB header or controller. Ensure software control is enabled if applicable. |
| Poor airflow or high temperatures. | Dust buildup on filters or fans; incorrect fan orientation. | Clean dust filters and internal components. Verify fan directions for optimal intake and exhaust. |
7. Specifications
Detailed technical specifications for the DARKROCK MH200 PC Computer Case.
| Feature | Detail |
|---|---|
| Model | MH200 |
| Case Type | Mid Tower |
| Motherboard Support | Micro ATX, Mini ITX |
| Dimensions (L x W x H) | 35.99 x 21.21 x 41.99 cm (14.17 x 8.35 x 16.53 inches) |
| Item Weight | 3.81 kg (8.4 lbs) |
| Material | Steel, Mesh |
| Expansion Slots | 4 |
| Drive Bays | 1x 3.5" HDD, 1x 2.5" SSD (or 2x 2.5" SSD if 3.5" bay unused) |
| Max GPU Length | 330mm |
| Max CPU Cooler Height | 165mm |
| Max PSU Length | 180mm |
| Fan Support |
|
| Radiator Support |
|
| Front I/O Ports | 1x USB Type-C, 2x USB 3.0, Audio In/Out, Power Button, Reset Button, LED Button |
| Dust Filters | Top (magnetic), Bottom (magnetic) |
8. Warranty and Support
For warranty information and technical support, please refer to the official DARKROCK website or contact your local retailer.
- Official Website: www.darkrock.com (Note: This is a placeholder URL. Please refer to actual product documentation for correct support links.)
- Customer Support: Contact details can typically be found on the manufacturer's website or the product packaging.
Please retain your proof of purchase for warranty claims.


