Introduction
This manual provides essential information for the safe and efficient operation, maintenance, and troubleshooting of your Truper HILA-1600C Compact Electric Pressure Washer. Please read all instructions carefully before use and retain this manual for future reference.
Product Overview and Components
Familiarize yourself with the components of your pressure washer to ensure proper assembly and operation.
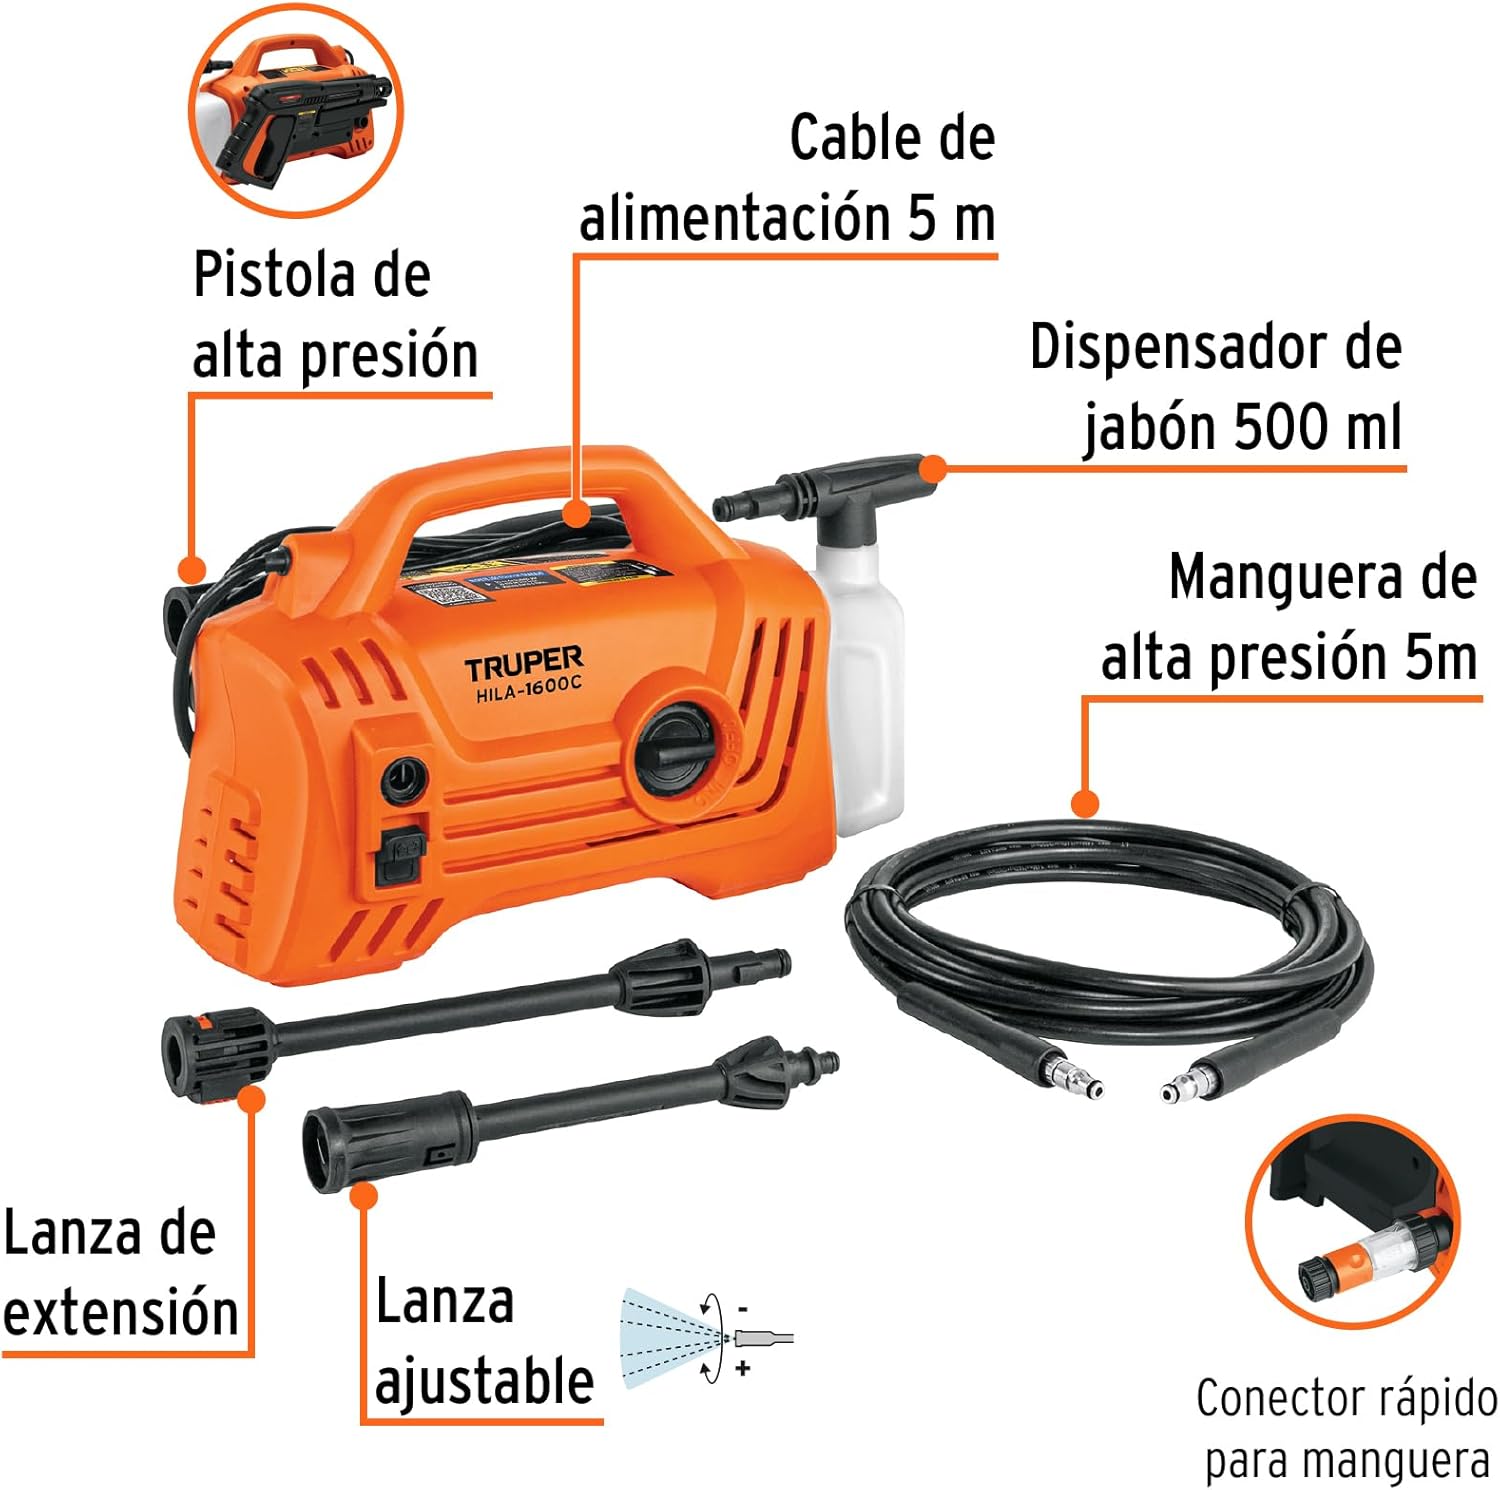
Figure 1: Front view of the Truper HILA-1600C Compact Electric Pressure Washer.

Figure 2: Diagram showing the main components of the Truper HILA-1600C pressure washer, including the high-pressure gun, 5m power cable, 500ml soap dispenser, 5m high-pressure hose, extension lance, adjustable lance, and quick connector for the hose.
Included Components:
- High-pressure gun
- 5m Power cable
- 500ml Soap dispenser
- 5m High-pressure hose
- Extension lance
- Adjustable lance
- Quick connector for hose
- Water filter
- Nozzle cleaner
Setup
Follow these steps for initial setup before operating your pressure washer.
- Unpack the Unit: Carefully remove all components from the packaging. Inspect for any damage.
- Connect Water Supply: Attach a garden hose (not included) to the water inlet on the pressure washer. Ensure the connection is secure to prevent leaks.
- Install Water Filter: Insert the water filter into the water inlet connection. This prevents debris from entering the pump.
- Connect High-Pressure Hose: Connect one end of the 5m high-pressure hose to the high-pressure outlet on the unit and the other end to the high-pressure gun. Tighten all connections firmly.
- Assemble Lance: Attach the extension lance to the high-pressure gun, then attach the adjustable lance to the extension lance. Ensure they click securely into place.
- Fill Soap Dispenser (Optional): If using detergent, fill the 500ml soap dispenser with appropriate pressure washer detergent. Attach it to the high-pressure gun if desired.
- Connect Power: Plug the 5m power cable into a grounded 127V electrical outlet.

Figure 3: Visual guide for connecting the water supply, high-pressure hose, and assembling the gun with lances.
Operating Instructions
Follow these guidelines for safe and effective operation of your pressure washer.
- Prepare for Use: Ensure all connections are secure. Turn on the water supply completely before turning on the pressure washer.
- Purge Air from System: Squeeze the trigger on the high-pressure gun to release air from the system until a steady stream of water emerges.
- Start the Unit: Turn the ON/OFF switch to the 'ON' position. The motor will start, and the unit will build pressure.
- Adjust Spray Pattern: Rotate the adjustable lance nozzle to select the desired spray pattern (from a concentrated jet to a wide fan spray) for your cleaning task.
- Apply Detergent (Optional): If using the soap dispenser, ensure it is attached. The pressure washer will automatically draw detergent when operating at low pressure or with the detergent nozzle.
- Begin Cleaning: Hold the gun firmly with both hands and maintain a safe distance from the surface being cleaned. Always start with a wider spray pattern and move closer as needed to avoid damaging the surface.
- Shut Down: When finished, turn the ON/OFF switch to the 'OFF' position. Turn off the water supply. Squeeze the trigger to release any remaining pressure in the system. Disconnect the power cable and water hose.
Maintenance
Regular maintenance ensures optimal performance and extends the life of your pressure washer.
- Clean Water Filter: Regularly check and clean the water filter to prevent blockages. Rinse it under running water to remove debris.
- Nozzle Cleaning: If the nozzle becomes clogged, use the provided nozzle cleaner tool to clear any obstructions.
- Hose and Gun Inspection: Periodically inspect the high-pressure hose and gun for any signs of wear, cracks, or damage. Replace damaged parts immediately.
- Storage: Before storing, ensure all water is drained from the unit, hose, and gun to prevent freezing damage. Store the pressure washer in a dry, frost-free area.
- Cable Management: Wrap the power cable neatly around the designated storage area on the unit.
Troubleshooting
Refer to this section for solutions to common issues.
| Problem | Possible Cause | Solution |
|---|---|---|
| Unit does not start | No power supply; ON/OFF switch is off; Thermal overload activated | Check power connection; Turn switch to ON; Allow unit to cool down |
| Low pressure | Insufficient water supply; Clogged nozzle; Air in pump; Leaks in hose connections | Ensure full water flow; Clean nozzle; Purge air from system; Tighten connections |
| Water leaks | Loose connections; Damaged O-rings or seals | Tighten all connections; Replace damaged O-rings or seals |
| Motor stops during use | Thermal overload activated; Power supply issue | Allow unit to cool down; Check power outlet and circuit breaker |
Specifications
| Feature | Detail |
|---|---|
| Manufacturer | Truper SA de CV |
| Product Model Number | HILA-1600C |
| Product Dimensions | 30 x 20 x 25 cm |
| ASIN | B0C6W1S2DF |
| Brand | TRUPER |
| Power Source | AC/DC |
| Color | Orange |
| Product Weight | 6.25 Kilograms |
| Hose Length | 5 Meters |
| Maximum Water Flow | 5.5 L/min |
| Motor | 1.9 HP |
| Pressure | 1600 PSI |
Warranty and Support
For warranty information, technical support, or service inquiries, please refer to the documentation included with your purchase or visit the official TRUPER website. Keep your proof of purchase for warranty claims.


