
WallarGe CL7001-B5
WallarGe Atomic Clock User Manual
Model: CL7001-B5
Introduction
Thank you for purchasing the WallarGe Atomic Clock. This device provides precise timekeeping, indoor and outdoor temperature readings, and an alarm function. It automatically synchronizes with the WWVB radio signal for accurate time updates and adjusts for Daylight Saving Time. Please read this manual carefully to ensure proper setup and operation.
Package Contents
- WallarGe Atomic Clock (Model: CL7001-B5)
- Wireless Outdoor Temperature Sensor
- User Manual (this document)
Note: Batteries are not included.
Product Overview

Image: The WallarGe Atomic Clock display unit alongside its wireless outdoor temperature sensor.
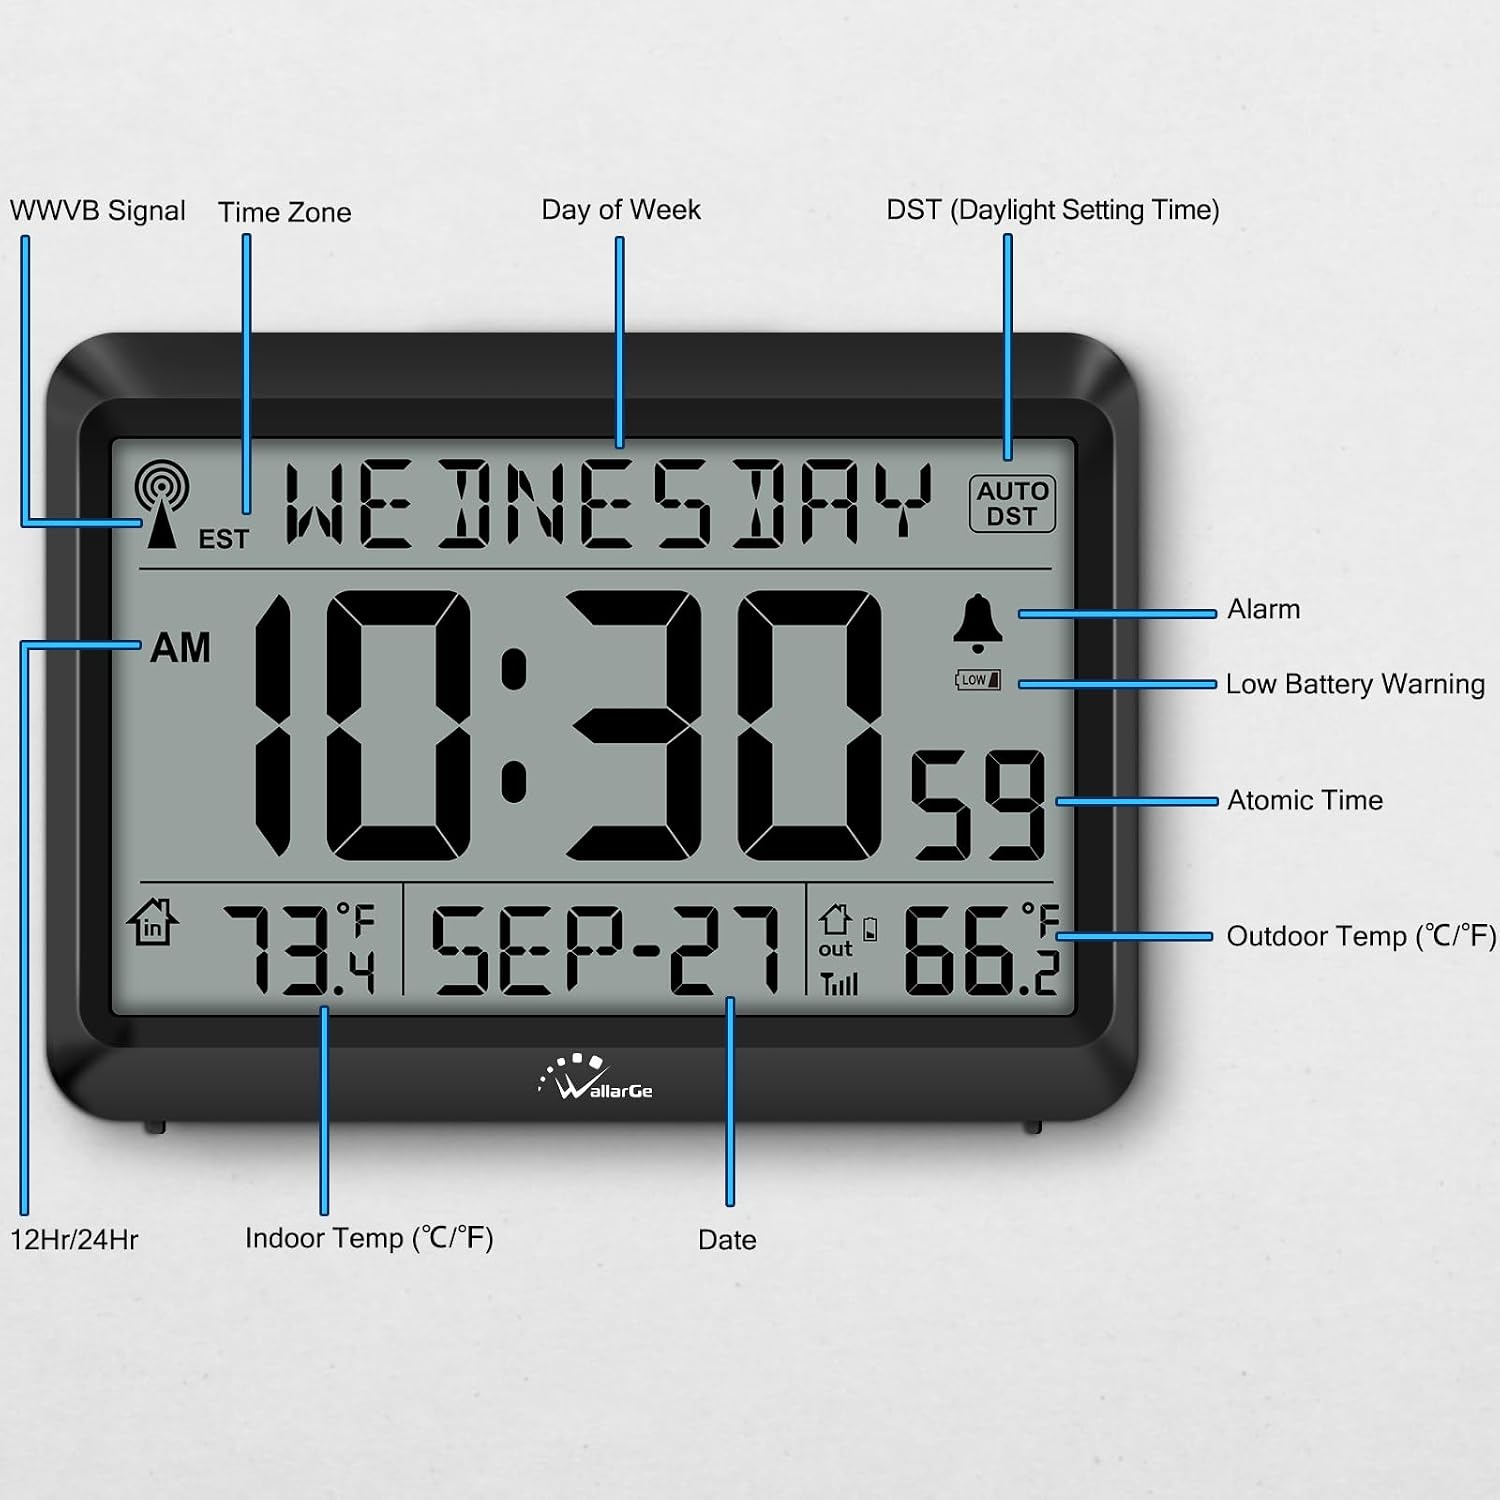
Image: Detailed view of the WallarGe Atomic Clock display, highlighting key features such as WWVB signal indicator, time zone, day of week, DST indicator, alarm, low battery warning, atomic time, indoor temperature, outdoor temperature, and date.
Main Unit Features:
- Large LCD Display
- WWVB Atomic Time Reception
- Indoor Temperature Display (Celsius/Fahrenheit)
- Outdoor Temperature Display (Celsius/Fahrenheit)
- Date and Day of Week Display
- Digital Alarm Clock with Snooze
- Automatic Daylight Saving Time (DST) Adjustment
- Low Battery Indicator
- Foldable Stand for Tabletop Use
- Wall-Mountable Design
Outdoor Sensor Features:
- Wireless Transmission
- Temperature Measurement
- Battery Operated
Setup
Battery Installation:
The clock unit requires 3 x AAA batteries, and the outdoor sensor requires 2 x AA batteries. Ensure correct polarity when inserting batteries.

Image: Rear view of the atomic clock and outdoor sensor, indicating battery compartments for 3x AAA batteries (clock) and 2x AA batteries (sensor). A foldable stand is also visible.
- Main Unit: Open the battery compartment cover on the back of the main unit. Insert 3 new AAA batteries, observing the polarity markings (+ and -). Close the cover.
- Outdoor Sensor: Open the battery compartment cover on the back of the outdoor sensor. Insert 2 new AA batteries, observing the polarity markings. Close the cover.
Note: A low battery symbol will appear on the screen when batteries need replacement.
Initial Setup and WWVB Signal Reception:
After battery installation, the clock will automatically begin searching for the WWVB atomic time signal. This process may take several minutes to several hours, depending on your location and environmental conditions. For best reception, place the clock near a window and away from electronic devices that may cause interference.

Image: The atomic clock displayed in a room, with concentric circles indicating the reception of the WWVB signal for automatic time setting.
- The WWVB signal icon (a radio tower with waves) will flash during signal search.
- Once the signal is received and synchronized, the icon will become solid.
- The clock will automatically update the time every midnight to ensure accuracy.
If the signal is not received after 24 hours, you can manually initiate a search by holding the "WWVB SEARCH" button for 2 seconds.
Setting Time Zone:
The clock supports 4 time zones: EST (Eastern Standard Time), CST (Central Standard Time), MST (Mountain Standard Time), and PST (Pacific Standard Time).
- Press the "TIME ZONE REG" button repeatedly to cycle through the available time zones until your desired zone is displayed.
- The clock will automatically adjust the time based on the selected time zone after WWVB synchronization.
Pairing Outdoor Sensor:
The outdoor sensor should automatically pair with the main unit after battery installation. If it does not, or if the outdoor temperature is not displayed:

Image: The atomic clock displaying both indoor and outdoor temperatures, with an illustration showing the placement of the outdoor sensor.
- Ensure both the main unit and the outdoor sensor have fresh batteries.
- Place the outdoor sensor within 100.6 meters (330 feet) of the main unit.
- Press the "WWVB SEARCH" button on the main unit to initiate a search for the outdoor sensor signal.
- On the outdoor sensor, there might be a small reset button or channel switch (A, B, C). Ensure the channel switch on the sensor matches the setting on the main unit (if applicable, refer to the back of the clock for 'A B C' switch).
- Avoid placing the outdoor sensor in direct sunlight or rain to ensure accurate readings and longevity.
Operating Instructions
Display Modes:
- Temperature Units: Press the "UP" button to switch between Celsius (°C) and Fahrenheit (°F) for both indoor and outdoor temperatures simultaneously.
- Time Format: The clock supports 12-hour (AM/PM) and 24-hour (military) time formats. Press the "DOWN" button to toggle between these formats.
Setting the Alarm:
- Press and hold the "ALARM SET" button for 2 seconds to enter alarm setting mode. The alarm hour will flash.
- Use the "UP" or "DOWN" buttons to adjust the hour.
- Press "ALARM SET" again to confirm the hour and move to the alarm minute setting. The alarm minute will flash.
- Use the "UP" or "DOWN" buttons to adjust the minute.
- Press "ALARM SET" again to confirm and exit alarm setting mode.
To activate or deactivate the alarm, press the "ALARM SET" button once. An alarm icon will appear on the display when the alarm is active.
When the alarm sounds, press any button (except "ALARM SET" again) to activate the snooze function. The alarm will sound again after approximately 5 minutes. To stop the alarm completely, press the "ALARM SET" button during the alarm sound or snooze period.
Daylight Saving Time (DST):
The clock features automatic DST adjustment. When DST is enabled, the clock will automatically advance or fall back by one hour at the appropriate times. A "DST" icon will be displayed when active.
To manually enable or disable DST, press the "TIME SET" button once. The DST icon will appear or disappear accordingly.
Manual Time/Date Setting (If WWVB signal is unavailable):
While the atomic clock function is preferred, you can manually set the time and date if needed.
- Press and hold the "TIME SET" button for 2 seconds. The year will begin to flash.
- Use "UP" or "DOWN" buttons to adjust the year. Press "TIME SET" to confirm and move to the next setting.
- Repeat this process for Month, Day, Hour, and Minute.
- After setting the minute, press "TIME SET" to exit manual setting mode.
Placement and Mounting

Image: The WallarGe Atomic Clock shown in two common placements: mounted on a wall and standing on a table using its foldable stand.
Main Unit:
- Tabletop Placement: Extend the foldable stand located on the back of the unit to place it on any flat surface.
- Wall Mounting: Use the integrated hanging hole on the back of the unit to mount it on a wall using a screw (not included).
- For optimal WWVB signal reception, place the clock near a window and away from large metal objects or strong electromagnetic interference sources.
Outdoor Sensor:
- Mount the outdoor sensor in a shaded, dry location, protected from direct sunlight and rain.
- Ensure it is within the 100.6 meter (330 feet) transmission range of the main unit.
- Avoid placing it near large metal structures, electrical appliances, or sources of heat/cold that could affect temperature readings.
Maintenance
- Clean the clock and sensor with a soft, dry cloth. Do not use abrasive cleaners or solvents.
- Replace batteries promptly when the low battery indicator appears to ensure continuous operation and accurate readings.
- If the unit will not be used for an extended period, remove the batteries to prevent leakage.
- Do not expose the units to extreme temperatures, humidity, or shock.
Troubleshooting
| Problem | Possible Cause | Solution |
|---|---|---|
| Clock not displaying time/blank screen. | No batteries or incorrect battery polarity. | Insert fresh batteries with correct polarity. |
| Time is incorrect or not setting automatically. | Poor WWVB signal reception; incorrect time zone. |
|
| Outdoor temperature not displayed or inaccurate. | Sensor out of range; low sensor battery; interference; sensor exposed to direct elements. |
|
| Alarm not sounding. | Alarm not activated; alarm volume too low (if adjustable, though not specified here). | Ensure alarm icon is displayed (press "ALARM SET" once to activate). |
Specifications
| Feature | Detail |
|---|---|
| Model Number | CL7001-B5 |
| Main Unit Power | 3 x AAA batteries (not included) |
| Outdoor Sensor Power | 2 x AA batteries (not included) |
| Wireless Transmission Range | Up to 100.6 meters (330 feet) in open air |
| Time Zones Supported | EST, CST, MST, PST |
| Dimensions (Main Unit) | 17.78 x 3.81 x 13.21 cm (7 x 1.5 x 5.2 inches) |
| Weight (Main Unit) | 360 grams (0.79 lbs) |
| Material | Acrylonitrile Butadiene Styrene (ABS) |
Warranty and Support
Information regarding specific warranty terms and customer support contact details is not provided in the product description. Please refer to the product packaging or the seller's information on the purchase platform for warranty details and support contacts.
For general inquiries or troubleshooting assistance, you may visit the WallarGe brand page on Amazon or contact the seller directly through your order history.
Ask a question about this manual
Ask about setup, troubleshooting, compatibility, parts, safety, or missing instructions. Manuals+ will review the question and use this page’s manual context to help answer it.