1. Introduction
This user manual provides comprehensive instructions for the installation, operation, and maintenance of your ASUS Prime B650M-K Micro-ATX Motherboard. This motherboard is designed to support AMD Ryzen 7000 Series Desktop Processors, featuring DDR5 memory, PCIe 5.0 M.2 support, 2.5Gb Ethernet, HDMI, VGA, USB 3.2 Gen 2 rear ports, and USB 3.2 Gen 1 Type-C front connectivity. Please read this manual thoroughly before beginning installation to ensure proper setup and optimal performance.
2. Safety Information
Always observe the following safety precautions to prevent damage to the motherboard or injury to yourself:
- Static Electricity: Motherboards are sensitive to electrostatic discharge (ESD). Always wear an anti-static wrist strap or frequently touch a grounded metal object before handling the motherboard and its components.
- Power Disconnection: Ensure the power supply is disconnected from the wall outlet and the motherboard before installing or removing any components.
- Component Compatibility: Verify that all components (CPU, RAM, GPU, etc.) are compatible with the ASUS Prime B650M-K motherboard before installation. Refer to the official ASUS website for the latest compatibility lists.
- Proper Ventilation: Ensure adequate airflow within your PC case to prevent overheating of components.
- Handle with Care: Hold the motherboard by its edges and avoid touching sensitive components or circuits.
3. Package Contents
Verify that all items listed below are present in your motherboard package. If any item is missing or damaged, contact your retailer.
- ASUS Prime B650M-K Motherboard
- User Guide / Manual
- SATA 6 Gb/s cables (typically two)
- M.2 screw package
- M.2 rubber package
- I/O Shield (if not pre-mounted)
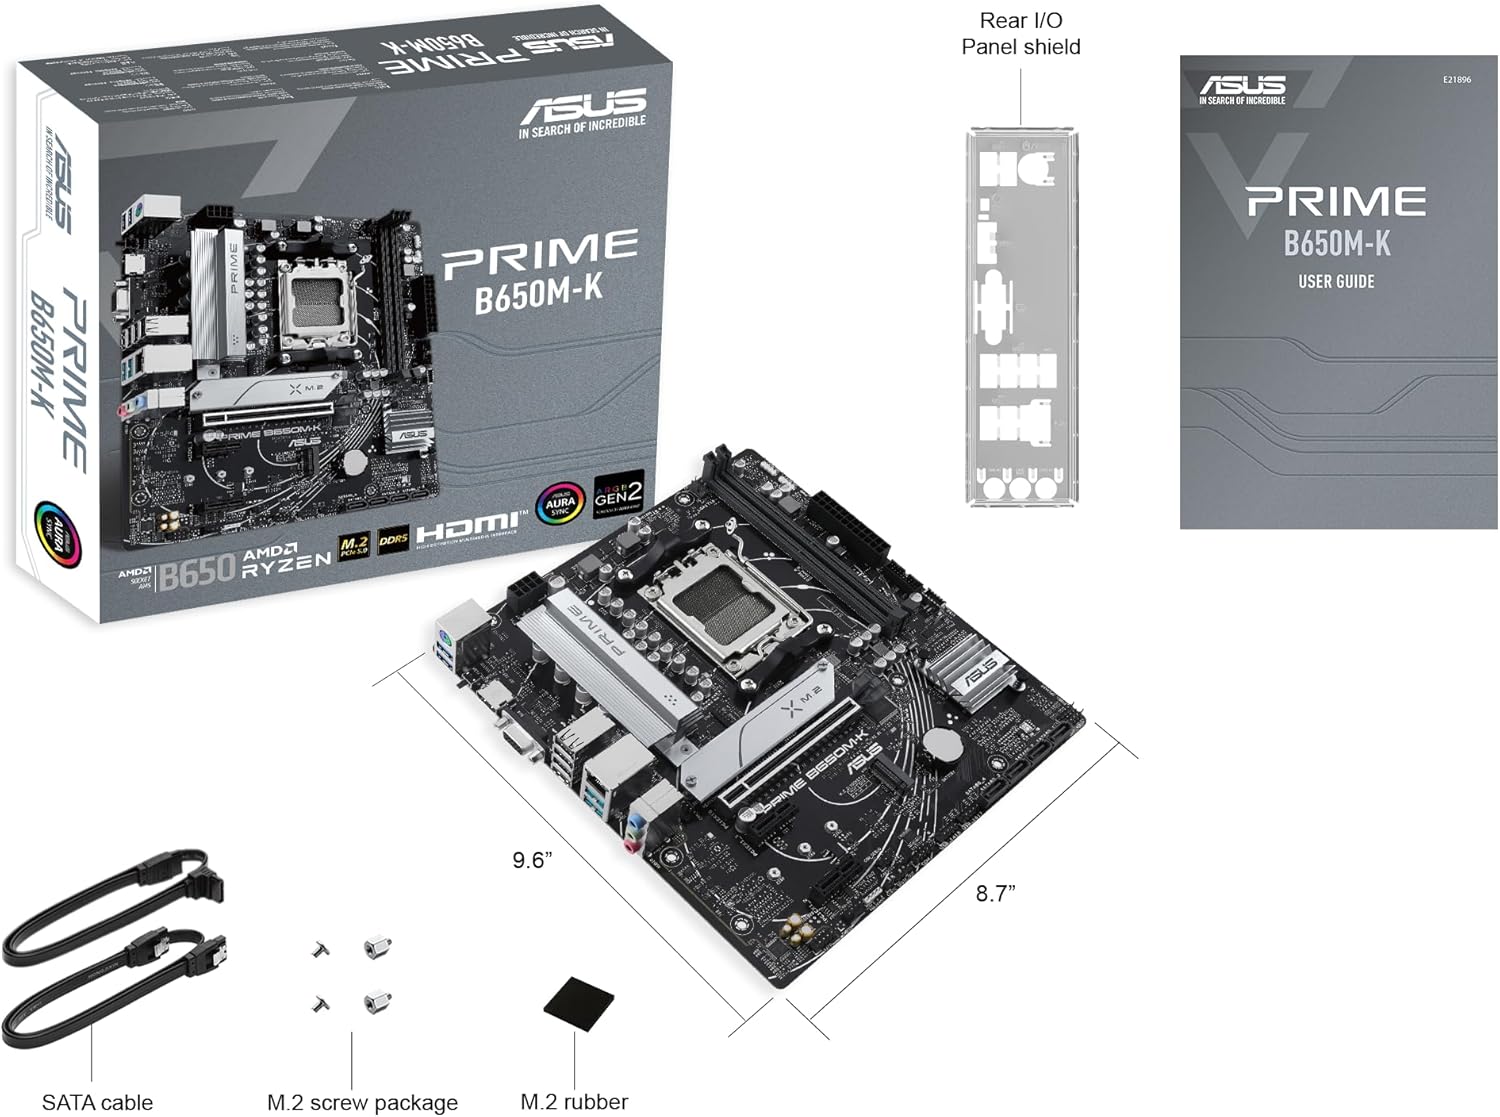
Image showing the ASUS Prime B650M-K motherboard, its retail box, I/O shield, SATA cables, M.2 screws, and M.2 rubber, illustrating the typical package contents.
4. Setup and Installation
Follow these steps carefully to install your motherboard and its components.
4.1. CPU Installation (AMD AM5 Socket)
- Locate the AM5 CPU socket on the motherboard.
- Gently push down the load lever and pull it away from the socket to open the retention frame.
- Align the triangular mark on the CPU with the triangular mark on the socket. Carefully place the CPU into the socket without forcing it.
- Close the retention frame and push the load lever back into its original position until it clicks.
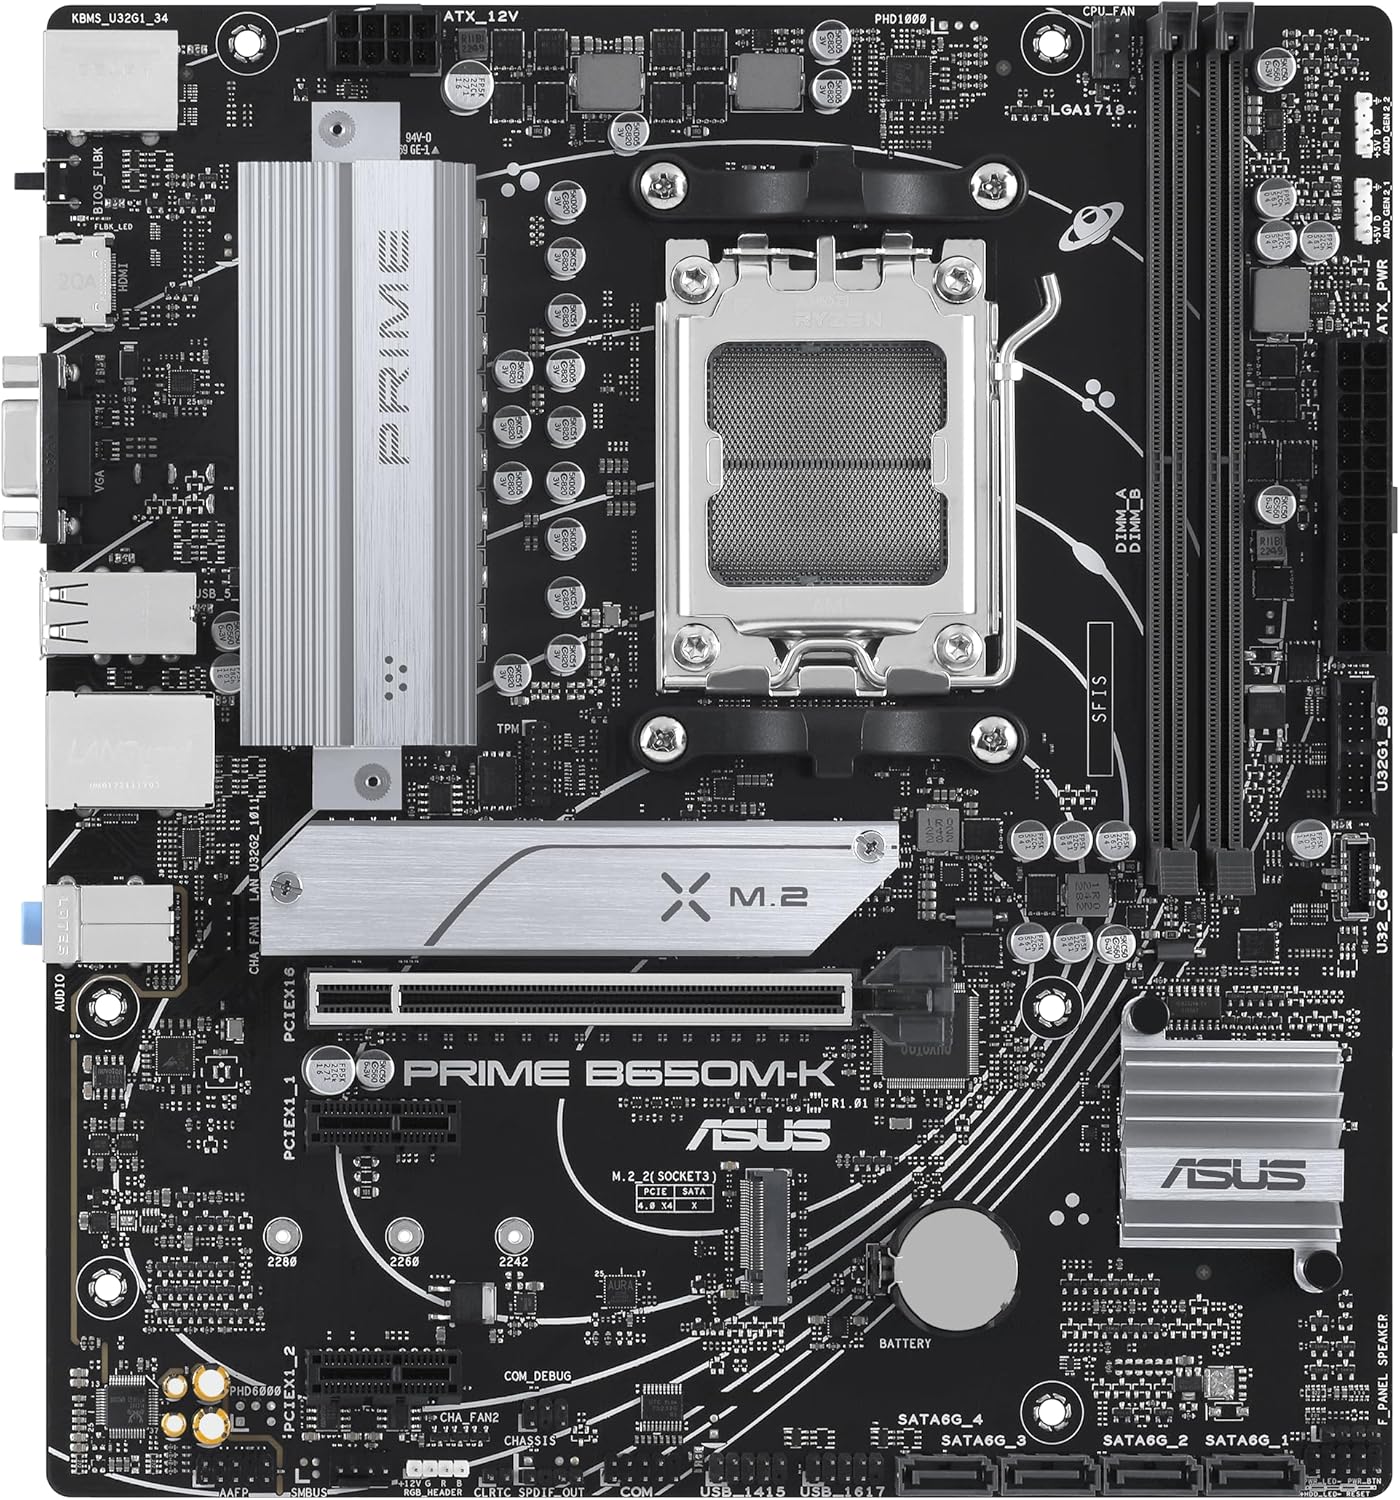
A detailed top-down view of the ASUS Prime B650M-K motherboard, highlighting the central AM5 CPU socket and surrounding components like RAM slots and M.2 slots.
4.2. CPU Cooler Installation
Install your CPU cooler according to its manufacturer's instructions. Ensure proper contact between the cooler's base and the CPU's integrated heat spreader (IHS), applying thermal paste if necessary.
4.3. Memory (DDR5 RAM) Installation
- Open the clips at both ends of the DDR5 DIMM slots.
- Align the notch on the DDR5 memory module with the key in the DIMM slot.
- Insert the memory module firmly into the slot until the clips snap into place. Ensure both clips are fully closed.
- For dual-channel configuration, refer to your motherboard's specific manual for recommended slot pairing (e.g., A2 and B2).
4.4. Storage Device Installation (M.2 SSDs and SATA Drives)
4.4.1. M.2 SSD Installation
- Locate the M.2 slots on the motherboard. The Prime B650M-K supports PCIe 5.0 M.2.
- Remove the M.2 screw and stand-off from the desired slot.
- Insert the M.2 SSD into the slot at a 30-degree angle.
- Gently push down the M.2 SSD and secure it with the M.2 screw and/or rubber provided in the package.
4.4.2. SATA Drive Installation
- Connect one end of the SATA data cable to a SATA 6 Gb/s port on the motherboard.
- Connect the other end of the SATA data cable to your SATA hard drive or SSD.
- Connect a SATA power cable from your power supply to the SATA drive.
4.5. Expansion Card Installation (PCIe)
- Locate the PCIe slots. The primary slot is typically for a graphics card.
- Remove the corresponding expansion slot cover from your PC case.
- Align the expansion card with the PCIe slot and press down firmly until it is fully seated.
- Secure the card to the case with a screw.
4.6. Power Connections
Connect the following power cables from your power supply to the motherboard:
- 24-pin ATX Power Connector: Located along the right edge of the motherboard.
- 8-pin (or 4+4-pin) ATX 12V Power Connector: Located near the CPU socket, typically at the top-left.
4.7. Front Panel Connections
Connect the cables from your PC case's front panel to the corresponding headers on the motherboard. Refer to the motherboard diagram for exact locations:
- USB 3.2 Gen 1 Type-C Front Panel Connector: For front USB-C ports.
- USB 3.2 Gen 1 Header: For front USB 3.0/3.1 Type-A ports.
- USB 2.0 Headers: For front USB 2.0 ports.
- Front Panel Audio Header (AAFP): For front audio jacks.
- System Panel Header (F_PANEL): For power button, reset button, HDD LED, power LED. Pay close attention to polarity.
4.8. Rear I/O Connections
After installing the motherboard into the case, connect your peripherals to the rear I/O ports:
- USB Ports: Connect keyboards, mice, and other USB devices. The Prime B650M-K features USB 3.2 Gen 2 rear ports.
- Ethernet Port: Connect your network cable for 2.5Gb Ethernet.
- Video Outputs: Connect your monitor to the HDMI or VGA port if using an integrated GPU.
- Audio Jacks: Connect speakers, headphones, or microphones.
- PS/2 Combo Port: For legacy keyboards or mice.
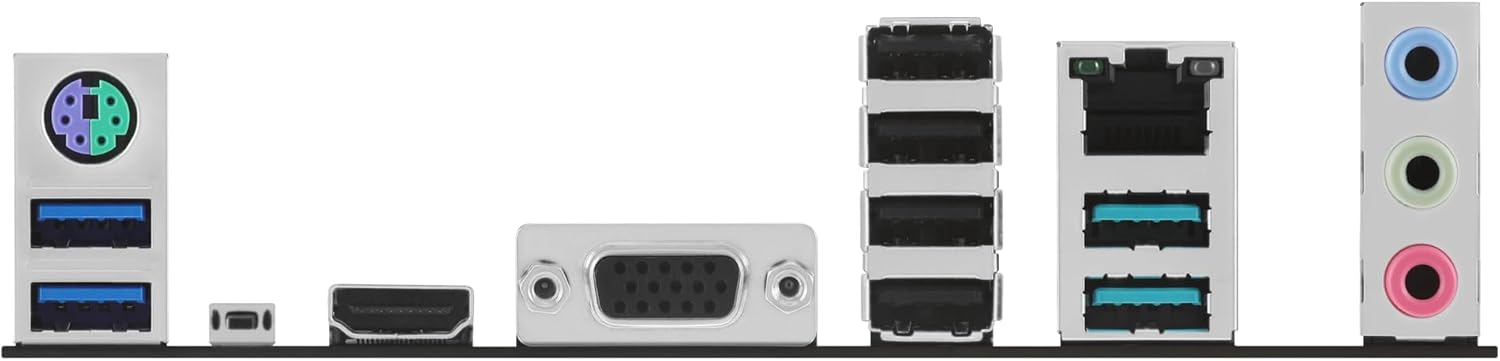
Close-up view of the rear input/output (I/O) panel of the ASUS Prime B650M-K motherboard, showing various ports including USB, Ethernet, HDMI, VGA, and audio jacks.
5. Operating Your Motherboard
5.1. First Boot and BIOS/UEFI Setup
After assembling your system, connect a monitor, keyboard, and mouse. Power on your PC.
- During startup, repeatedly press the DEL key or F2 key to enter the BIOS/UEFI setup utility.
- In the BIOS/UEFI, you can configure boot order, system time, enable/disable integrated peripherals, and adjust performance settings.
- Ensure your storage drive with the operating system is set as the primary boot device.
- Save changes and exit the BIOS/UEFI to boot into your operating system.
5.2. Driver Installation
After installing your operating system, install the necessary drivers for your motherboard components. These typically include:
- Chipset Drivers
- LAN (Ethernet) Drivers
- Audio Drivers
- USB Drivers (if applicable)
- Graphics Drivers (for integrated or discrete GPU)
Drivers can be found on the official ASUS support website for your specific motherboard model.
6. Maintenance
6.1. Cleaning
Regular cleaning helps maintain optimal performance and longevity of your motherboard:
- Dust Removal: Use compressed air to remove dust from fans, heatsinks, and other components. Do this in a well-ventilated area.
- Component Inspection: Periodically check for loose cables or components.
- Power Off: Always power down and unplug your PC before cleaning.
6.2. BIOS/UEFI Updates
BIOS/UEFI updates can improve system stability, add support for new CPUs or features, and fix bugs. Refer to the ASUS support website for the latest BIOS versions and update instructions. ASUS motherboards often support BIOS FlashBack™ for easy updates.
7. Troubleshooting
This section addresses common issues you might encounter.
| Problem | Possible Cause | Solution |
|---|---|---|
| System does not power on. | Loose power cables, faulty power supply, incorrect front panel connections. | Check 24-pin and 8-pin CPU power connections. Verify front panel power button connection. Test power supply. |
| No display output. | Monitor not connected, faulty GPU, incorrect video output selected, RAM issues. | Ensure monitor is connected to the correct port (motherboard or discrete GPU). Reseat RAM modules. Test with another GPU if available. |
| System reboots unexpectedly or crashes. | Overheating, unstable overclock, faulty RAM, driver issues. | Check CPU/GPU temperatures. Reset BIOS to default settings. Run memory diagnostic tools. Update drivers. |
| Operating system not found. | Incorrect boot order, loose storage drive connection, corrupted OS. | Check boot order in BIOS/UEFI. Reseat SATA/M.2 cables. Reinstall OS if necessary. |
8. Specifications
Key technical specifications for the ASUS Prime B650M-K Motherboard:
| Feature | Detail |
|---|---|
| CPU Socket | AMD AM5 Socket |
| Chipset | AMD B650 |
| Memory | DDR5, Dual Channel, up to 6400+ (OC) MHz |
| Expansion Slots | 1 x PCIe 4.0 x16, 2 x PCIe 3.0 x1 |
| Storage | 1 x M.2 slot (PCIe 5.0 x4), 1 x M.2 slot (PCIe 4.0 x4), 4 x SATA 6Gb/s ports |
| Ethernet | Realtek 2.5Gb Ethernet |
| Video Output | HDMI, VGA |
| USB Ports (Rear) | USB 3.2 Gen 2, USB 2.0 |
| USB Ports (Front) | USB 3.2 Gen 1 Type-C, USB 3.2 Gen 1, USB 2.0 |
| Audio | Realtek 7.1 Surround Sound High Definition Audio CODEC |
| Form Factor | Micro-ATX (24.4 cm x 24.4 cm) |
9. Warranty and Support
9.1. Warranty Information
ASUS products come with a limited warranty. The duration and terms of the warranty may vary by region and product type. Please refer to the warranty card included with your product or visit the official ASUS website for detailed warranty information specific to your region.
9.2. Technical Support
For technical assistance, driver downloads, BIOS updates, or further information, please visit the official ASUS support website:
When contacting support, please have your product model name (ASUS Prime B650M-K) and serial number ready.


