1. Introduction
Thank you for choosing the MOUNT PRO Dual Monitor Wall Mount. This manual provides essential information for the safe and efficient installation, operation, and maintenance of your new monitor mount. Please read all instructions carefully before beginning installation and retain this manual for future reference.
Important Safety Warning: Do not mount to drywall alone! This mount requires installation into a solid wood stud, concrete wall, or brick wall for secure support. Failure to follow these instructions may result in property damage or personal injury.

Image: MOUNT PRO Dual Monitor Wall Mount. This image displays the full assembly of the dual monitor wall mount, showcasing its articulating arms and VESA mounting plates, ready for installation.
2. Package Contents
Please verify that all components are present before proceeding with installation. If any parts are missing or damaged, contact MOUNT PRO customer support.
- Dual Monitor Wall Mount Assembly (Main Arm and Wall Plate)
- VESA Monitor Plates (2x)
- Mounting Hardware Kit (Screws, Washers, Spacers for Wall and Monitor)
- Wall Anchors (for Concrete/Brick Walls)
- Hex Keys / Allen Wrenches (for adjustments)
- Cable Management Clips
- User Manual (this document)
3. Setup and Installation
For detailed, step-by-step installation instructions, please refer to the official Installation Manual PDF: Download Installation Manual (PDF).
Pre-Installation Checks:
- Wall Type: Ensure your wall is suitable for mounting. This mount is designed for wood studs, concrete walls, or brick walls. DO NOT install on drywall alone.
- Monitor Compatibility: Verify your monitors meet the specifications:
- Screen Size: 13 to 32 inches
- Weight Capacity: 4.4 to 17.6 lbs (2 kg to 8 kg) per arm
- VESA Pattern: 75x75mm or 100x100mm

Image: Wall Compatibility. This graphic illustrates the compatible wall types for installation: wood stud, concrete wall, and brick wall, emphasizing that drywall alone is not sufficient.
General Installation Steps:
- Locate Wall Studs: Use a stud finder to accurately locate the center of a wood stud. For concrete/brick walls, mark your desired drilling locations.
- Attach Wall Plate: Secure the wall plate to the wall using the appropriate hardware for your wall type. Ensure it is level and firmly attached.
- Attach VESA Plates to Monitors: Fasten the VESA plates to the back of your monitors using the provided screws and spacers that fit your monitor's VESA holes.
- Mount Monitors to Arms: Carefully slide the monitors (with VESA plates attached) onto the monitor arms. Ensure they are securely locked in place.
- Adjust Gas Spring Tension: Once monitors are mounted, adjust the gas spring tension using the provided hex key to match your monitor's weight. This ensures smooth and stable height adjustment.
4. Operating and Adjustments
The MOUNT PRO Dual Monitor Wall Mount offers full motion adjustability for an ergonomic and comfortable viewing experience.
Key Adjustments:
- Height Adjustment: The gas spring arms allow for smooth vertical movement. Adjust the tension if the monitor sags or springs up too quickly.
- Tilt: Tilt your monitors up to +90° or down to -90° to reduce glare and optimize viewing angles.
- Swivel: Swivel the monitors up to 180° horizontally to share your screen with others or adjust for different seating positions.
- Rotation: Rotate your monitors 360° to switch between landscape and portrait orientations.
- Extension: Extend or retract the arms to bring the monitors closer or push them further away from the wall.

Image: Easy Adjustment. This image illustrates how to adjust the gas spring tension for monitor height and the tilt angle of the monitor, showing the tools and directions for adjustment.

Image: Perfect View from Anywhere. This graphic demonstrates the extensive tilt and 360-degree rotation capabilities of the monitor mount, allowing for versatile screen positioning.
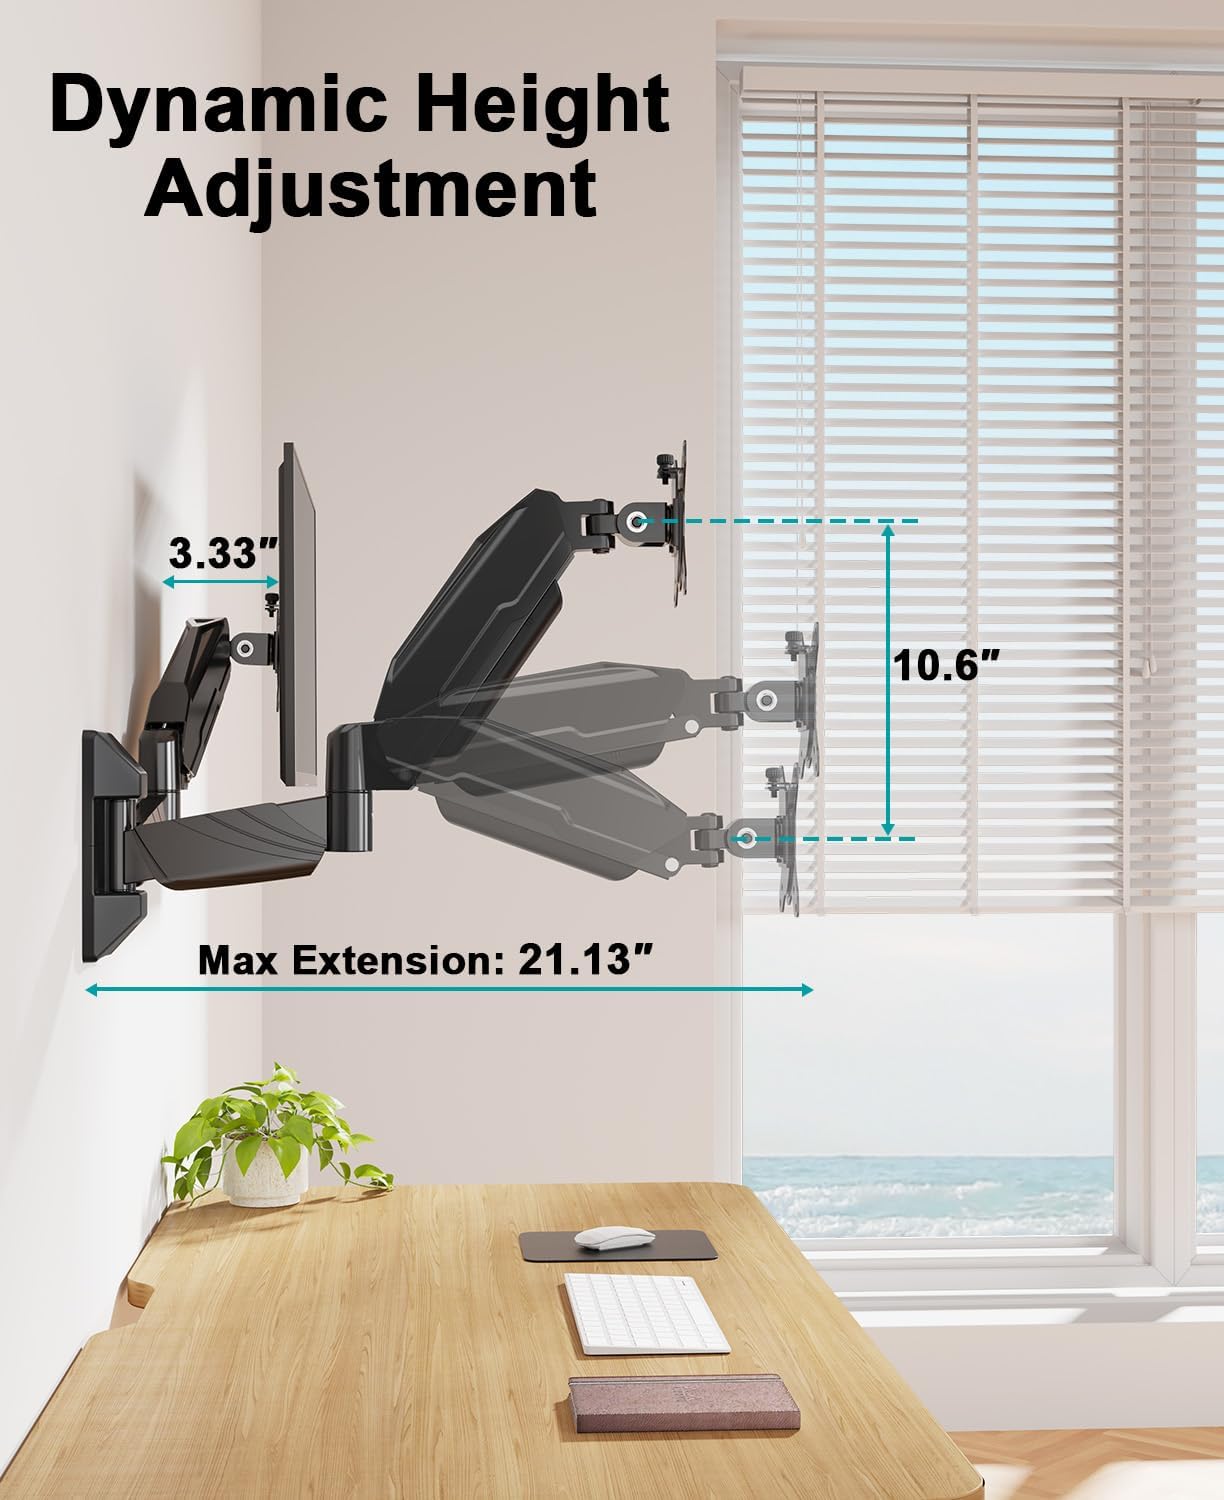
Image: Dynamic Height Adjustment. This image shows the range of vertical height adjustment and maximum extension of the monitor arms from the wall.

Image: Multiple Monitor Configurations. This composite image displays various possible arrangements for two monitors using the wall mount, including side-by-side landscape, stacked portrait, and mixed orientations.
5. Maintenance
To ensure the longevity and optimal performance of your MOUNT PRO Dual Monitor Wall Mount, follow these maintenance guidelines:
- Cleaning: Wipe the mount surfaces with a soft, damp cloth. Avoid abrasive cleaners or solvents that could damage the finish.
- Periodic Checks: Periodically check all screws and connections to ensure they remain tight and secure. Re-tighten if necessary.
- Gas Spring Adjustment: If your monitor feels too loose or too stiff, re-adjust the gas spring tension as described in the Operating section.
6. Troubleshooting
If you encounter issues with your MOUNT PRO Dual Monitor Wall Mount, refer to the following common problems and solutions:
| Problem | Possible Cause | Solution |
|---|---|---|
| Monitor sags or drops | Gas spring tension is too low for monitor weight. | Increase gas spring tension (turn clockwise) using the provided hex key. |
| Monitor springs up too quickly | Gas spring tension is too high for monitor weight. | Decrease gas spring tension (turn counter-clockwise) using the provided hex key. |
| Monitor cannot be tilted | Tilt bolt is too tight or too loose. | Loosen the tilt bolt slightly to adjust, then re-tighten to secure. |
| Mount feels unstable on the wall | Improper wall installation or loose wall plate screws. | Ensure the wall plate is securely fastened to a stud or appropriate wall material. Re-tighten all wall mounting screws. Do not use if unstable. |
7. Specifications
| Brand | MOUNT PRO |
| Model | MP-DMW01 |
| Mounting Type | Wall Mount |
| Material | Aluminum |
| Color | Black |
| Compatible Screen Sizes | 13 - 32 inches |
| Weight Capacity (per arm) | 4.4 - 17.6 lbs (2 - 8 kg) |
| VESA Compatibility | 75x75mm, 100x100mm |
| Movement Type | Articulating, Rotate, Swivel, Tilt |
| Maximum Tilt Angle | ±90 Degrees |
| Product Dimensions (folded) | 17.28 x 13.7 x 2.56 inches |
| Item Weight | 8.45 pounds |

Image: Display Compatibility. This graphic summarizes the key compatibility specifications including screen size range (13-32 inches), load capacity (4.4-17.6 lbs per arm), and VESA sizes (75x75mm / 100x100mm).
8. Warranty and Support
MOUNT PRO products are manufactured with quality and durability in mind. For specific warranty information, please refer to the documentation included with your product or visit the official MOUNT PRO website.
If you require technical assistance, have questions about installation, or need to report a missing/damaged part, please contact MOUNT PRO customer support through the retailer's platform or the manufacturer's official contact channels.


