
1. Introduction
This manual provides detailed instructions for the setup, operation, and maintenance of your JIAN BOLAND Fingerprint Time Clock, Model A2. This device is designed for efficient and paperless employee time tracking in small and medium-sized businesses, offering biometric identification for accurate record-keeping.

Figure 1.1: JIAN BOLAND Fingerprint Time Clock Model A2 in operation.
Key Features:
- Fingerprint and Password Identification: Supports up to 1000 fingerprints and 100,000 record capacity.
- No Monthly Fees: Operates without recurring software or service charges.
- Data Backup: Built-in backup protects time data against power failure.
- Automatic Attendance Reports: Generates Excel attendance reports directly via USB.
- Multi-language Support: Voice prompts and interface available in English, Spanish, and Portuguese.
- Easy Installation: Designed for wall mounting or desk placement.
2. Product Components and Overview
Familiarize yourself with the components of your time clock and the included accessories.
Device Layout:
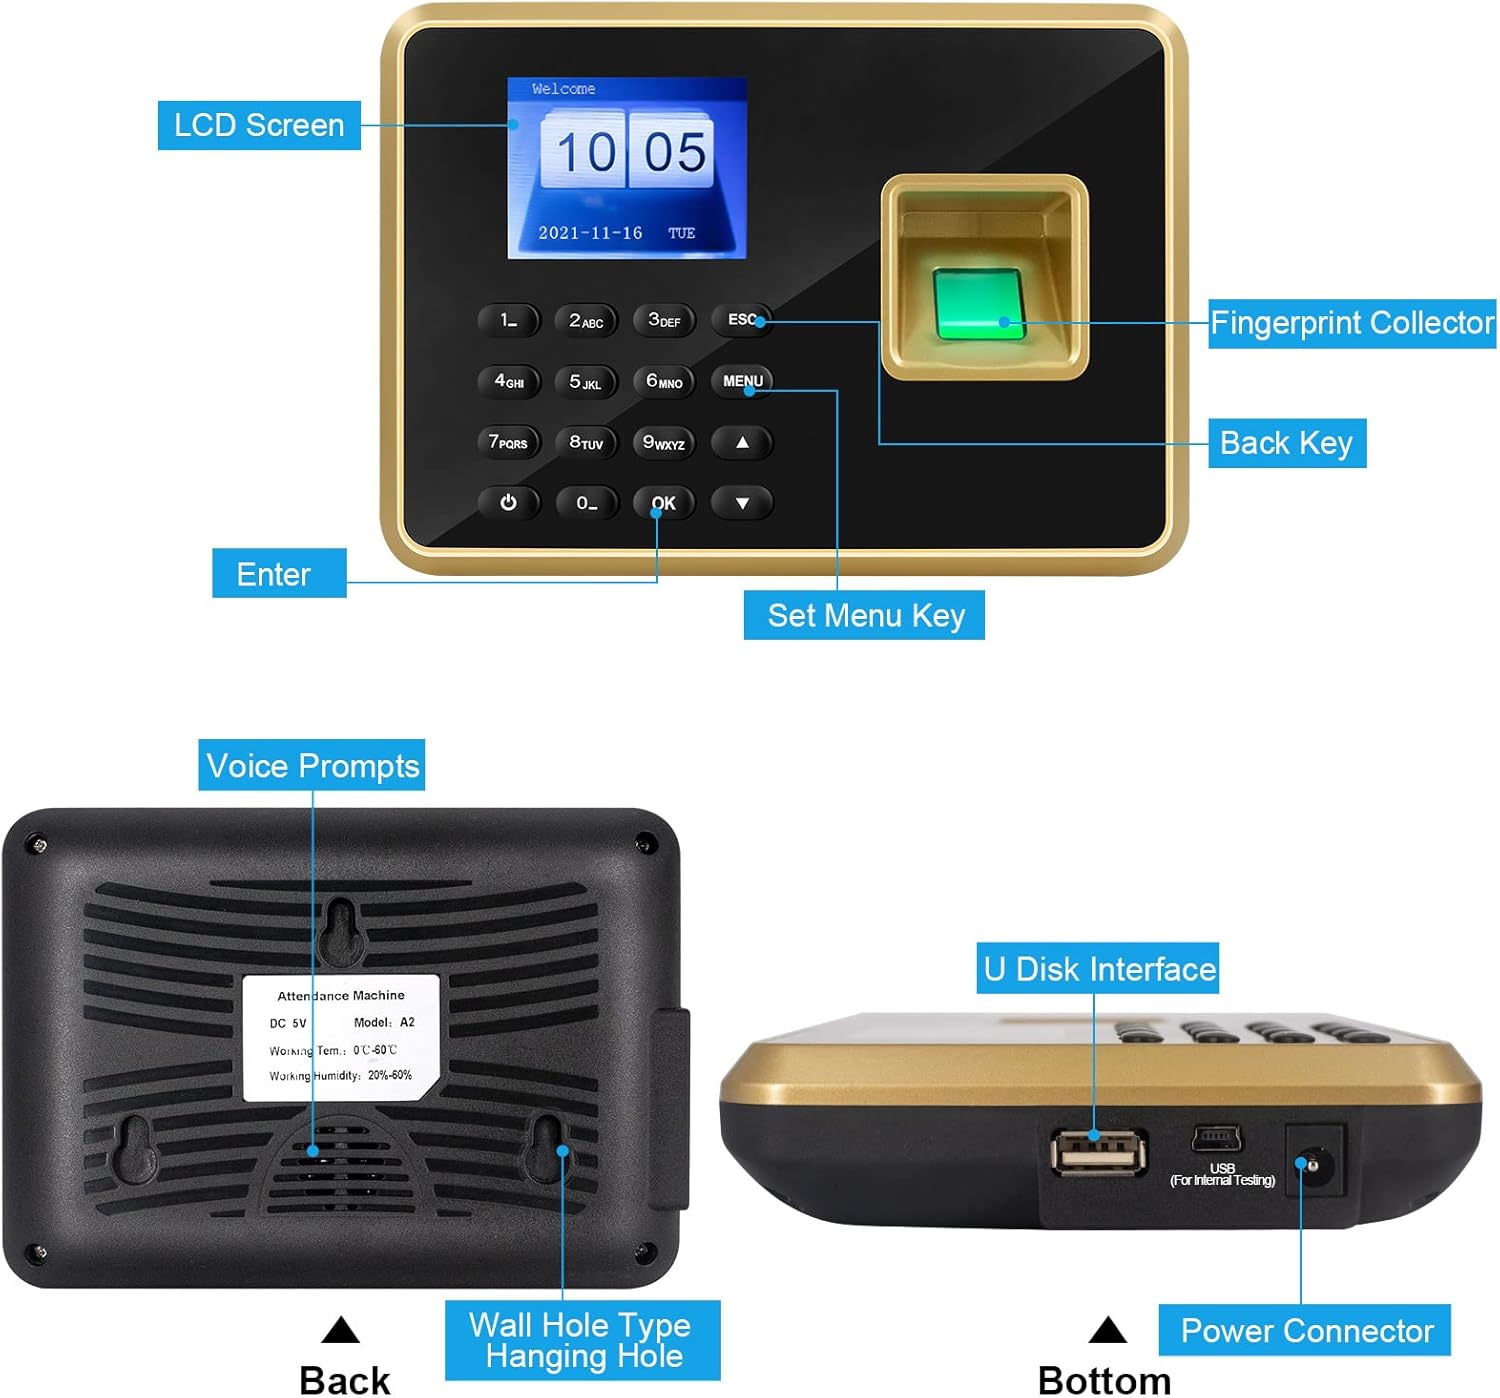
Figure 2.1: Front, back, and bottom views of the time clock with labeled components.
- LCD Screen: Displays time, date, and menu options.
- Fingerprint Collector: Area for scanning fingerprints.
- Keypad: For navigation and data entry.
- U Disk Interface (USB Port): For downloading attendance data.
- Power Connector: For connecting the power adapter.
- Wall Hole Type Hanging Hole: For wall mounting.
Included Accessories:

Figure 2.2: Contents of the product package.
- Fingerprint Time Clock Unit
- Power Cable
- Mounting Screws
- 8GB USB Flash Drive
- User Manual (this document)
3. Setup
Follow these steps for initial setup of your time clock.
3.1 Powering On and Initial Configuration
- Connect Power: Plug the power adapter into the time clock's power connector and then into a wall outlet. The device will power on automatically.
- Set Date and Time: Upon first power-on, you may need to set the correct date and time. Navigate through the menu using the keypad. Refer to the "Device Setting" section in the operating instructions for detailed steps.
- Administrator Registration: It is recommended to register at least one administrator fingerprint and password immediately to secure the device and access advanced settings.
3.2 Mounting the Device
The time clock can be placed on a desk or mounted on a wall.
- Desk Placement: Simply place the device on a stable, flat surface.
- Wall Mounting: Use the provided screws and the wall hole type hanging hole on the back of the device to securely mount it to a wall. Ensure the mounting surface is stable and the device is at a convenient height for users.
4. Operating Instructions
This section details the daily operation and management of the time clock.
4.1 Menu Navigation
Use the keypad to navigate the menu:
- MENU: Press to enter the main menu.
- UP/DOWN Arrows: Navigate through menu options.
- OK: Confirm selection.
- ESC: Go back to the previous menu or exit.
4.2 Setting Shifts and Departments
Before registering employees, configure your company's shifts and departments.

Figure 4.1: Setting Shift Schedule.
- Press MENU.
- Select "Device Setting" and press OK.
- Select "Att.Rule" and press OK.
- Select "Shift Schedule" to edit shift names and times (e.g., AM IN, AM OUT, PM IN, PM OUT).

Figure 4.2: Setting Departments.
- From "Att.Rule", select "Set Dept" and press OK.
- Choose an existing department or use the keypad to enter a new department name.
- Assign a shift name to the department.
4.3 Registering Users (Employees)
Each employee needs to be registered with their fingerprint and/or password.

Figure 4.3: Fingerprint registration process.

Figure 4.4: User Registration Menu.
- Press MENU.
- Select "Employee" and press OK.
- Select "Register" and press OK.
- Enter the employee's ID, Name, and assign them to a Department.
- Register Fingerprint: Follow the on-screen prompts to place the employee's finger on the scanner multiple times until registered.
- Optionally, set a password for the employee.
4.4 Punching In/Out
Employees can punch in or out using their registered fingerprint or password.
- Fingerprint: Place a registered finger on the fingerprint collector. The device will confirm the punch with a voice prompt.
- Password: Enter the employee ID, then press OK, enter the password, and press OK.
4.5 Setting Attendance Rules
Configure rules for late arrivals and early departures.

Figure 4.5: Setting Attendance Rules.
- Press MENU.
- Select "Device Setting" and press OK.
- Select "Att.Rule" and press OK.
- Select "Statistic Rule" to set the allowable late and early times.
4.6 Downloading Attendance Reports
Attendance data can be downloaded to the provided USB flash drive.

Figure 4.6: Downloading attendance data via USB.

Figure 4.7: Downloading Attendance Report Menu.
- Ensure the USB flash drive is formatted to FAT32.
- Insert the USB flash drive into the U Disk Interface on the side of the time clock.
- Press MENU.
- Select "U-Down" and press OK.
- Select "Attn.Report" (Attendance Report) or "Att Rec" (Attendance Record) or "UserInfo" (User Information) and press OK.
- Specify the desired start and end dates for the report.
- Press OK to initiate the download. The report will be saved as an Excel file on the USB drive.
5. Maintenance
Proper maintenance ensures the longevity and optimal performance of your time clock.
5.1 Cleaning
- Wipe the device, especially the fingerprint collector and LCD screen, with a soft, dry cloth.
- Do not use abrasive cleaners, solvents, or spray liquids directly onto the device.
5.2 Data Backup
- Regularly download attendance reports to your computer using the USB flash drive. This creates an external backup of your data.
- The device has a built-in backup for internal data, but external backups are crucial for data security.
6. Troubleshooting
Refer to this section for solutions to common issues.
Common Issues and Solutions:
- Fingerprint Not Recognized:
- Ensure your finger is clean and dry.
- Place your finger flat and centered on the scanner.
- Try re-registering your fingerprint if the issue persists.
- Ensure the fingerprint collector is clean.
- Cannot Access Menu:
- Ensure you are logged in as an administrator.
- If no administrator is set, you may need to reset the device (consult support for this advanced procedure).
- USB Data Download Failure:
- Ensure the USB flash drive is correctly inserted.
- Verify the USB drive is formatted to FAT32.
- Try a different USB flash drive.
- Incorrect Time/Date:
- Access "Device Setting" in the menu to manually adjust the time and date.
- Check for daylight saving settings if applicable.
7. Specifications
Technical specifications for the JIAN BOLAND Fingerprint Time Clock Model A2.
| Feature | Specification |
|---|---|
| Brand | JIAN BOLAND |
| Model Number | A2 |
| Display Type | Digital |
| Power Source | Corded Electric |
| Mounting Type | Wall Mount |
| Operation Mode | Electrical |
| Product Dimensions | 4.5 x 1.5 x 7 inches |
| Item Weight | 1.04 pounds |
| Material | Acrylonitrile Butadiene Styrene |
| Fingerprint Capacity | Up to 1000 |
| Record Capacity | Up to 100,000 |
| Data Output | USB (Excel format) |
8. Warranty and Support
For any questions, technical assistance, or warranty inquiries regarding your JIAN BOLAND Fingerprint Time Clock Model A2, please contact the seller or manufacturer directly through your purchase platform. Ensure you have your product model number (A2) and purchase details available when seeking support.