
STINGER MT15001
STINGER Audio MT15001 Monoblock Car Amplifier User Manual
Model: MT15001
Introduction
Thank you for choosing the STINGER Audio MT15001 Monoblock Car Amplifier. This Class D amplifier is designed to deliver powerful and clear audio for your car's subwoofer system. This manual provides detailed instructions for installation, operation, maintenance, and troubleshooting to ensure optimal performance and longevity of your amplifier.
Safety Information
Always observe the following safety precautions during installation and operation:
- Disconnect the vehicle's negative battery terminal before starting any electrical work.
- Ensure proper grounding to the vehicle chassis.
- Use appropriate gauge wiring as specified (4-gauge for power/ground).
- Avoid installing the amplifier in areas exposed to direct sunlight, excessive heat, moisture, or dust.
- Securely mount the amplifier to prevent movement during vehicle operation.
- Do not open the amplifier casing; there are no user-serviceable parts inside. Refer servicing to qualified personnel.
- Protect all wiring from sharp edges and moving parts.
What's in the Box
Verify that all components are present:
- 1 x STINGER Audio MT15001 Monoblock Amplifier
- 1 x Remote Bass Control Knob
- 1 x Remote Bass Control Cable
- 1 x 4-Gauge Amplifier Wiring Kit (includes power cable, ground cable, remote turn-on wire, RCA cables, speaker wire, fuse holder, and terminals)
- User Manual (this document)

Image: The STINGER Audio MT15001 amplifier shown alongside the included 4-gauge wiring kit, which contains power cables, RCA cables, and a remote bass control.

Image: A detailed view of the components included in the 4-gauge amplifier wiring kit, such as power and ground cables, RCA interconnects, and various terminals.
Product Features
- Digital Class-D Monoblock Amplifier: High-efficiency design for powerful subwoofer performance with a compact footprint.
- Robust Unregulated Power Supplies: Advanced pulse width modulator integrated circuits for improved performance and efficiency.
- Small Footprint and Sturdy Design: Precision metal potentiometer for tuning and durable construction.
- Remote Bass Controller Included: Provides convenient level control of bass from the listening position.
- 4 Gauge Amp Wiring Kit Included: High-quality materials for optimal performance and durability.
- Adjustable Filters: Features Low-Pass Filter (LPF), Subsonic Filter, and Bass Boost for fine-tuning sound.
- RCA and Bridge Inputs: Versatile input options for various audio setups.
Setup and Installation
Proper installation is crucial for optimal performance and safety. If you are unsure about any steps, consult a professional installer.
Mounting the Amplifier
Choose a mounting location that is dry, well-ventilated, and away from direct heat sources. Ensure sufficient space for wiring and air circulation. Secure the amplifier firmly to a solid surface using appropriate screws.
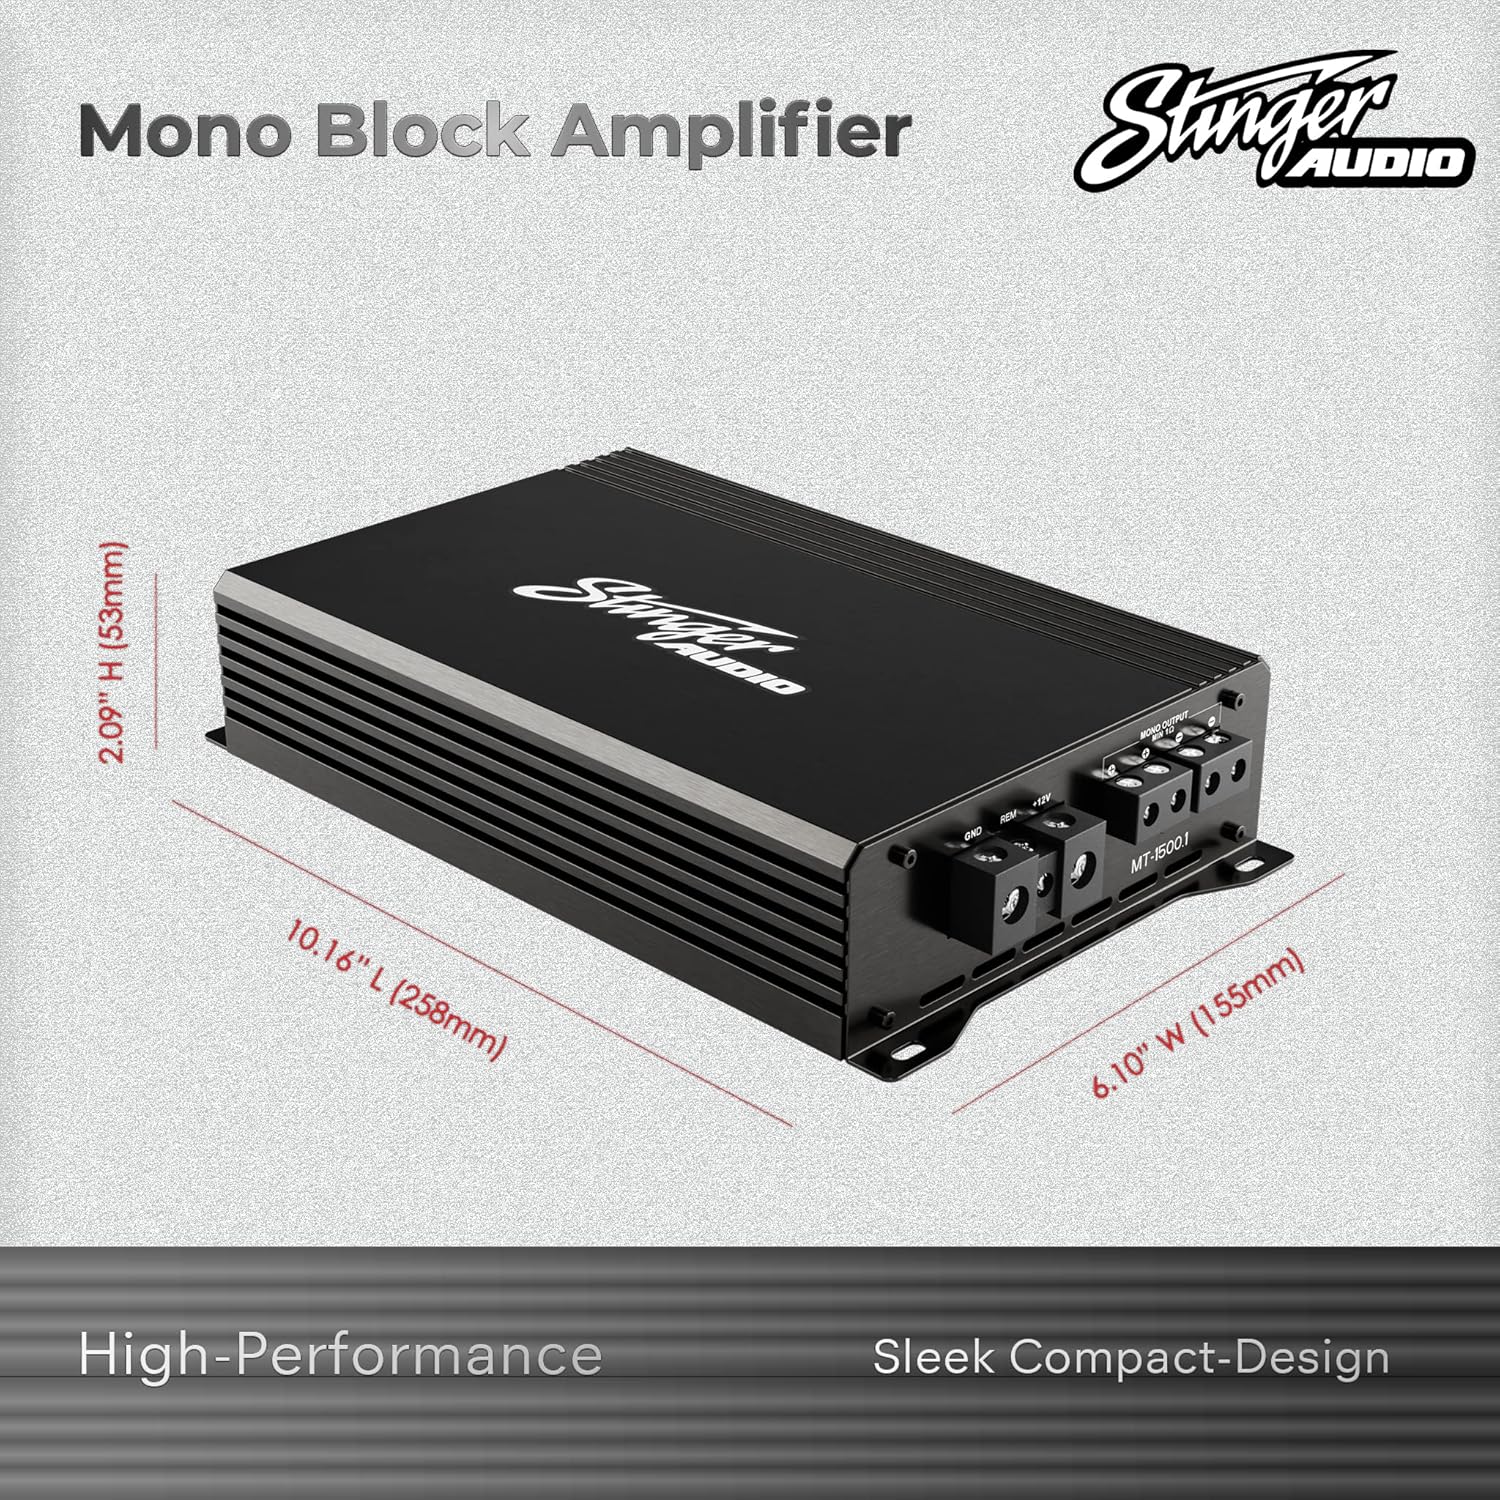
Image: A visual representation of the STINGER Audio MT15001 monoblock amplifier, highlighting its compact dimensions: 2.09" H (53mm), 10.16" L (258mm), and 6.10" W (155mm).
Wiring Connections
Follow these steps for wiring the amplifier:
- Power Connection (+12V): Run the 4-gauge power cable from the vehicle's positive battery terminal to the amplifier's +12V terminal. Install the included fuse holder within 18 inches (45 cm) of the battery.
- Ground Connection (GND): Run the 4-gauge ground cable from the amplifier's GND terminal to a clean, unpainted metal surface on the vehicle's chassis. Ensure a solid, low-resistance connection.
- Remote Turn-On Connection (REM): Connect a remote turn-on wire from your head unit's remote output to the amplifier's REM terminal. This wire turns the amplifier on and off with your head unit.
- RCA Input Connection: Connect the RCA cables from your head unit's subwoofer pre-out (or full-range pre-out if using the amplifier's LPF) to the amplifier's RCA INPUTs.
- Speaker Output Connection: Connect your subwoofer(s) to the amplifier's MONO OUTPUT terminals. Ensure correct polarity (+ to + and - to -). This amplifier is designed for a 1 Ohm load.
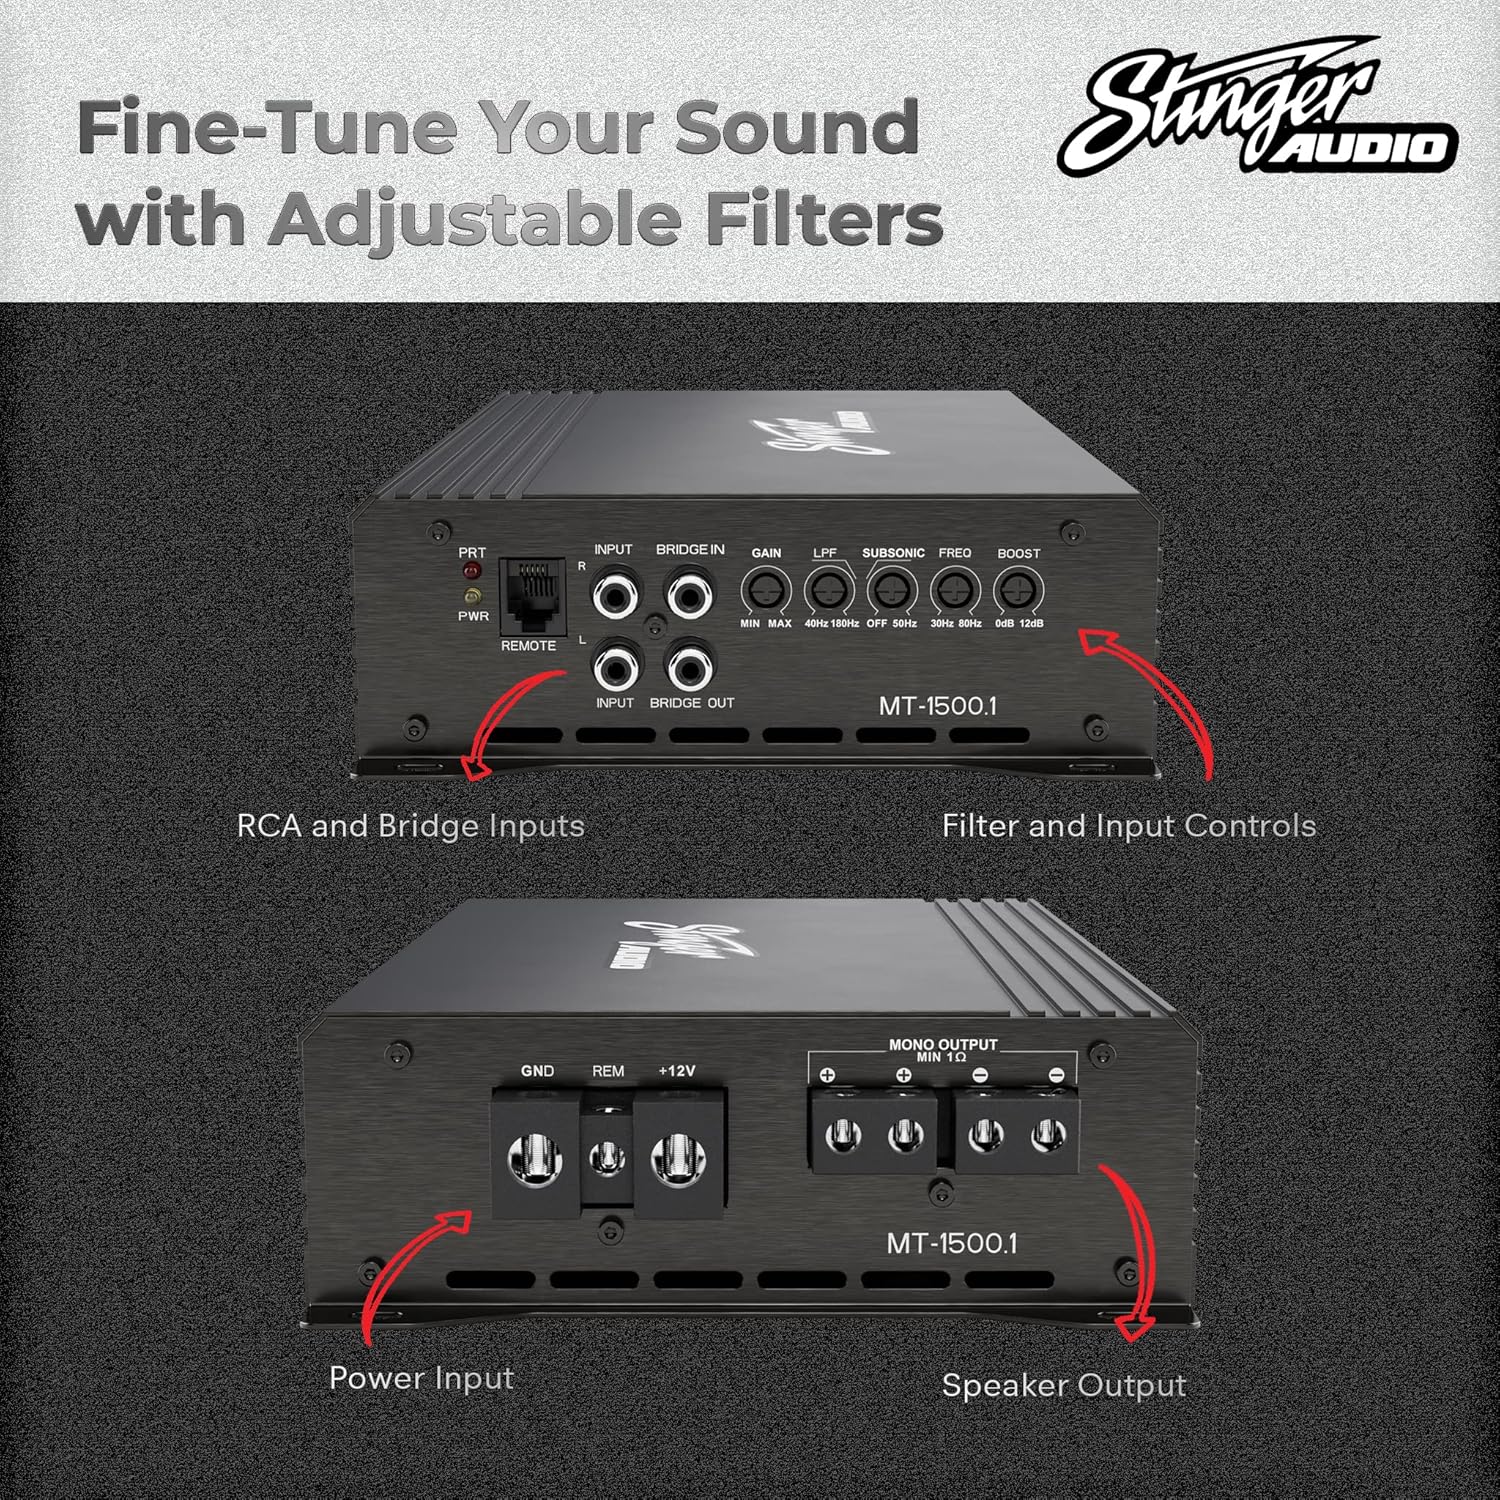
Image: A top-down view of the STINGER Audio MT15001 amplifier's control panel, showing RCA and Bridge Inputs, Filter and Input Controls (Gain, LPF, Subsonic, Freq, Boost), and the Power Input (GND, REM, +12V) and Speaker Output terminals.
Remote Bass Control Installation
Connect the remote bass control knob to the amplifier's "REMOTE" port using the provided cable. Mount the knob in a convenient location within reach of the driver, such as under the dashboard.

Image: The STINGER Audio remote bass control knob with its connecting cable, designed for easy adjustment of bass levels from the driver's seat.

Image: The STINGER Audio MT15001 amplifier displayed next to its remote bass control knob, illustrating the complete setup for bass management.
Operating Instructions
Once installed, you can fine-tune the amplifier's settings for optimal audio performance.
Adjusting Controls
- GAIN: This control matches the amplifier's input sensitivity to the output level of your head unit. Start with the gain at minimum and slowly increase it until the sound is clear and distortion-free.
- LPF (Low-Pass Filter): This filter allows only frequencies below the set point to pass through to the subwoofer. Adjust this to blend the subwoofer's output with your main speakers. Range: 50Hz - 150Hz.
- SUBSONIC: This filter removes ultra-low frequencies that are inaudible and can cause damage to your subwoofer. Set this slightly below your subwoofer's port tuning frequency or around 20-30Hz. Range: 10Hz - 50Hz.
- FREQ (Bass Boost Frequency): Selects the center frequency for the bass boost.
- BOOST (Bass Boost Level): Increases the bass output at the selected frequency. Use sparingly to avoid distortion. Range: 0dB - 12dB.
Using the Remote Bass Control
The remote bass control allows you to conveniently adjust the subwoofer's output level from your listening position without accessing the amplifier directly. Turn the knob clockwise to increase bass and counter-clockwise to decrease it.
Maintenance
The STINGER Audio MT15001 amplifier requires minimal maintenance. Keep the unit clean and free from dust. Periodically check all wiring connections to ensure they are secure and free from corrosion. Do not use harsh chemicals or abrasive cleaners.
Troubleshooting
If you experience issues with your amplifier, refer to the following common problems and solutions:
| Problem | Possible Cause | Solution |
|---|---|---|
| No Power / Amplifier Not Turning On | Blown fuse, loose power/ground/remote wire, no remote signal from head unit. | Check fuse, verify all connections are secure, ensure head unit is providing remote turn-on signal. |
| No Sound Output | RCA cables disconnected, speaker wires disconnected, amplifier in protect mode, gain too low. | Check RCA and speaker connections, check for protect light (PRT), increase gain slowly. |
| Distorted Sound | Gain set too high, improper LPF/Subsonic settings, poor ground connection, damaged speaker. | Reduce gain, adjust filters, check ground connection, inspect speaker for damage. |
| Amplifier Overheating | Insufficient ventilation, impedance too low, prolonged high-volume use. | Ensure proper airflow around amplifier, verify speaker impedance (minimum 1 Ohm), reduce volume. |
Specifications
Technical specifications for the STINGER Audio MT15001 Monoblock Amplifier:
| Feature | Detail |
|---|---|
| Model Name | Monoblock (MT15001) |
| Speaker Type | Subwoofer |
| Material | Metal |
| Speaker Maximum Output Power | 1500 Watts (Peak) |
| Signal to Noise Ratio | > 93 dB |
| Harmonic Distortion | < 1% @ 14.4V |
| Frequency Response | 10Hz - 180Hz |
| Operating Voltage | 9V to 16V |
| Power Terminal | 4 Gauge |
| Dimensions (H x L x W) | 2.09" x 10.16" x 6.10" (53mm x 258mm x 155mm) |
| Connectivity Technology | Wired (RCA, Speaker Level) |
| Audio Output Mode | Mono |
| Control Method | Remote |
| Power Source | Corded Electric |

Image: A graphic detailing key performance specifications of the STINGER Audio MT15001 amplifier, including Total Watts (peak): 1500W, Signal to noise: > 93 dB, Harmonic Distortion: < 1% @ 14.4V, and Frequency Response: 10Hz - 180Hz.

Image: An overview of the STINGER Audio MT15001 amplifier highlighting its Class-D Mono Block design, suitability for 1 Ohm loads, 4 Gauge Power Terminal, small and compact design, Bridged RMS Rating of 2,800W / 2 Ohm Minimum, and Operating voltage of 9V to 16V.
Warranty and Support
This STINGER Audio product comes with a Limited Warranty. For specific warranty terms and conditions, please refer to the warranty card included with your product or visit the official STINGER Audio website. For technical support or further assistance, please contact STINGER Audio customer service.
Official STINGER Website: www.stinger.com
Related documentsMT15001


Ask a question about this manual
Ask about setup, troubleshooting, compatibility, parts, safety, or missing instructions. Manuals+ will review the question and use this page’s manual context to help answer it.