
1. Product Overview
The Riworal 7 Channel Audio Interface is a versatile mixing console designed for various audio applications, including karaoke, DJ performances, stage events, streaming, and studio recording. It features multiple input options, Bluetooth connectivity, USB playback/recording, 3-band EQ, and +48V phantom power.

Image 1.1: Front view of the Riworal 7 Channel Audio Interface USB Audio Mixer. This image displays the overall layout of the mixer, including all channels, controls, and the digital MP3 player section.
Key Features:
- 7 Channels Input: 5 XLR/LINE inputs, 1/4'' Jack (6.35mm) INSERT and LINE inputs on channels 1/2, and 1/4'' Jack (6.35mm) mono/Stereo Inputs on channel 6/7.
- USB Audio Interface / Bluetooth Functionality for wireless streaming and USB playback/recording.
- 3-Band EQ (High, Mid, Low) on each channel for precise tone control.
- +48V Phantom Power for condenser microphones.
- Built-in effects (Delay/Repeat).
- Intelligent compatibility with various devices including microphones, power amplifiers, mobile phones, and computers.
2. Setup Guide
2.1 Unpacking and Initial Inspection
Carefully remove all components from the packaging. Verify that all items listed in the package contents are present and undamaged. If any items are missing or damaged, contact customer support immediately.

Image 2.1: This image shows the package contents, including the mixing console, power cable (US Plug), and user manual. It also illustrates the product dimensions: 13.38 inches (length), 9.45 inches (width), and 1.45 inches (height).
2.2 Power Connection
- Ensure the mixer's power switch is in the OFF position.
- Connect the provided power cable to the AC IN port on the rear of the mixer.
- Plug the other end of the power cable into a standard 110V AC power outlet.
2.3 Connecting Audio Devices
The mixer supports various audio input and output connections. Refer to the diagram below for common connection types.
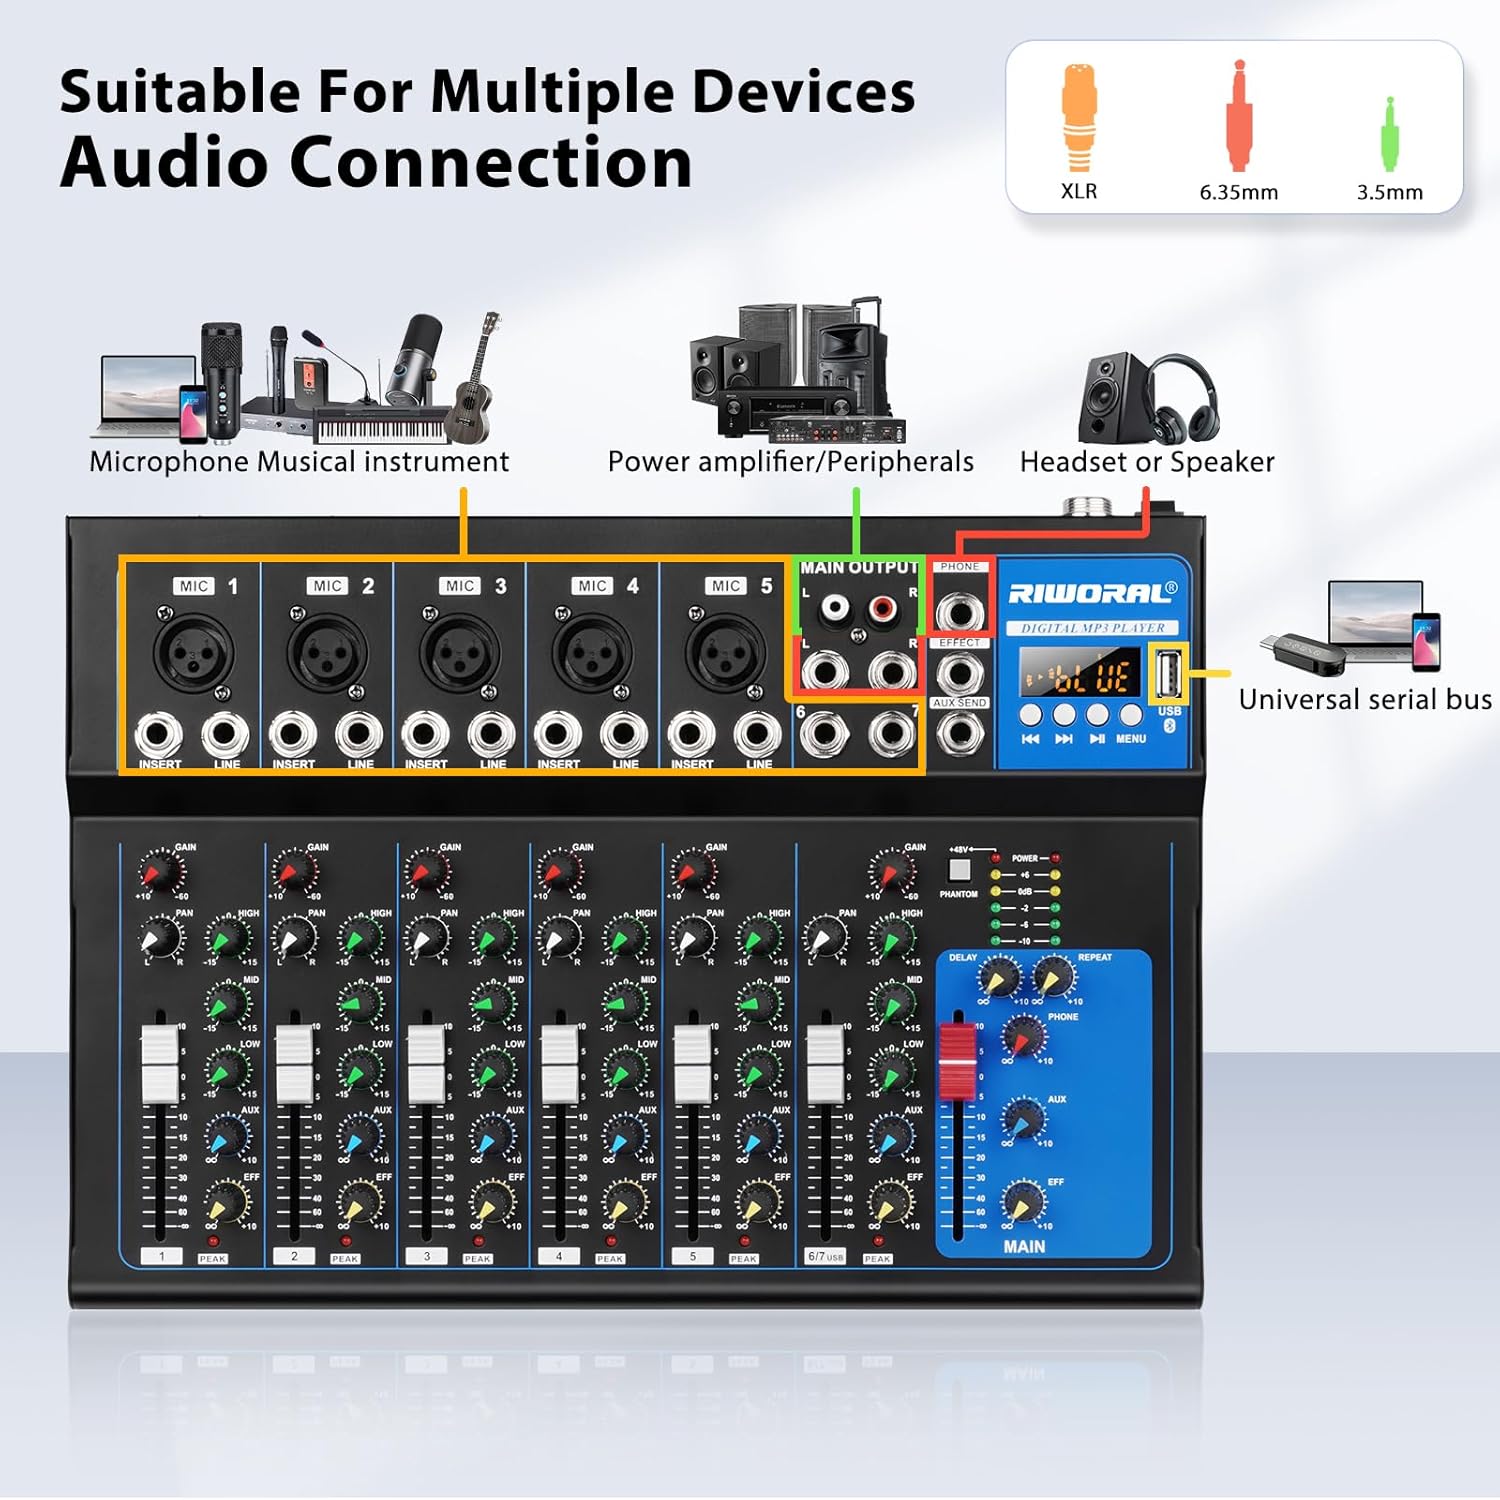
Image 2.2: This diagram illustrates how to connect various audio devices to the mixer. It shows connections for microphones, musical instruments, power amplifiers/peripherals, headsets/speakers, and a universal serial bus (USB) for computer connection.
- Microphones/Instruments: Use XLR cables for microphones or 1/4" (6.35mm) LINE/INSERT cables for instruments (e.g., guitar, piano, keyboard) into channels 1-5.
- Stereo Inputs: Use 1/4" (6.35mm) mono/stereo inputs for channels 6/7.
- Main Output: Connect your speakers or power amplifier to the MAIN OUTPUT (L/R) using 1/4" (6.35mm) or RCA cables.
- Headphones: Plug headphones into the PHONE jack for monitoring.
- AUX/EFFECT Output: Use the 1/4" AUX/EFFECT output for external effects processors or additional monitoring.
2.4 Computer Connection
To use the mixer as an audio interface for recording or playback with a computer:
- Connect the mixer to your computer via a USB cable.
- The computer should recognize the mixer as an audio device. Select it as your input/output device in your operating system's sound settings or your Digital Audio Workstation (DAW).
- The mixer can record and edit processed audio, adapting to mainstream DAWs.

Image 2.3: This image shows the Riworal mixer connected to a computer via USB, illustrating its use as an audio interface for recording and editing audio.
3. Operating Instructions
3.1 Mixer Panel Overview
Familiarize yourself with the controls on the mixer panel.

Image 3.1: This detailed diagram labels the various controls on the audio mixer panel, including Mic Input, Stereo/Line Input, Main Output, Headphone Jack, USB, Play Control, Aux Output Effect, Gain, L/R Balance, Knob of Mono EQ with 3 Band, 48V Power, Level Light, Reverb Effect Adjustment, Headphone Volume, AUX Send Adjustment, Channel Volume, Channel Reverb, Effect Send Adjustment, and Total Volume Adjustment.
3.2 Channel Controls
- GAIN: Adjusts the input sensitivity for each channel. Use this to set the optimal input level without clipping.
- EQ (HIGH, MID, LOW): These knobs control the treble, midrange, and bass frequencies for each channel. Adjust to shape the tone of your audio source.
- PAN: Adjusts the stereo position (left/right) of the channel's signal.
- AUX: Controls the amount of signal sent to the AUX output for external effects or monitoring.
- EFF: Controls the amount of signal sent to the internal effects processor.
- Channel Volume Fader: Adjusts the overall volume level of each individual channel.
- PEAK LED: Illuminates when the input signal is too high, indicating potential clipping. Reduce the GAIN if this LED lights up frequently.
3.3 Master Controls
- MAIN Fader: Controls the overall output volume of the mixer.
- PHONE: Adjusts the volume of the headphone output.
- DELAY/REPEAT: Controls the parameters of the built-in delay effect.
- +48V PHANTOM POWER: Press this button to supply +48V power to condenser microphones connected via XLR inputs. Ensure condenser microphones are connected before activating phantom power.

Image 3.2: This image provides a close-up view of the +48V Phantom Power button and indicator lights. Pressing this button activates phantom power for condenser microphones.
3.4 Digital MP3 Player (USB/Bluetooth)
The mixer features a built-in digital MP3 player with USB and Bluetooth capabilities.
- USB Playback: Insert a USB flash drive (U stick/fast memory) with MP3 files into the USB port. Use the Play/Pause/Switch songs controls (spin button) to navigate and play music.
- Bluetooth Function: Activate Bluetooth on your iPad/smartphone and pair with the mixer. You can then wirelessly stream music.
- Important Note: The USB and Bluetooth functions cannot be used simultaneously.

Image 3.3: This image highlights the USB interface on the mixer, showing a USB drive connected for MP3 playback or recording.

Image 3.4: This image demonstrates the Bluetooth connectivity feature, showing a smartphone wirelessly streaming music to the mixer.
4. Maintenance
Proper maintenance ensures the longevity and optimal performance of your audio mixer.
- Cleaning: Use a soft, dry cloth to clean the exterior of the mixer. Avoid using harsh chemicals or abrasive cleaners.
- Dust Protection: Keep the mixer covered when not in use to prevent dust accumulation, especially in faders and knobs.
- Storage: Store the mixer in a cool, dry place away from direct sunlight and extreme temperatures.
- Cable Management: Ensure cables are not tangled or stressed, which can lead to damage over time.
5. Troubleshooting
If you encounter issues with your Riworal audio mixer, refer to the following common troubleshooting steps:
- No Power:
- Check if the power cable is securely connected to both the mixer and the power outlet.
- Ensure the power outlet is functional.
- No Sound Output:
- Verify that the MAIN fader is raised and not at its lowest setting.
- Check individual channel volume faders and GAIN controls.
- Ensure speakers/headphones are properly connected and powered on.
- Confirm that the correct input source is selected (e.g., USB, Bluetooth, Line).
- Distorted Sound / Clipping:
- Reduce the GAIN control on the input channel if the PEAK LED is frequently lighting up.
- Lower the volume of the input source.
- Check for damaged cables.
- Microphone Not Working (Condenser Mic):
- Ensure the +48V PHANTOM POWER is activated for condenser microphones.
- Check microphone cable connection.
- USB/Bluetooth Not Working:
- Remember that USB and Bluetooth cannot be used simultaneously. Ensure only one is active.
- For USB, ensure the USB drive is formatted correctly and contains compatible audio files.
- For Bluetooth, ensure the mixer is in pairing mode and your device's Bluetooth is enabled and searching.
- Low Volume from 1/4" Plug Microphone:
- Some 1/4" plug microphones may require higher gain settings. Adjust the GAIN, channel fader, and main fader accordingly. Consider using an XLR microphone for better signal strength if available.
6. Specifications
| Feature | Specification |
|---|---|
| Item Model Number | 7 Channel Audio Interface |
| Brand | Riworal |
| Number of Channels | 7 |
| Product Dimensions | 13.38 x 9.45 x 1.45 inches (34 x 24 x 3.7 cm) |
| Item Weight | 5.92 pounds (2.69 Kilograms) |
| Power Source | Corded Electric |
| Voltage | 110 Volts |
| Connectivity Technology | Auxiliary, USB, Bluetooth |
| Phantom Power | +48V |
7. Warranty and Support
This product comes with a standard manufacturer's warranty. For specific warranty details, please refer to the documentation included with your purchase or contact the seller directly.
If you encounter any problems or have questions regarding your Riworal 7 Channel Audio Interface, please do not hesitate to contact Riworal customer service. We are committed to providing assistance and ensuring customer satisfaction.
Contact information can typically be found on the product packaging, the seller's storefront, or the official Riworal website.
