
ChickenGuard PRO
ChickenGuard Automatic Chicken Coop Door Opener PRO Instruction Manual
Model: PRO
1. Introduction
The ChickenGuard Automatic Chicken Coop Door Opener PRO is designed to provide a reliable and convenient solution for automating your chicken coop door. This system ensures the safety of your flock by automatically opening at dawn and closing at dusk, or at pre-set times, protecting them from predators and allowing you to manage your coop with ease. Engineered in the UK, it features a robust motor and durable components built to withstand various weather conditions.
2. Key Features
- Powerful Motor: Lifts coop doors weighing up to 2kg (4lb), suitable for various weather conditions, including temperatures down to -20°C.
- PRO + Door Option: Includes a self-locking door with wings that engage when lowered, preventing predators from lifting the door.
- Multiple Power Options: Can be powered by solar panel kit, AA alkaline batteries, or a standard 9-12V DC cable (not included).
- Easy Installation & Setup: Comes with all necessary components, an intuitive LCD screen, and a user-friendly setup wizard. Large buttons allow for easy operation.
- 4 Operating Modes: Timer-based open/close, light-sensor open/close, Dual-safe mode (combining timer and light sensor), and manual operation.
- Self-Diagnostics: Displays alert messages for necessary actions. A 'Door Closed' safety light is visible from up to 100m away.
3. Components Included
- ChickenGuard Automatic Coop Door Opener (PRO Motor Unit)
- Self-Locking Door & 4 Door Runners
- 4 x AA Alkaline Batteries (if PRO + Batteries option selected)
- Instruction Leaflets
- Screw Pack for installation
4. Setup and Installation
4.1 Mounting the Unit and Door
The ChickenGuard PRO unit and the self-locking door are designed for straightforward installation. Ensure you have a flat, stable surface on your chicken coop for mounting. The door runners should be securely attached to allow smooth vertical movement of the door.

Figure 1: ChickenGuard PRO unit and self-locking door installed on a chicken coop.
4.2 Power Options
The unit offers flexible power options:
- AA Alkaline Batteries: Insert the 4 provided AA batteries into the unit. Ensure correct polarity.
- Solar Panel Kit: If purchased, connect the solar panel to the unit for continuous charging.
- 9-12V DC Cable: An optional 9-12V DC power supply (not included) can be used for mains power.

Figure 2: Close-up of the ChickenGuard PRO unit, illustrating the battery compartment and power options.
4.3 Initial Setup Wizard
Upon first power-up, the unit will guide you through a user-friendly setup wizard on its LCD screen. Follow the on-screen prompts to set the current time, date, and initial operating preferences.

Figure 3: The intuitive LCD display of the ChickenGuard PRO, showing the setup wizard.
5. Operating Modes
The ChickenGuard PRO offers four distinct operating modes to suit your needs:
- Timer Mode: Set specific times for the door to open and close. Ideal for consistent schedules.
- Light Sensor Mode: The door opens at sunrise and closes at sunset, adapting to seasonal light changes.
- Dual-Safe Mode: Combines timer and light sensor. The door will close based on whichever condition (pre-set time or sunset) occurs first, ensuring maximum safety.
- Manual Mode: Open or close the door manually by pressing the up and down buttons on the unit.

Figure 4: Overview of the ChickenGuard PRO's automatic open/close features, including the self-locking mechanism.
5.1 Self-Locking Door Mechanism
The self-locking door features unique wings that engage when the door is fully lowered. This mechanism prevents predators from lifting the door, providing enhanced security for your flock.
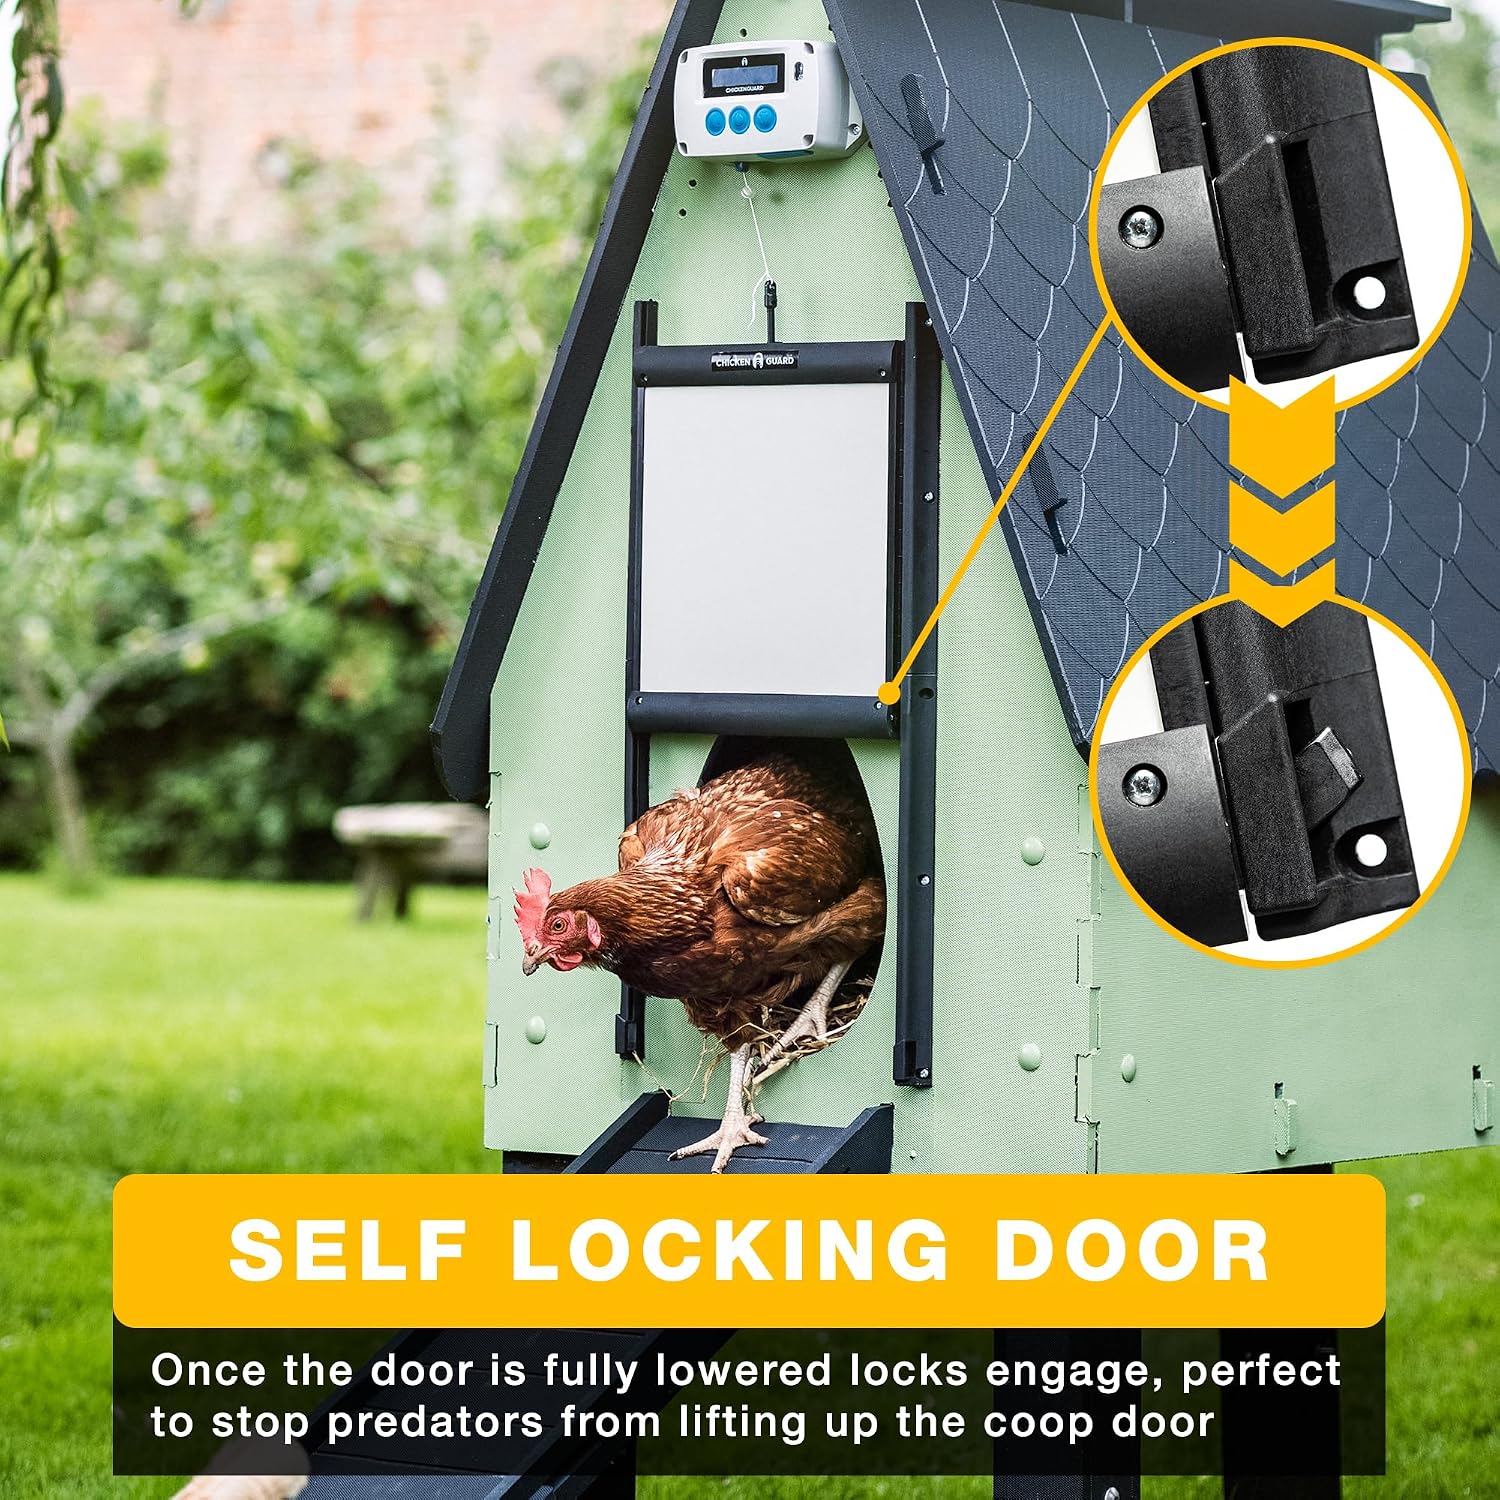
Figure 5: Detailed view of the self-locking wings on the ChickenGuard door, ensuring predator-proof closure.
6. Maintenance
6.1 Battery Replacement
The unit's batteries typically last a significant period. When the battery level is low, an alert message will appear on the LCD screen. To replace batteries, carefully remove the unit from its mounting, open the battery compartment, and replace the 4 AA alkaline batteries. Ensure correct polarity. It is recommended to replace all batteries at once.
6.2 General Cleaning
Periodically inspect the door runners and the door itself for any debris, dirt, or ice buildup, especially in harsh weather conditions. Clean with a damp cloth as needed to ensure smooth operation. Avoid using abrasive cleaners.
7. Troubleshooting
7.1 Self-Diagnostic Alerts
The ChickenGuard PRO features self-diagnostics. If an issue is detected, an alert message will be displayed on the screen. Refer to the specific message for guidance on the required action. Common alerts include low battery, door obstruction, or motor issues.
7.2 Door Not Opening/Closing Properly
- Check for Obstructions: Ensure the door path and runners are clear of any debris, dirt, or ice.
- Battery Level: Verify that the batteries are not low or depleted. Replace if necessary.
- Light Sensor Sensitivity: If using light sensor mode, ensure the sensor is not obstructed or exposed to artificial light sources that might interfere with its operation. Adjust sensitivity settings if available in the menu.
- Time Settings: In timer mode, double-check that the set open and close times are correct.
7.3 'Door Closed' Safety Light
A red 'Door Closed' safety light flashes once a minute when the door is fully closed, providing visual confirmation from a distance (up to 100m). If this light is not flashing when the door is closed, it may indicate an issue with the door's full closure or the sensor.
8. Specifications
| Attribute | Value |
|---|---|
| Brand | ChickenGuard |
| Model Name | PRO ldk |
| Item Weight | 1.32 pounds (0.6 Kilograms) |
| Item Dimensions (LxWxH) | 2.28 x 6.54 x 3.62 inches (Unit); 11.4"L x 3.2"W x 12.8"H (Door) |
| Material | Powder coated Aluminium, Acrylic Styrene Acrylonitrile (ASA) |
| Color | White & Blue |
| Power Options | 4 x AA Alkaline Batteries, Solar Panel (optional), 9-12V DC (optional) |
| Max Door Weight Lifted | 2kg (4lb) |
| Operating Temperature | Down to -20°C |
| Special Features | Predator-Proof, Anti-Pinch Safety, Self-Diagnostics |
9. Warranty and Support
The ChickenGuard PRO comes with a 3-year manufacturer warranty. For any product support, technical assistance, or warranty claims, please refer to the contact information provided in your product packaging or visit the official ChickenGuard website. They offer a dedicated in-house, multilingual customer support team and an automated help center.
For additional resources and community support, you may find helpful videos and reviews from other users. Below are official product videos from the seller:
Video 1: Official ChickenGuard video demonstrating various auto coop door models and their features. This video helps in understanding the different options available and how they function.
Video 2: A short preview video from ChickenGuard showcasing the automatic door in action. Useful for a quick visual demonstration of the product's operation.
10. Safety Information
- Always ensure the door path is clear before operation to prevent injury to animals or damage to the unit.
- Do not attempt to force the door open or closed manually while the motor is operating.
- Keep the unit and its components out of reach of children and pets.
- Use only recommended power sources and batteries.
- Regularly check for wear and tear on the cord and door mechanism.
Related documentsPRO


Ask a question about this manual
Ask about setup, troubleshooting, compatibility, parts, safety, or missing instructions. Manuals+ will review the question and use this page’s manual context to help answer it.