
1. Introduction
This manual provides detailed instructions for the installation, operation, and maintenance of your SANNCE CCTV Security Camera System. This system includes an 8-channel Digital Video Recorder (DVR) with a pre-installed 2TB hard drive and four 1080P bullet surveillance cameras, designed for both indoor and outdoor use.
Please read this manual thoroughly before installation and operation to ensure proper use and to maximize the system's performance and longevity. Keep this manual for future reference.
2. Package Contents
Verify that all items listed below are present and in good condition. If any items are missing or damaged, please contact SANNCE customer support.
- 1 x SANNCE 8-Channel Digital Video Recorder (DVR) with 2TB Hard Drive
- 4 x SANNCE 1080P Bullet Surveillance Cameras
- 1 x Power Adapter for DVR
- 1 x Power Adapter for Cameras (with 4-way splitter)
- 4 x BNC Video Cables (approx. 60ft/18m each)
- 1 x USB Mouse
- 1 x HDMI Cable
- 1 x Ethernet Cable
- Mounting Screw Kits for Cameras
- User Manual (this document)

Image: Overview of the SANNCE 8-Channel DVR and four 1080P bullet cameras, along with the 2TB hard drive.
3. Product Overview
3.1 Digital Video Recorder (DVR)
The SANNCE DVR is the central unit of your security system, responsible for recording, storing, and managing video footage. It supports various camera types (TVI, AHD, CVI, CVBS analog, and IP cameras) up to 1080P resolution.
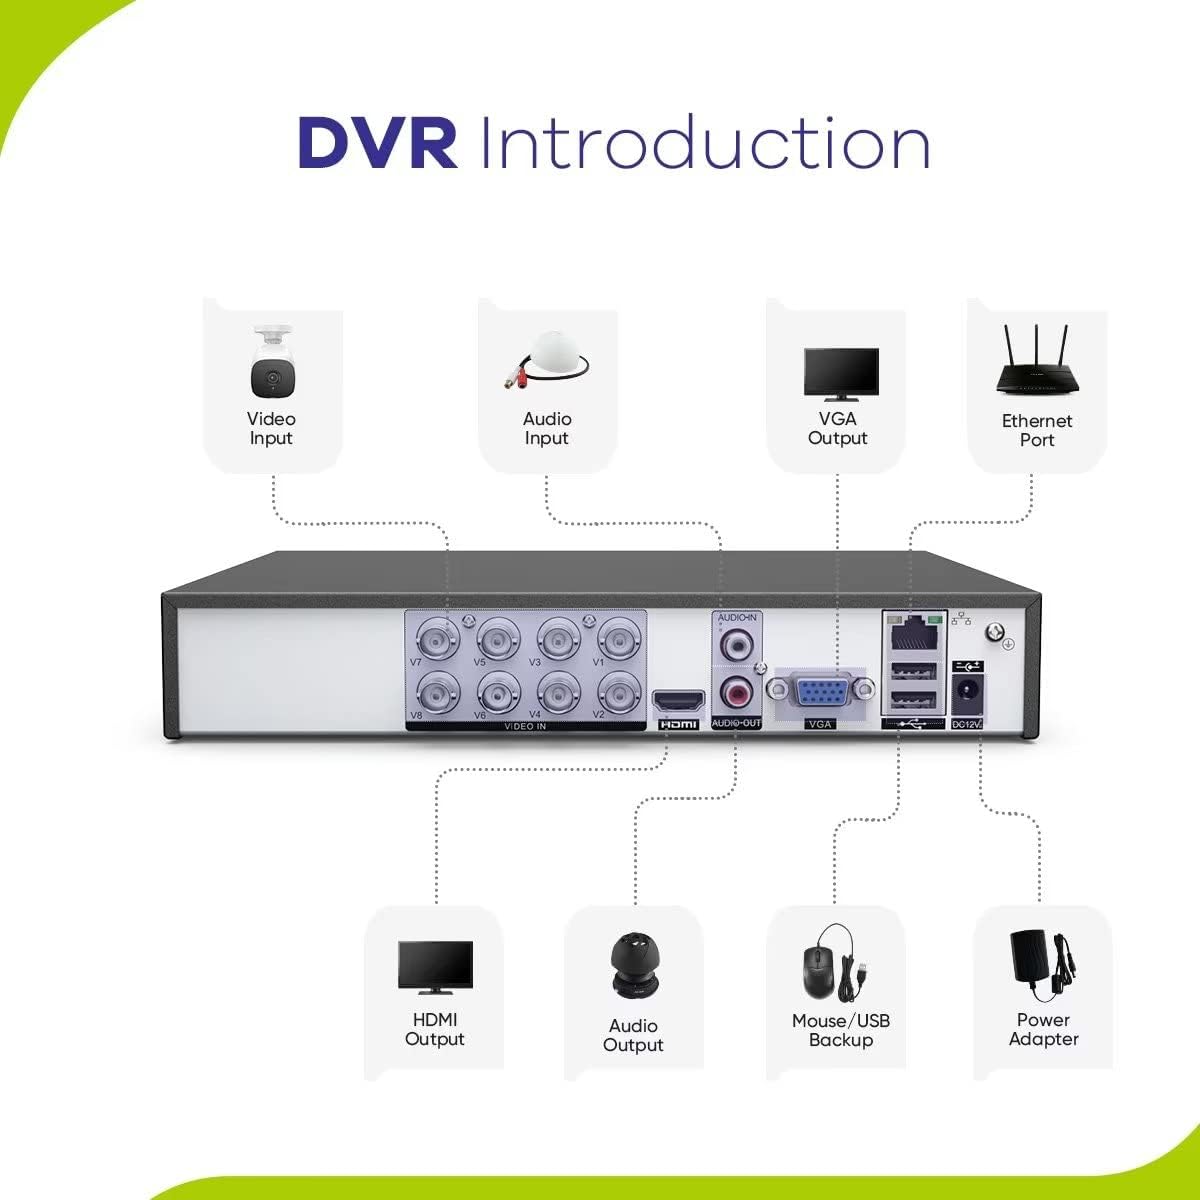
Image: Diagram illustrating the rear panel ports of the SANNCE DVR, including video input, audio input/output, HDMI, VGA, Ethernet, and USB ports.
- Video Input (BNC): Connects to analog cameras.
- Audio Input/Output (RCA): For connecting microphones and speakers.
- HDMI Output: Connects to an HD monitor or TV.
- VGA Output: Connects to a VGA monitor.
- Ethernet Port (RJ45): For network connection and remote access.
- USB Ports: For mouse control and USB backup devices.
- DC12V Power Input: Connects to the DVR power adapter.
3.2 1080P Bullet Cameras
The included bullet cameras provide 1080P Full HD video. They feature full-color night vision with built-in warm lights, a wide field of view, and an IP66 weatherproof rating for outdoor durability.

Image: Detailed view of the SANNCE bullet camera highlighting features such as IP66 housing, 3-axis mounting bracket, 3.6mm HD lens, 2 LEDs for warm light, and power port. Dimensions are also shown.
- 1080P HD Resolution: Provides clear and detailed video footage.
- Full-Color Night Vision: Equipped with warm lights for color images in low-light conditions up to 100ft (30m).
- IP66 Weatherproof: Designed to withstand harsh outdoor weather conditions.
- 3.6mm HD Lens: Offers an 82.2-degree wide field of view.
- 3-Axis Mounting Bracket: Allows flexible positioning for optimal coverage.

Image: A SANNCE bullet camera being sprayed with water, demonstrating its IP66 dust and waterproof rating.
4. System Setup
Follow these steps to set up your SANNCE CCTV Security Camera System.
4.1 Connect the DVR
- Connect a Monitor: Connect the DVR to a monitor using the provided HDMI cable or a VGA cable (not included).
- Connect the Mouse: Plug the USB mouse into one of the USB ports on the DVR.
- Connect to Network (Optional): For remote viewing and network features, connect an Ethernet cable from the DVR's Ethernet port to your router.
- Connect Power: Plug the DVR power adapter into the DVR's DC12V input and then into a power outlet. The DVR will power on automatically.
4.2 Install and Connect Cameras
- Choose Mounting Locations: Select strategic locations for your cameras, ensuring they cover desired areas and are within reach of the video and power cables. Consider the 100ft night vision range.
- Mount Cameras: Use the provided screw kits to securely mount each camera. Adjust the 3-axis bracket to achieve the desired viewing angle.
- Connect Video Cables: Connect one end of each BNC video cable to the camera's video output and the other end to a corresponding "VIDEO IN" port on the DVR.
- Connect Camera Power: Use the 4-way power splitter to connect all four cameras to the camera power adapter. Plug the camera power adapter into a power outlet.

Image: An illustration showing the SANNCE camera's 100ft night vision capability, with light spread indicated at 30ft, 70ft, and 100ft distances from a house.
5. Operating Instructions
Once the system is powered on, the DVR will boot up. You will typically be guided through an initial setup wizard on the connected monitor to configure basic settings like language, date/time, and network settings.
5.1 Live View
After initial setup, the DVR will display the live view from all connected cameras. You can use the USB mouse to navigate the on-screen menu. Double-click a camera view to enlarge it to full screen, and double-click again to return to multi-camera view.
5.2 Recording
The DVR is pre-configured for continuous recording. You can adjust recording schedules, motion detection settings, and other parameters through the DVR's main menu (right-click on the live view screen to access the menu).
- Continuous Recording: Records 24/7.
- Motion Detection Recording: Records only when motion is detected in the camera's field of view. Configure detection zones and sensitivity in the menu.
- Scheduled Recording: Set specific times for recording.
5.3 Playback
To review recorded footage, access the "Playback" option from the main menu. You can select the date, time, and specific camera channel to view recordings. The 2TB hard drive provides ample storage for extended recording periods.
5.4 Night Vision and Full-Color Imaging
The cameras automatically switch to night vision mode in low-light conditions. With the built-in warm lights, the cameras can capture full-color images even at night, providing more detailed visual information than traditional black-and-white infrared night vision.

Image: An example of full-color night vision from a SANNCE camera, showing a vibrant night scene with illuminated buildings and boats, enabled by two warm lights.

Image: A comparison showing the view from a SANNCE camera with its 3.6mm lens, illustrating how the scene appears with the warm lights "ON" (bright and clear) versus "OFF" (dark and less detailed).

Image: A visual comparison demonstrating the superior clarity of 1080P resolution from the SANNCE bullet camera compared to 720P, showing more detail in a street scene.
6. Maintenance
Regular maintenance ensures optimal performance and extends the lifespan of your security system.
- Camera Cleaning: Periodically clean the camera lenses with a soft, damp cloth to remove dust, dirt, or water spots that may obscure the view. Do not use harsh chemicals.
- DVR Ventilation: Ensure the DVR is placed in a well-ventilated area to prevent overheating. Keep vents clear of obstructions.
- Firmware Updates: Check the SANNCE official website for any available firmware updates for your DVR. Firmware updates can improve system stability and add new features.
- Data Backup: Regularly back up important footage to an external USB drive or network storage to prevent data loss.
7. Troubleshooting
If you encounter issues with your SANNCE security system, refer to the following common problems and solutions.
- No Video Display:
- Check all power connections to the DVR and cameras.
- Ensure video cables are securely connected to both cameras and DVR.
- Verify the monitor is correctly connected to the DVR via HDMI or VGA and is set to the correct input source.
- No Recording:
- Check if the hard drive is properly installed and initialized in the DVR settings.
- Verify recording schedules and motion detection settings are configured correctly.
- Ensure the hard drive is not full. If it is, enable overwrite or back up and format the drive.
- Poor Image Quality:
- Clean camera lenses.
- Ensure cameras are focused correctly (if adjustable).
- Check cable connections for any damage or loose contacts.
- Verify the monitor resolution supports 1080P.
- Remote Access Not Working:
- Ensure the DVR is connected to the internet via the Ethernet port.
- Check network settings on the DVR (IP address, gateway, DNS).
- Verify port forwarding settings on your router if required for direct access.
- Ensure the mobile app or client software is correctly configured.
For further assistance, please contact SANNCE customer support.
8. Specifications
| Feature | Specification |
|---|---|
| Brand | SANNCE |
| Video Capture Resolution | 1080p |
| Special Feature | Night Vision (Full-Color) |
| Number of Channels | 8 |
| Memory Storage Capacity | 2 TB (Hard Drive) |
| Power Source | Corded Electric |
| Item Dimensions (L x W x H) | 18.5 x 13.39 x 4.72 inches |
| Compatible Devices | Cameras (TVI, AHD, CVI, CVBS analog, IP) |
| Low Light Technology | Night Vision |
| Recording Mode | Motion Detection, Continuous, Scheduled |
| Weatherproof Rating (Cameras) | IP66 |
| Field of View (Cameras) | 82.2 degrees |
| Night Vision Distance | Up to 100ft (30m) |
| Operating Temperature | -4°F to 140°F (-20°C to 60°C) |
9. Warranty and Support
SANNCE products are designed for reliability and performance. For warranty information, please refer to the warranty card included with your product or visit the official SANNCE website.
If you require technical assistance or have questions regarding your security system, please contact SANNCE customer support through their official website or the contact information provided in your product packaging.
Online Support: www.sannce.com/support (Example link, actual link may vary)


