
1. Introduction
Thank you for purchasing the General Trade L.DICTROLUX 12L 1800W Air Fryer Oven, Model GNR12100. This appliance is designed to provide a versatile cooking experience, combining the functions of an air fryer and a compact oven. To ensure safe operation and optimal performance, please read this manual thoroughly before first use and retain it for future reference.
2. Important Safety Instructions
When using electrical appliances, basic safety precautions should always be followed to reduce the risk of fire, electric shock, and injury to persons.
- Read all instructions before using the appliance.
- Do not touch hot surfaces. Use handles or knobs.
- To protect against electric shock, do not immerse cord, plugs, or the main unit in water or other liquid.
- Close supervision is necessary when any appliance is used by or near children.
- Unplug from outlet when not in use and before cleaning. Allow to cool before putting on or taking off parts.
- Do not operate any appliance with a damaged cord or plug, or after the appliance malfunctions or has been damaged in any manner.
- The use of accessory attachments not recommended by the appliance manufacturer may cause injuries.
- Do not use outdoors.
- Do not let cord hang over edge of table or counter, or touch hot surfaces.
- Do not place on or near a hot gas or electric burner, or in a heated oven.
- Extreme caution must be used when moving an appliance containing hot oil or other hot liquids.
- To disconnect, turn any control to 'off', then remove plug from wall outlet.
- Do not use appliance for other than intended use.
- Ensure the appliance is placed on a stable, heat-resistant surface with adequate ventilation around it.
3. Product Overview
The General Trade L.DICTROLUX Air Fryer Oven is a multi-functional kitchen appliance designed for efficient cooking with minimal oil. It features a spacious 12-liter capacity and a powerful 1800W heating element, allowing for various cooking methods including air frying, roasting, baking, and dehydrating.
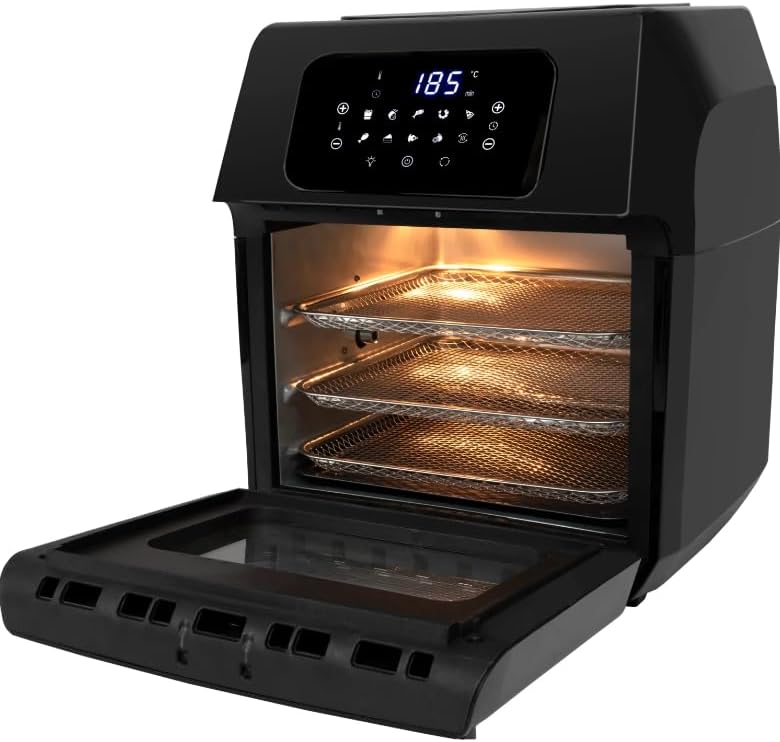
This image displays the General Trade L.DICTROLUX 12L 1800W Air Fryer Oven. The appliance is black with a digital control panel on top, showing '185°C'. The front door is open, revealing the stainless steel interior with three mesh racks for cooking. The interior is illuminated, indicating the heating element is active or recently used. The control panel features various icons for functions like temperature, time, power, and pre-set cooking modes.
Components:
- Main Unit: The primary housing containing heating elements and fan.
- Digital Control Panel: Touch-sensitive interface for setting time, temperature, and selecting cooking modes.
- Oven Door: Transparent door for viewing cooking progress.
- Mesh Racks (3): For air frying and dehydrating various foods.
- Drip Tray: Collects excess oil and food particles during cooking.
4. Setup
4.1 Unpacking
- Carefully remove all packaging materials from the appliance and its accessories.
- Check for any damage during transit. If damaged, do not operate and contact customer support.
- Remove any promotional stickers or labels.
4.2 Placement
- Place the air fryer oven on a stable, level, and heat-resistant surface.
- Ensure there is at least 10-15 cm (4-6 inches) of clear space around the back and sides of the appliance for proper ventilation.
- Do not place the appliance near flammable materials or heat sources.
4.3 Before First Use
- Wipe the exterior of the appliance with a damp cloth.
- Wash the mesh racks and drip tray in warm, soapy water. Rinse thoroughly and dry completely.
- Insert the drip tray at the bottom of the oven cavity.
- To eliminate any manufacturing odors, run the appliance empty for approximately 15 minutes at 180°C (350°F). Ensure the area is well-ventilated during this process.
5. Operating Instructions
5.1 Control Panel Overview
The digital control panel allows for easy adjustment of cooking settings. Refer to the product image for visual reference.
- Power Button: Turns the appliance on/off and starts/pauses cooking.
- Temperature Control (+/-): Adjusts the cooking temperature.
- Time Control (+/-): Adjusts the cooking time.
- Light Button: Turns the interior light on/off to monitor cooking progress.
- Pre-set Function Icons: Various icons (e.g., fries, chicken, fish, steak, pizza, cake, dehydrate) represent pre-programmed cooking settings for common foods.
5.2 Basic Operation
- Prepare Food: Place your food on the mesh racks or in an oven-safe dish. Do not overload the racks.
- Insert Racks: Slide the racks into the desired positions within the oven cavity. Ensure the drip tray is at the bottom.
- Power On: Plug the appliance into a grounded electrical outlet. Press the Power Button to turn on the display.
- Set Temperature and Time:
- Use the Temperature Control buttons to set the desired cooking temperature.
- Use the Time Control buttons to set the desired cooking duration.
- Use Pre-set Functions (Optional): Instead of manual settings, you can select a pre-set icon for specific food types. The appliance will automatically set the recommended time and temperature. You can adjust these manually if needed.
- Start Cooking: Press the Power Button again to start the cooking cycle. The fan and heating elements will activate.
- Monitor Cooking: Use the Light Button to check on your food without opening the door.
- Finish Cooking: The appliance will beep when the cooking cycle is complete. Press the Power Button to turn it off, or it will automatically shut down after a short cooling period.
- Remove Food: Carefully open the oven door. Use oven mitts to remove the hot racks and food.
5.3 Cooking Tips
- For best air frying results, preheat the oven for 3-5 minutes before adding food.
- Shake or flip food halfway through cooking for even browning.
- Lightly spray or toss food with a small amount of oil for crispier results.
- Do not overcrowd the racks; cook in batches if necessary to ensure proper air circulation.
6. Cleaning and Maintenance
Regular cleaning ensures the longevity and optimal performance of your air fryer oven.
6.1 General Cleaning
- Unplug and Cool: Always unplug the appliance from the power outlet and allow it to cool completely before cleaning.
- Exterior: Wipe the exterior with a damp cloth and mild detergent. Do not use abrasive cleaners or scourers.
- Interior: Wipe the interior walls with a damp cloth. For stubborn food residue, use a non-abrasive sponge with warm, soapy water. Ensure the interior is dry before next use.
- Accessories: The mesh racks and drip tray can be washed in warm, soapy water or placed in the dishwasher. Ensure they are thoroughly dry before storing or reusing.
6.2 Self-Cleaning Feature
This appliance includes a self-cleaning feature. Refer to the specific instructions in the full product manual for details on how to activate and utilize this function effectively.
7. Troubleshooting
If you encounter issues with your air fryer oven, consult the following table before contacting customer support.
| Problem | Possible Cause | Solution |
|---|---|---|
| Appliance does not turn on. | Not plugged in; power outlet malfunction; appliance not switched on. | Ensure plug is securely in outlet; test outlet with another appliance; press the Power Button. |
| Food is not cooked evenly. | Overcrowding; insufficient shaking/flipping; incorrect temperature/time. | Cook in smaller batches; shake or flip food halfway; adjust temperature and time as needed. |
| White smoke coming from appliance. | Grease residue from previous use; fatty food cooking. | Clean the drip tray and interior thoroughly; ensure drip tray is in place to catch excess fat. |
| Appliance emits a burning smell. | Food residue on heating elements; new appliance odor. | Clean interior thoroughly; run empty for 15 minutes in a well-ventilated area for first use. |
8. Specifications
- Model: GNR12100
- Brand: General Trade
- Capacity: 12 Liters
- Power: 1800W
- Material: Aluminum (internal components likely stainless steel)
- Special Features: Self-cleaning, Timer function
- Approximate Package Dimensions: 75.5 x 60 x 50 cm
- Approximate Package Weight: 1 kg
9. Warranty and Support
This product is covered by a manufacturer's warranty. For detailed information regarding warranty terms, conditions, and duration, please refer to the warranty card included with your purchase or contact General Trade customer support directly. Keep your proof of purchase for any warranty claims.
For technical assistance, troubleshooting beyond this manual, or to order replacement parts, please contact General Trade customer service through their official channels.
