
ZTE MC888
ZTE MC888 5G Wireless Router User Manual
Model: MC888
1. Product Overview
The ZTE MC888 5G Wireless Router is designed to provide high-speed internet connectivity for home and small office environments. It supports 5G and Wi-Fi 6 (802.11ax) standards, offering robust and reliable network performance. This manual will guide you through the setup, operation, and maintenance of your device.

Figure 1.1: ZTE MC888 5G Wireless Router (Front and Side View)
This image displays the sleek, black cylindrical design of the ZTE MC888 router, highlighting its compact form factor suitable for various indoor placements.
2. Setup Guide
2.1 Package Contents
Before you begin, please ensure all items are present in the package:
- ZTE MC888 5G Wireless Router
- Power Adapter
- Ethernet Cable (RJ45)
- Quick Start Guide (if included)
2.2 SIM Card Installation
The ZTE MC888 requires a Nano-SIM card for 5G/4G cellular connectivity. Follow these steps to install the SIM card:
- Locate the SIM card slot at the bottom of the router.
- Gently insert the Nano-SIM card into the slot with the gold contacts facing down and the notched corner aligned correctly. Push until it clicks into place.
- Ensure the SIM card is fully seated to establish a proper connection.
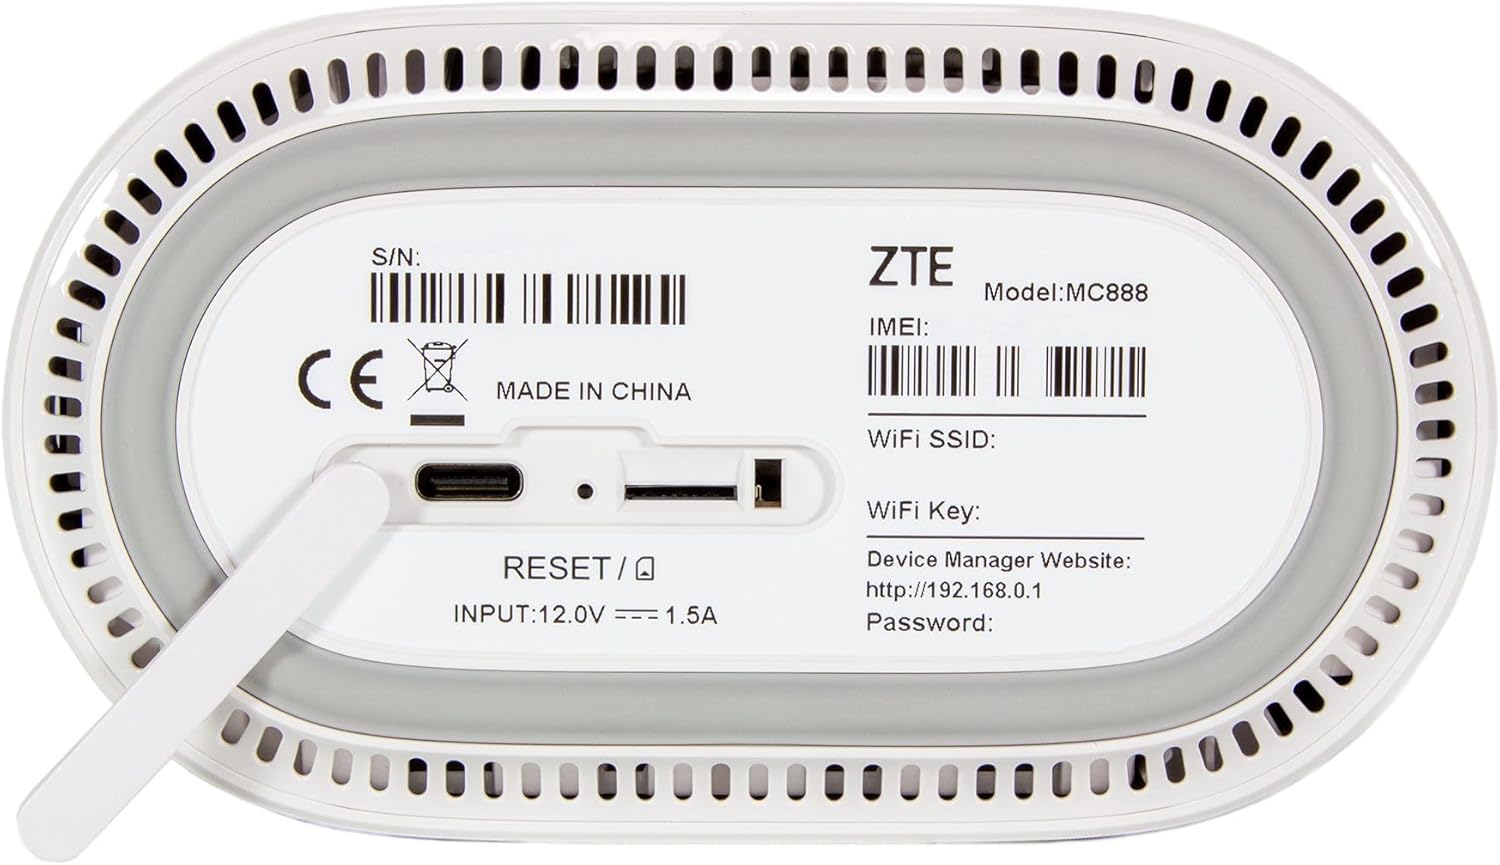
Figure 2.1: Bottom Panel of ZTE MC888 Router
This image shows the underside of the router, detailing the SIM card slot, the recessed reset button, and the power input port. The device manager website address (http://192.168.0.1) and default WiFi SSID/Key are also visible on the label.
2.3 Powering On
- Connect the power adapter to the router's power input port (12V, 1.5A) located at the bottom.
- Plug the other end of the power adapter into a wall outlet.
- The router will automatically power on. Wait for the indicator lights on the front panel to stabilize.
2.4 Initial Connection
You can connect to the router via Wi-Fi or Ethernet.
2.4.1 Wi-Fi Connection
- On your device (smartphone, laptop), search for available Wi-Fi networks.
- Locate the Wi-Fi network name (SSID) printed on the label at the bottom of the router.
- Enter the Wi-Fi Key (password) also found on the label to connect.
2.4.2 Ethernet Connection
- Connect one end of the Ethernet cable to a LAN port on the back of the router.
- Connect the other end of the Ethernet cable to your computer's Ethernet port.

Figure 2.2: Rear Panel of ZTE MC888 Router
This image illustrates the rear of the router, featuring two LAN (Ethernet) ports, a Phone (RJ11) port, and the WPS button for easy Wi-Fi setup.
3. Operating the Router
3.1 Indicator Lights
The front panel of the router features several indicator lights that provide status information:
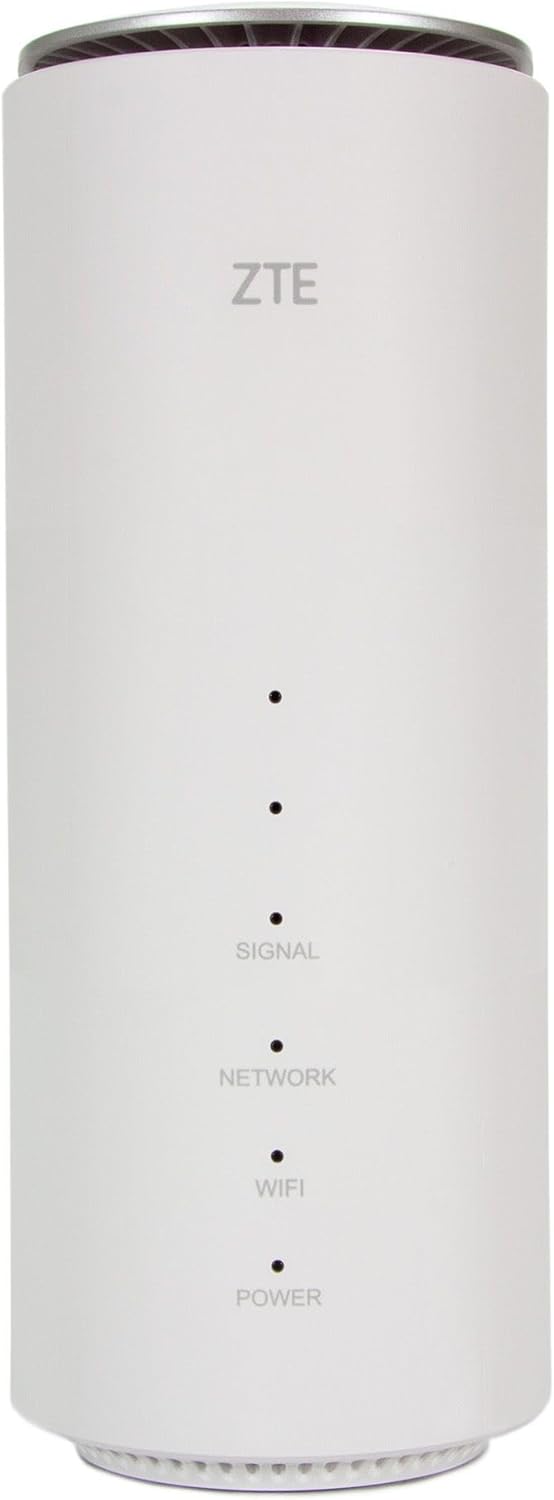
Figure 3.1: Front Panel LED Indicators
This image highlights the LED indicators on the front of the router, labeled Signal, Network, WiFi, and Power, which provide visual feedback on the device's status.
- Power: Indicates the power status. Solid green when powered on.
- WiFi: Indicates Wi-Fi status. Solid green when Wi-Fi is active. Blinking when data is being transmitted.
- Network: Indicates cellular network status. Color and state vary based on network type (5G/4G) and signal strength.
- Signal: Indicates cellular signal strength. More bars/lights typically mean stronger signal.
3.2 Accessing the Web Management Interface
To configure advanced settings, access the router's web management interface:
- Ensure your device is connected to the router (Wi-Fi or Ethernet).
- Open a web browser and enter the default IP address: http://192.168.0.1
- Enter the default username and password (usually printed on the router's bottom label or in the Quick Start Guide).
- From the interface, you can manage Wi-Fi settings (SSID, password, security), network modes, parental controls, and more.
3.3 Using WPS (Wi-Fi Protected Setup)
The WPS button on the back of the router allows for quick and secure connection of WPS-compatible devices without entering the Wi-Fi password:
- Press the WPS button on the router for a few seconds.
- Within two minutes, activate WPS on your client device.
- The devices will automatically connect.
3.4 Ethernet (LAN) Ports
The router is equipped with two LAN ports (RJ45) on the back. These ports allow you to connect wired devices such as desktop computers, gaming consoles, or smart TVs for a stable and high-speed connection.
3.5 Phone (RJ11) Port
The RJ11 port on the back of the router is designed for connecting a traditional landline phone. This feature allows you to make and receive calls over the cellular network, depending on your SIM card's plan and carrier support.
4. Maintenance
4.1 Optimal Placement
For the best performance, place the router in an open area, away from obstructions like thick walls, large metal objects, and other electronic devices that may cause interference. A central location in your home or office is generally recommended.
4.2 Cleaning
Regularly clean the router with a soft, dry cloth. Do not use liquid cleaners or aerosols, as they may damage the device.
4.3 Firmware Updates
Periodically check the router's web management interface for available firmware updates. Keeping the firmware updated ensures optimal performance, security, and access to new features.
5. Troubleshooting
5.1 No Internet Connection
- Check the Network and Signal indicator lights. If they are off or red, ensure the SIM card is properly inserted and activated.
- Restart the router by unplugging the power adapter, waiting 10 seconds, and plugging it back in.
- Verify your SIM card has an active data plan.
- Access the web management interface to check APN settings and network status.
5.2 Slow Wi-Fi Speed
- Ensure the router is placed in an optimal location, free from interference.
- Reduce the number of connected devices or bandwidth-intensive activities.
- Check for firmware updates.
- Consider using the 5GHz Wi-Fi band for compatible devices, as it generally offers higher speeds over shorter distances.
5.3 Cannot Access Web Management Interface
- Ensure your device is connected to the router's network.
- Verify you are typing the correct IP address (http://192.168.0.1).
- Try a different web browser.
- Temporarily disable any firewall or antivirus software on your computer.
5.4 Factory Reset
If issues persist, you may perform a factory reset. Note: This will erase all custom settings and restore the router to its default factory configuration.
- With the router powered on, use a pin or straightened paperclip to press and hold the recessed Reset button (located at the bottom, see Figure 2.1) for approximately 5-10 seconds.
- Release the button when the indicator lights flash, indicating the reset process has begun.
- The router will restart with default settings.
6. Specifications
| Feature | Description |
|---|---|
| Model Name | MC888 |
| Brand | ZTE |
| Connectivity Technology | Ethernet, Wi-Fi |
| Wireless Communication Standard | 802.11ax (Wi-Fi 6) |
| Frequency Band Class | Dual-Band |
| Special Feature | Dual Band |
| Compatible Devices | Smartphone |
| Product Dimensions | 50 x 50 x 28 cm; 600 grams |
| Recommended Uses | Home |
| Included Components | One package (Router, Power Adapter, Ethernet Cable) |
7. Warranty and Support
7.1 Warranty Information
The ZTE MC888 5G Wireless Router comes with a standard manufacturer's warranty. Please refer to the warranty card included in your product packaging or visit the official ZTE website for detailed warranty terms and conditions specific to your region.
7.2 Technical Support
For technical assistance, troubleshooting beyond this manual, or service inquiries, please contact ZTE customer support. Contact information can typically be found on the official ZTE website or in your product documentation.
Related documentsMC888


Ask a question about this manual
Ask about setup, troubleshooting, compatibility, parts, safety, or missing instructions. Manuals+ will review the question and use this page’s manual context to help answer it.