
1. Introduction
Thank you for choosing the TIGERKING Extra Large Home Safe. This manual provides essential information for the safe and efficient operation of your new security safe. Please read these instructions carefully before installation and use, and retain them for future reference.
The TIGERKING 150XH-1(W) is designed to protect your valuables with its heavy-duty alloy steel construction, advanced electronic combination lock, and dual safety key system. It features a spacious 17.6 cubic feet interior with adjustable shelves and an internal lock box for organized storage.
2. Safety Information
- Always keep the master keys and emergency keys in a secure location, separate from the safe itself. Do not store them inside the safe.
- Ensure the safe is placed on a level surface. For maximum security, anchor the safe to a wall or floor using the provided expansion screws.
- Keep children and unauthorized individuals away from the safe.
- Do not attempt to force the safe open if you encounter resistance. Refer to the troubleshooting section or contact customer support.
- This safe is not water-resistant. Avoid placing it in areas prone to water exposure.
3. Package Contents
Carefully unpack your safe and ensure all items listed below are present. If any items are missing or damaged, please contact TIGERKING customer support immediately.
- 1 x TIGERKING 150XH-1(W) Safe Box
- 1 x User Manual (this document)
- 1 x Emergency Battery Box
- 2 x Blue Master Keys
- 2 x Emergency Keys
- 2 x Inner Door Keys (for internal lock box)
- 2 x Expansion Screws (for anchoring)
Important: Do not store the emergency keys or emergency battery box inside the safe.

Figure 3.1: Package Contents
4. Setup
4.1 Initial Opening and Battery Installation
- Locate the emergency keyhole, usually concealed behind a cover on the keypad panel.
- Insert one of the emergency keys and turn it. Simultaneously, turn the handle to open the safe door.
- Inside the safe door, locate the battery compartment. Insert 4 AA batteries (not included) with correct polarity.
- Close the battery compartment. The safe is now powered.
4.2 Removing Transport Wheels
The safe comes with removable wheels for easier transport. For enhanced security and stability, these wheels should be removed once the safe is in its final position.
- Carefully tilt the safe to access the wheels at the bottom.
- Unscrew and remove each wheel.
- Ensure the safe rests firmly on its base after removing the wheels.
4.3 Anchoring the Safe
To prevent unauthorized removal, it is highly recommended to anchor the safe to a wall or floor.
- Position the safe in your desired location.
- Locate the pre-drilled back holes inside the safe.
- Mark the drilling points on the wall or floor through these holes.
- Move the safe away and drill pilot holes at the marked points.
- Reposition the safe and align the holes.
- Insert the provided expansion screws through the safe's back holes and into the wall/floor, then tighten securely.
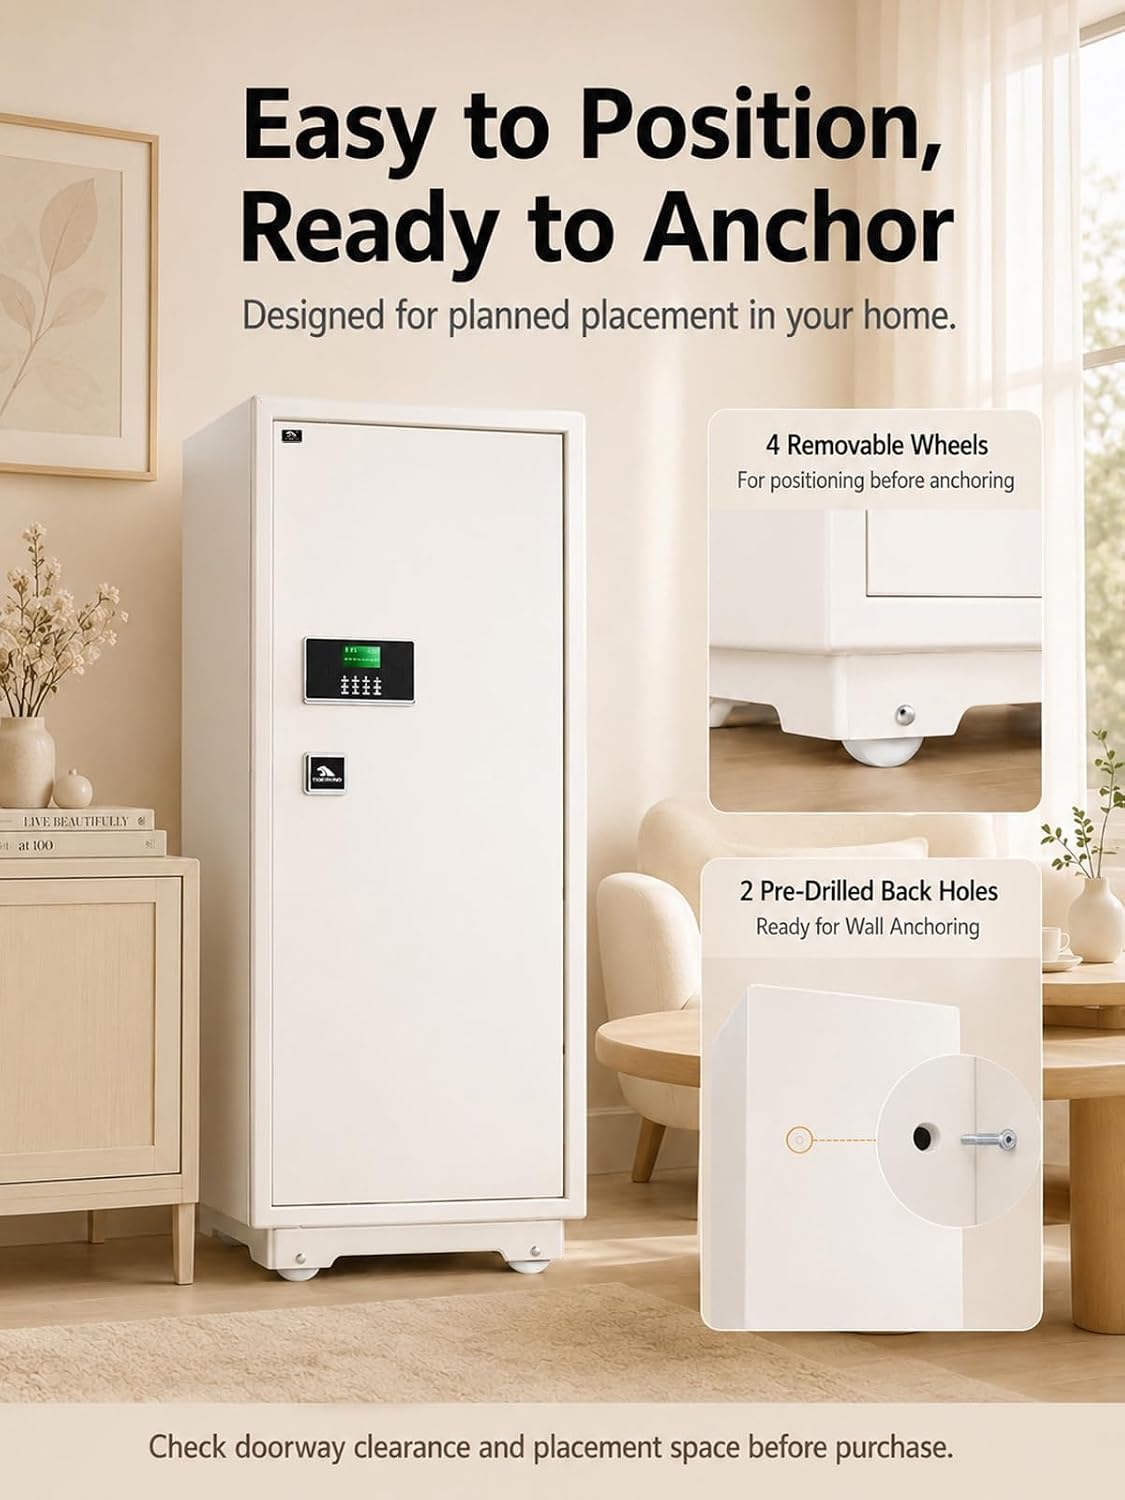
Figure 4.1: Removable Wheels and Anchoring Points
5. Operating Instructions
5.1 Opening the Safe
The TIGERKING safe offers dual-control access for enhanced security.
Method 1: Master Key + Password
- Insert the blue master key into the main keyhole and turn it clockwise to the open position.
- Enter your 1-8 digit password on the keypad.
- Press the '#' key to confirm.
- Within 5 seconds, turn the handle clockwise to open the safe door.
Method 2: Master Key + Emergency Key
This method bypasses the electronic keypad and is useful if you forget your password or if the batteries are completely drained.
- Insert the blue master key into the main keyhole and turn it clockwise to the open position.
- Locate the emergency keyhole (usually hidden behind a small cover on the keypad panel).
- Insert an emergency key into the emergency keyhole and turn it.
- Simultaneously turn the handle clockwise to open the safe door.

Figure 5.1: Dual Safety Key Lock System
5.2 Setting/Changing Your Password
- With the safe door open, press the red reset button located on the inside of the door (usually near the hinge). You will hear a beep.
- On the keypad, enter your new 1-8 digit password.
- Press the '#' key to confirm. The safe will beep twice, indicating successful password change.
- Test the new password with the door open before closing it.
5.3 Anti-Theft Alarm System
The safe is equipped with an alarm system that activates under certain conditions:
- Violent Vibration: If the safe experiences significant impact or movement.
- Incorrect Entries: After three consecutive incorrect password attempts.
When activated, the alarm will sound for 60 seconds. To silence the alarm, enter the correct password or use the master key and emergency key combination.

Figure 5.2: Dual Warning System
5.4 Hidden Code Feature
To prevent others from seeing your password as you enter it, use the hidden code feature:
- Press the '*' key before entering your password.
- Enter your password. The digits will not be displayed on the screen.
- Press the '#' key to confirm.
5.5 Internal Lock Box and Adjustable Shelves
The safe includes an internal lock box for additional security of smaller, highly valuable items. It also features three removable and adjustable shelves to customize the storage space according to your needs.

Figure 5.3: Organized Storage Inside
6. Maintenance
6.1 Battery Replacement
When the battery power is low, the keypad display will indicate a low battery warning. Replace the batteries promptly to ensure continuous operation.
- Open the safe door.
- Locate the battery compartment on the inside of the door.
- Replace the old batteries with 4 new AA batteries, ensuring correct polarity.
- Close the battery compartment.
If the batteries die while the safe is locked, use the emergency battery box or the emergency key to open the safe.
6.2 Cleaning
Clean the exterior of the safe with a soft, damp cloth. Avoid using abrasive cleaners or solvents that could damage the finish. Do not spray cleaning solutions directly onto the keypad or lock mechanism.
7. Troubleshooting
| Problem | Possible Cause | Solution |
|---|---|---|
| Safe does not open with password. | Incorrect password entered; Low batteries; Keypad malfunction. | Re-enter password carefully. Replace batteries. Use master key + emergency key. |
| Keypad is unresponsive. | Dead batteries; Loose battery connection. | Replace batteries. Ensure batteries are correctly inserted. Use emergency battery box. |
| Alarm sounds unexpectedly. | Vibration detected; Multiple incorrect entries. | Enter correct password or use master key + emergency key to silence. |
| Door does not close properly. | Obstruction; Locking bolts misaligned. | Check for items blocking the door. Ensure safe is on a level surface. |
8. Specifications
- Model: 150XH-1(W)
- Brand: TIGERKING
- Color: White
- Material: Alloy Steel
- External Dimensions (D x W x H): 22" x 23.6" x 62.2" (55.88 cm x 59.94 cm x 157.99 cm)
- Internal Dimensions (D x W x H): 18.7" x 23.2" x 48" (47.5 cm x 58.93 cm x 121.92 cm)
- Capacity: 17.6 Cubic Feet
- Item Weight: 235 lbs (106.64 kg)
- Lock Type: Electronic Combination Lock, Dual Safety Key Lock
- Special Features: Alarm System, Anti-Theft, Combination Lock, Removable Shelf, Sensor Light, Built-in Lock Box, Door Hooks, Door Storage Basket, Removable Wheels, Pre-Drilled Back Holes for Wall Anchoring.
- Power: 4 x AA Batteries (not included)
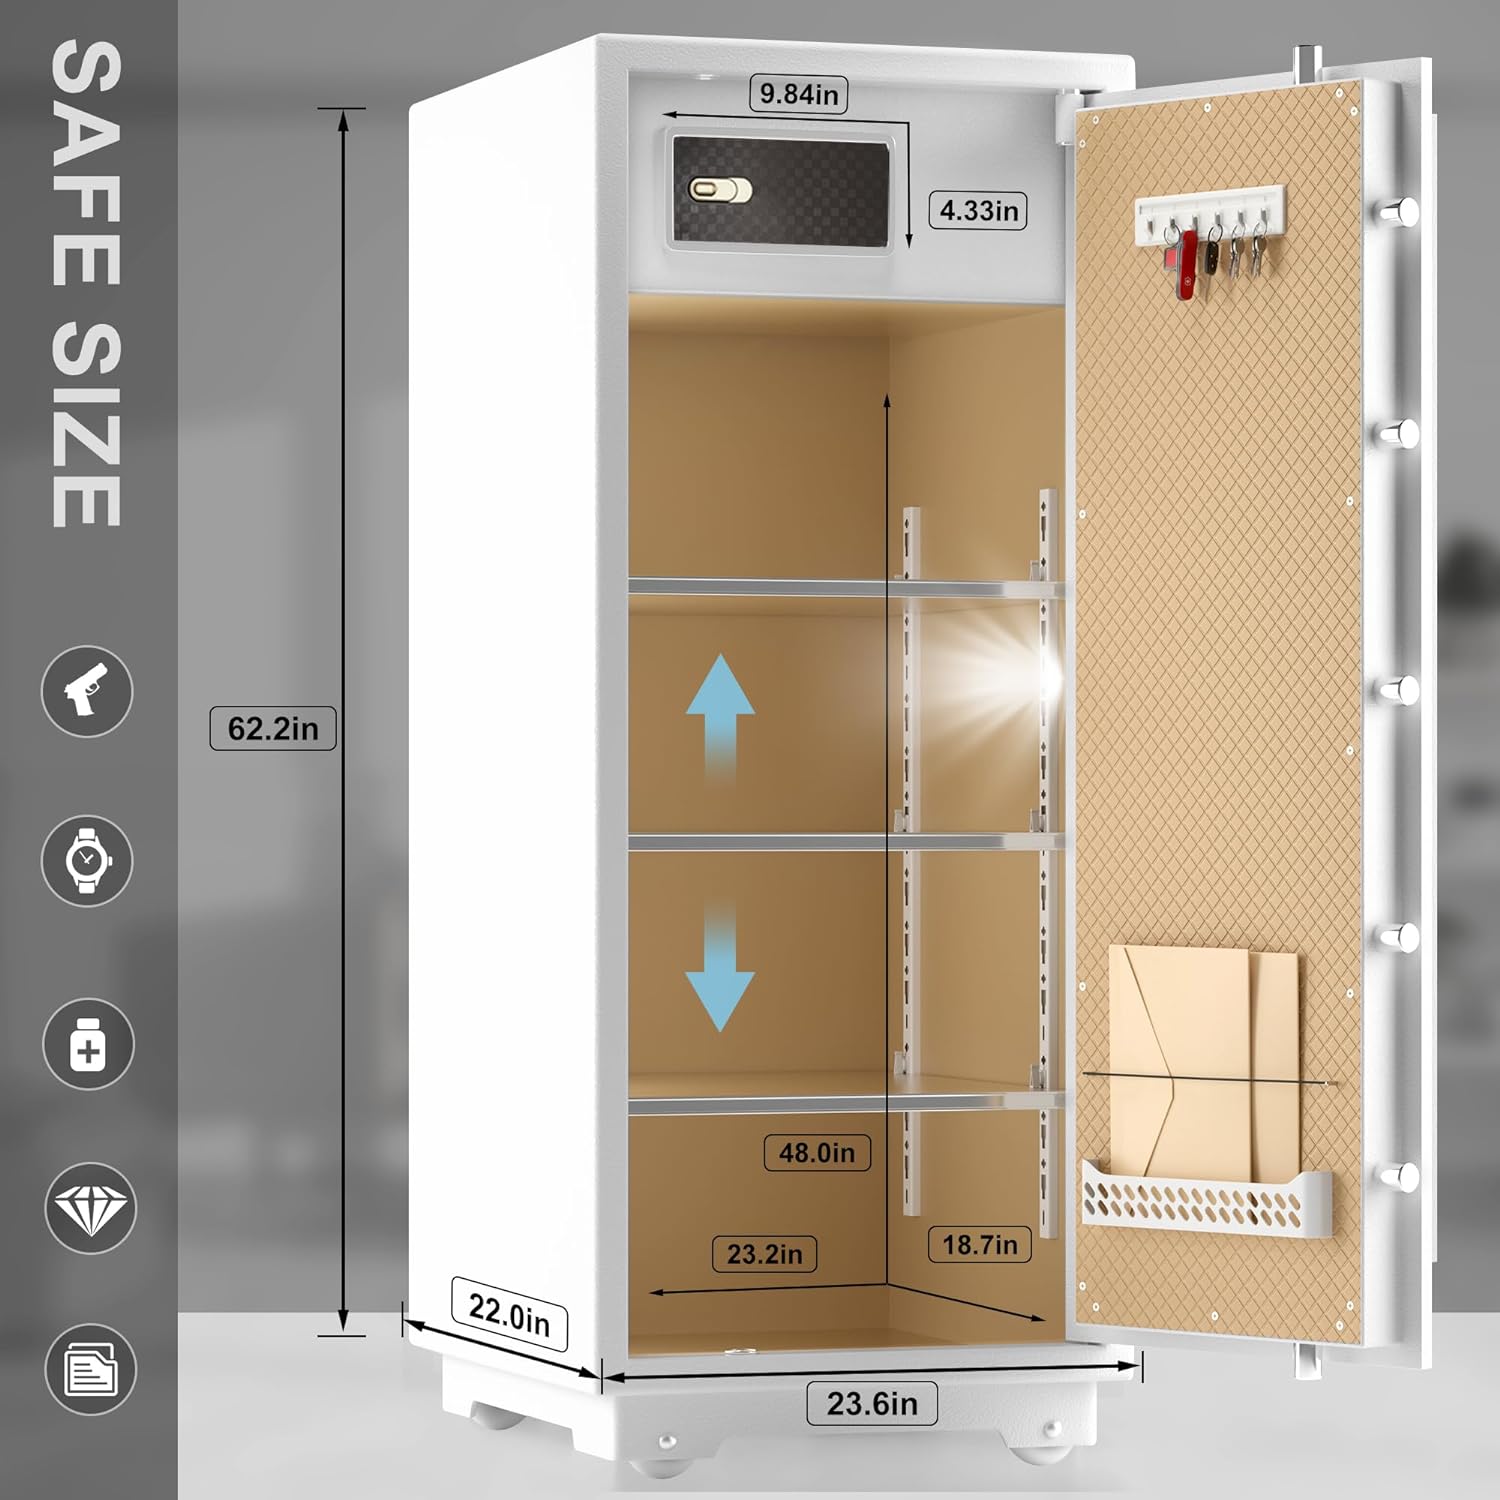
Figure 8.1: Safe Dimensions
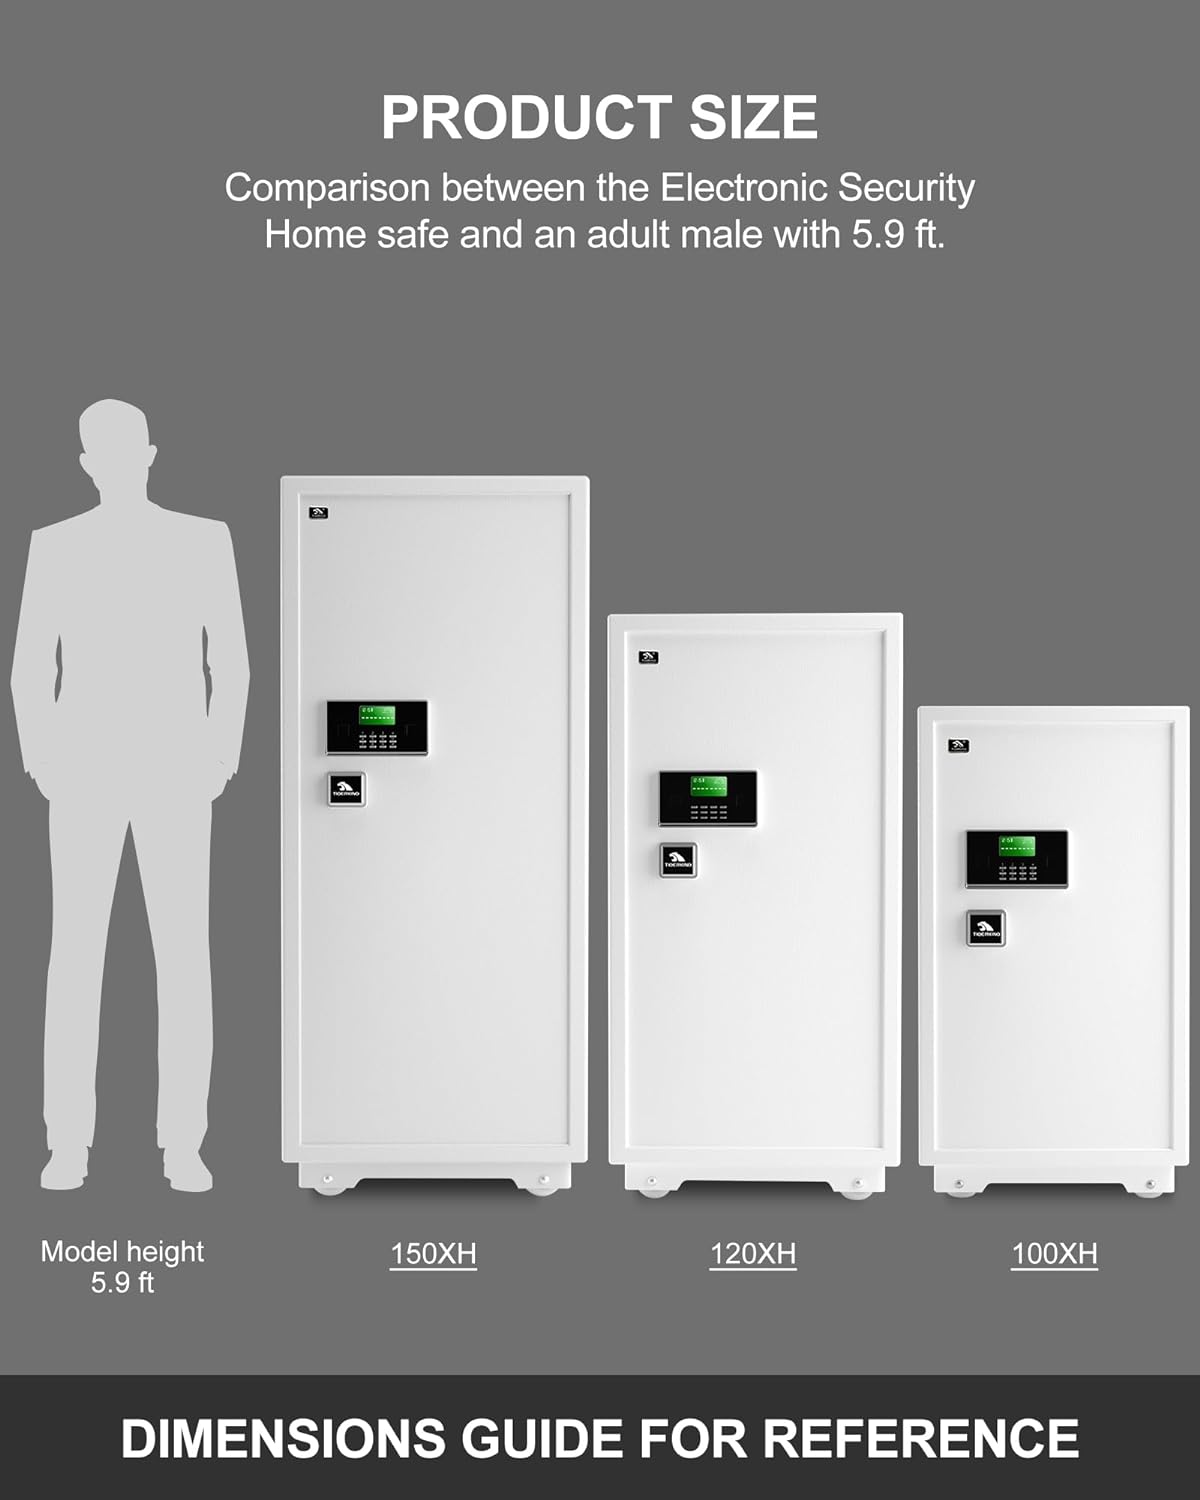
Figure 8.2: Product Size Reference
9. Warranty and Support
TIGERKING offers a 1-year warranty from the original purchase date for your safe. This warranty covers manufacturing defects and ensures peace of mind regarding the product's quality.
For any questions, technical assistance, or warranty claims, please contact TIGERKING customer support. Our team is dedicated to providing prompt and effective solutions.
Contact Information: Please refer to the contact details provided on the TIGERKING official website or your purchase documentation.
10. Product Video
Watch the official product video for a visual guide on the TIGERKING Extra Large Heavy Duty Safe Box features and operation.
Video 10.1: TIGERKING Extra Large Heavy Duty Safe Box Overview