
VIHELM TA501A
VIHELM TA501A Digital Tachometer User Manual
Model: TA501A
1. Introduction
The VIHELM TA501A is a handheld digital tachometer designed for non-contact measurement of rotation speed (RPM). It utilizes a semiconductor laser sensor for accurate and reliable readings across a wide range of applications. This manual provides detailed instructions for the safe and effective operation, maintenance, and troubleshooting of your TA501A tachometer.
2. Safety Information
Please read all safety warnings and operating instructions before using this instrument to avoid potential injury and prevent damage to the product. Keep this manual for future reference.
- Do not point the laser directly at eyes or reflective surfaces.
- Ensure the measurement surface is clean and free of obstructions.
- Do not operate the device in environments with explosive gas, vapor, or dust.
- Keep the device dry and clean. Avoid exposure to extreme temperatures or humidity.
- Only use the specified battery type (3 x 1.5V AAA). Remove batteries if the device will not be used for an extended period.
- Do not attempt to disassemble or modify the device. Refer all servicing to qualified personnel.
3. What's in the Box
Carefully unpack the contents and check for any damage. If any items are missing or damaged, please contact your supplier.

Figure 3.1: Package Contents. This image displays the items included with the TA501A tachometer: 1. Carton packaging, 2. TA501A Meter, 3. Cloth bag, 4. Instruction Manual, 5. Reflective tape (x3), 6. Protective cover.
- TA501A Digital Tachometer (x1)
- Instruction Manual (x1)
- Cloth Bag (x1)
- Reflective Tape (x3)
- Protective Cover (x1)
Note: Batteries (3 x 1.5V AAA) are not included and must be purchased separately.
4. Product Overview and Components
Familiarize yourself with the different parts of your TA501A tachometer.

Figure 4.1: TA501A Front View. This image shows the overall design of the TA501A digital tachometer with its LCD screen and control buttons.
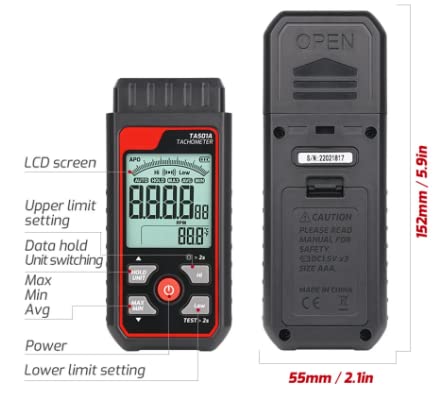
Figure 4.2: TA501A Front and Back View with Labeled Components. This image shows the front panel with the LCD screen, power button, HOLD/UNIT button, MAX/MIN button, and TEST button. The back panel shows the battery compartment and serial number. Dimensions are also indicated: 152mm / 5.9in (height) and 55mm / 2.1in (width).
4.1 Front Panel Layout
- LCD Screen: Displays measurement readings, units, battery level, and various indicators.
- Power Button (Ⓘ): Turns the device ON/OFF.
- HOLD/UNIT Button: Press to hold the current reading. Long press to switch measurement units (e.g., RPM).
- MAX/MIN Button: Cycles through Maximum, Minimum, and Average readings.
- TEST Button: Press and hold for more than 2 seconds to activate the speed measurement function and emit the red laser.
- Upper Limit Setting (Hi): Button for setting the upper alarm threshold.
- Lower Limit Setting (Low): Button for setting the lower alarm threshold.
4.2 Rear Panel
- Battery Compartment: Houses 3 x 1.5V AAA batteries.
- Serial Number: Unique identifier for the device.
4.3 Laser Sensor
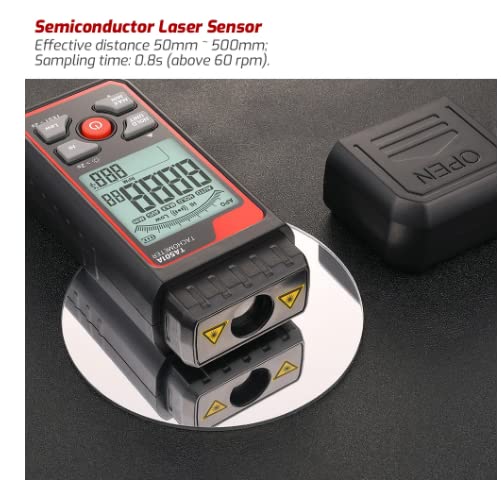
Figure 4.3: Semiconductor Laser Sensor. This image highlights the laser emission and reception points on the front of the tachometer. The effective measurement distance is 50mm to 500mm, with a sampling time of 0.8 seconds (for speeds above 60 RPM).
The TA501A uses a semiconductor laser sensor for non-contact RPM measurement. The laser is emitted from the front of the device and detects reflections from the target surface.
5. Setup
5.1 Battery Installation
The TA501A requires 3 x 1.5V AAA batteries (not included).
- Locate the battery compartment cover on the rear of the device.
- Slide the cover open in the direction indicated by the arrow.
- Insert three AAA batteries, ensuring correct polarity (+ and -) as marked inside the compartment.
- Close the battery compartment cover securely.
The device supports an auto power-off feature after 10 minutes of inactivity to conserve battery life. This can be manually canceled if needed.
5.2 Applying Reflective Tape
For accurate non-contact measurements, a piece of reflective tape must be applied to the rotating object. The tachometer measures the time it takes for the laser to reflect off this tape as it passes the sensor.
- Cut a small piece of the provided reflective tape.
- Apply it to the rotating shaft or object you wish to measure. Ensure the tape is flat and securely adhered.
- For best results, apply the tape to a clean, non-reflective surface.
6. Operating Instructions
6.1 Powering On/Off
- Press the Ⓘ button to turn the tachometer ON.
- Press and hold the Ⓘ button for approximately 2 seconds to turn the tachometer OFF.
6.2 Performing a Measurement

Figure 6.1: Infrared Non-Contact Measurement. This image demonstrates the TA501A being used to measure the RPM of a fan. The user presses and holds the TEST button for more than 2 seconds to activate the red laser, then aims it at the reflective tape on the rotating object.
- Ensure the reflective tape is properly applied to the rotating object.
- Turn on the tachometer.
- Hold the tachometer firmly and aim the laser beam at the reflective tape on the rotating object.
- Press and hold the TEST button for more than 2 seconds. The red laser will emit from the front end.
- Adjust the distance between the tachometer and the object to be within the effective range (50mm to 500mm).
- The RPM reading will be displayed on the LCD screen. Release the TEST button to stop measurement.
6.3 Data Hold Function
- During measurement, briefly press the HOLD/UNIT button to freeze the current reading on the display. The "HOLD" indicator will appear.
- Press the HOLD/UNIT button again to release the hold and resume live measurement.
6.4 MAX/MIN/AVG Measurement
- During measurement, press the MAX/MIN button to cycle through the maximum, minimum, and average RPM values recorded during the current measurement session.
- The corresponding indicator (MAX, MIN, AVG) will appear on the display.
6.5 Upper and Lower Limit Alarm
The TA501A allows you to set upper and lower RPM thresholds. When the measurement is higher or lower than the set threshold, the red background light on the screen will be on and the measurement value will blink.
- Press the Hi button to set the upper limit.
- Press the Low button to set the lower limit.
- Follow the on-screen prompts to adjust the values using the appropriate buttons.
6.6 Display Instructions
The LCD screen provides various indicators and readings:
- Battery level: Indicates remaining battery power.
- Auto power off (APO): Shows if the auto power-off function is active.
- Analog bar: Provides a visual representation of the RPM.
- Upper/Lower limit alarm: Indicators for set thresholds.
- Data hold: Indicates when a reading is frozen.
- Max/Min/Avg: Shows which statistical value is currently displayed.
- RPM: The primary rotation speed unit.
7. Maintenance
- Cleaning: Use a soft, dry cloth to clean the instrument's casing. Do not use abrasive cleaners or solvents.
- Laser Lens: Keep the laser emission and reception lenses clean and free of dust or smudges for accurate readings. Use a lens cleaning cloth if necessary.
- Storage: When not in use for extended periods, remove the batteries to prevent leakage and store the device in a cool, dry place, preferably in its protective cloth bag.
- Battery Replacement: Replace batteries when the low battery indicator appears on the display to ensure accurate operation.
8. Troubleshooting
| Problem | Possible Cause | Solution |
|---|---|---|
| Device does not power on. | Dead or incorrectly installed batteries. | Check battery polarity. Replace with new AAA batteries. |
| Inaccurate or unstable readings. |
|
|
| Laser does not emit. | TEST button not held long enough or device malfunction. | Press and hold TEST button for >2 seconds. If problem persists, contact support. |
9. Specifications
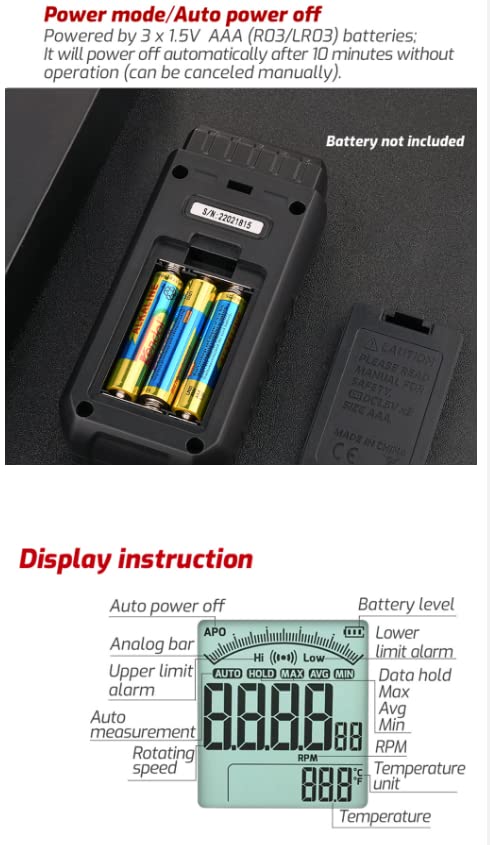
Figure 9.1: Technical Parameters. This image provides a detailed table of the TA501A's specifications, including measurement range, resolution, accuracy, effective distance, sampling rate, auto power off, working environment, storage environment, product size, screen size, weight, and power requirements.
| Parameter | Specification |
|---|---|
| Model | TA501A |
| Measurement Range | 2.5 RPM ~ 99999 RPM |
| Resolution | 0.1 RPM (2.5 RPM ~ 999.9 RPM), 1 RPM (1000 RPM ~ 99999 RPM) |
| Accuracy | ±(0.05% reading + 1 digit) |
| Effective Distance | 50mm ~ 500mm |
| Sampling Rate | 0.8 seconds (above 60 RPM) |
| Auto Power Off | 10 minutes (can be canceled manually) |
| Working Environment | -10 °C ~ 50 °C, Max 80% RH, indoor altitude < 2000m |
| Storage Environment | -10 °C ~ 50 °C, Max 70% RH (battery removed) |
| Product Size | 152 x 55 x 33 mm |
| Screen Size | 37 x 41 mm |
| Weight | Approx. 125g (battery not included) |
| Power | 3 x 1.5V AAA (R03/LR03) batteries |
10. Warranty and Support
VIHELM products are manufactured to high quality standards. For information regarding warranty coverage, technical support, or service, please refer to the warranty card included with your product or visit the official VIHELM website. Please retain your purchase receipt as proof of purchase for warranty claims.
For further assistance, please contact your local distributor or the manufacturer directly.
Ask a question about this manual
Ask about setup, troubleshooting, compatibility, parts, safety, or missing instructions. Manuals+ will review the question and use this page’s manual context to help answer it.