
Waitbird CB-03A
Waitbird Steam Cleaner User Manual
Model: CB-03A
Introduction
Thank you for choosing the Waitbird Multipurpose Powerful Steam Cleaner. This manual provides essential information for the safe and effective operation, maintenance, and troubleshooting of your new steam cleaner. Please read it thoroughly before first use and keep it for future reference.
This steam cleaner is designed to provide a natural and chemical-free way to clean and disinfect various surfaces using high-temperature steam, reaching up to 248°F (120°C).
Important Safety Instructions
WARNING: To reduce the risk of fire, electric shock, or injury, read all instructions before using this appliance.
- Always unplug the appliance from the electrical outlet when not in use and before servicing.
- Do not leave the appliance unattended when plugged in.
- Do not use with a damaged cord or plug.
- Do not direct steam at people, animals, or electrical components. High-temperature steam can cause burns.
- Ensure the safety cap is fully tightened before heating. Never operate with a loose cap.
- Do not open the lid immediately after use. Allow the unit to cool and release pressure before opening.
- Do not overfill the water tank. Recommended maximum is 30 ounces (900 ml).
- Keep out of reach of children. This unit has a built-in child safety lock.
- The appliance will auto-shutdown if steam pressure is too high or water runs out.
Package Contents
Your Waitbird Steam Cleaner comes with the following accessories:

Image: The Waitbird Steam Cleaner unit with all 21 included accessories, such as brushes, nozzles, and cloths, displayed.
- 6 x Nylon Utility Brushes
- 4 x Brass Utility Brushes
- 3 x Ironing Towels
- 6 x Microfiber Mop Pads
- 2 x Extension Tubes
- 1 x Measuring Cup
- 1 x Glove
- 1 x Ironing Brush
- 1 x Shoulder Strap
- 1 x Glass Brush
- 1 x Big Nozzle
- 1 x Floor Brush
- 1 x Carpet Glider
Product Overview
Familiarize yourself with the main components of your steam cleaner:

Image: A detailed diagram showing the steam cleaner unit and its various parts, including the steam gun, hose, power button, and safety cap.
| Component | Description |
|---|---|
| Main Unit | Houses the water tank and heating element. |
| Steam Gun | Handheld part for directing steam, with steam button and lock. |
| Safety Cap | Pressure release cap for water tank. |
| Power ON/OFF Button | Controls power to the unit. |
| LED Light | Indicates power and heating status. |
| Adjustable Button | Regulates steam volume (Min/Max). |
| Extension Tubes | For extended reach, especially with floor brush. |
Setup Instructions
- Fill the Water Tank:
Ensure the unit is unplugged and cool. Unscrew the safety cap counter-clockwise. Use the provided measuring cup to add up to 30 ounces (900 ml) of clean water into the tank. Do not overfill. Screw the safety cap back on clockwise until fully tightened.
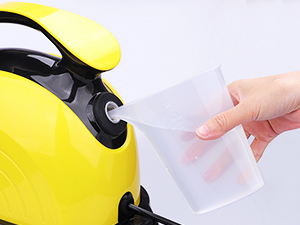
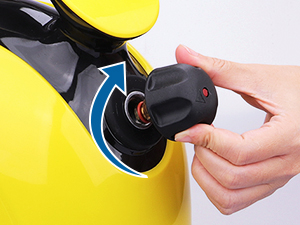
Image: Steps showing how to fill the water tank using the measuring cup and then securely tighten the safety cap.
- Attach Accessories:
Select the appropriate accessory for your cleaning task and firmly attach it to the steam gun or extension tube. Ensure it clicks into place securely.
- Power On:
Plug the power cord into a grounded electrical outlet. Press the Power ON/OFF button. The LED light will illuminate, indicating the unit is heating up. The steam cleaner heats up in under 5 minutes.
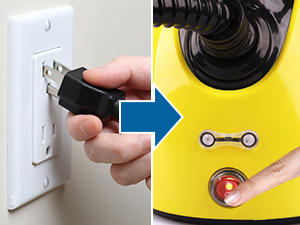
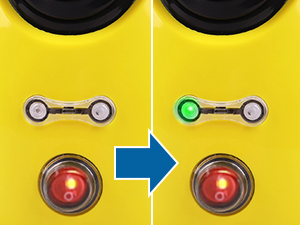
Image: Visual guide for plugging in the unit and observing the power indicator light change from red (heating) to green (ready).
Operating Instructions
Steam Modes:

Image: Illustration of the steam gun showing the manual and automatic steam lock positions.
- Manual Mode: Hold the steam gun by hand and push the steam button forward. Steam will be released as long as the button is held.
- Automatic Mode: To release continuous steam without holding the button, turn the steam lock to the right side. This will lock the steam button in the "on" position.
Adjusting Steam Volume:

Image: Close-up of the steam gun showing the Min/Max slider for steam volume adjustment.
Use the adjustable button on the steam gun to control the intensity of the steam. Slide it towards "Min" for lighter steam or "Max" for more powerful steam, depending on the cleaning task.
General Usage Tips:
- Always test the steam on an inconspicuous area first, especially on delicate surfaces.
- Move the steam nozzle slowly over the surface to allow the heat to penetrate and loosen dirt.
- Wipe away loosened dirt with a clean cloth immediately after steaming.
- For stubborn stains, apply steam for a longer duration or use a brush attachment.
Applications
The Waitbird Steam Cleaner is versatile and can be used on a wide range of surfaces:

Floors & Carpets
Effectively cleans sealed wood flooring, laminate, ceramic tile, and refreshes carpets with the floor brush and carpet glider.

Cars
Ideal for cleaning car interiors, upholstery, and hard-to-reach areas with various nozzle attachments.

Kitchens
Sanitize countertops, kitchen range hoods, ovens, and grout lines. The brass brushes are effective for tough grease.

Furniture & Upholstery
Refresh and clean fabric furniture, removing odors and light stains. Test on an inconspicuous area first.

Windows & Mirrors
Achieve streak-free windows and mirrors using the glass brush attachment.

Children's Products
Sanitize toys, high chairs, and other baby items without harsh chemicals.
Maintenance
- Draining Water: After each use, unplug the unit and allow it to cool completely. Turn it upside down and press the vapor release button until all pressure is vented. Carefully unscrew the safety cap and drain any remaining water.
- Cleaning Accessories: Wash removable accessories with mild soap and water. Allow them to air dry completely before storing.
- Descaling: Over time, mineral deposits may build up in the tank. To descale, add a solution of equal parts water and white vinegar to the tank. Heat the unit and release steam until the tank is empty. Repeat if necessary, then rinse thoroughly with clean water.
- Storage: Store the steam cleaner and its accessories in a cool, dry place, away from direct sunlight and extreme temperatures.
Troubleshooting
Here are solutions to common issues you might encounter:
- Q: Why can't I open the lid immediately after use?
- A: Residual steam and pressure inside the tank are still dangerously high. Please follow these steps: 1. Unplug the unit. 2. Turn it upside down and press the vapor release button until all pressure is vented. 3. Safely open the lid. 4. Refill with water as needed (it is recommended that no more than 900ml of water be added at one time).
- Q: Why do I need to loosen the lid after each use?
- A: Prolonged tightening may result in the lid getting stuck due to temperature changes. To prevent this, gently unscrew the lid (one full turn) once it has cooled down. This maintains the integrity of the seals for long term use.
- Q: Why is there not enough steam pressure?
- A: Before heating, make sure the safety cap is fully tightened. If the pressure is still low: 1. Allow the unit to cool completely. 2. Reopen and securely fasten the cap and reheat. Never operate with the cap loose as there is a risk of burns or malfunction.
- Q: Why does the unit leak air after connecting the accessories?
- A: 1. Press the steam switch once to allow steam to be released. This usually resolves a slight pressure imbalance. 2. If the leak persists, contact our support team for troubleshooting or replacement parts.
- Q: Why can't steam stay hot indefinitely?
- A: The high heat of steam naturally dissipates quickly for quick cleaning. To maintain optimal performance, keep the unit energized during use.
- Q: How much water should I add?
- A: Never fill completely to overflow, it is recommended to add no more than 30 ounces (900 ml) at a time. Overfilling may cause leaks during heating or operation. If a leak occurs, contact our support team immediately via email/phone with photos/videos for assistance.
Specifications
| Feature | Detail |
|---|---|
| Brand | Waitbird |
| Model Name | CB-03A |
| Maximum Temperature | 248°F (120°C) |
| Water Tank Capacity | 1.08 Liters (approx. 38 oz) |
| Heat Time | Under 5 minutes |
| Continuous Steam Time | Up to 45 minutes |
| Wattage | 1100W |
| Voltage | 230V |
| Item Weight | 9.97 pounds (4.53 kg) |
| Product Dimensions | 11.54 x 6.22 x 8.66 inches |
| Special Features | Carry Handle, Child Lock, Compact Design, High Pressure, Rapid Heat Up |
Warranty and Support
Waitbird provides a 12-month warranty for this product. For any questions, concerns, or assistance with troubleshooting, please contact our customer support team.

Image: A customer service representative ready to assist with product inquiries.
You can find more information and contact details on the official Waitbird store page: Waitbird Official Store
Related documentsCB-03A


Ask a question about this manual
Ask about setup, troubleshooting, compatibility, parts, safety, or missing instructions. Manuals+ will review the question and use this page’s manual context to help answer it.