1. Introduction
This manual provides comprehensive instructions for the installation, operation, and maintenance of your INTELBRAS TDMI 300 Dedicated Apartment Intercom. Designed for residential use in apartments and condominiums, this intercom facilitates communication with the building's entrance or concierge. Please read this manual thoroughly before installation and use to ensure proper functionality and longevity of the product.
2. Product Overview
The INTELBRAS TDMI 300 is a dedicated intercom unit featuring a lightweight design and essential functions for apartment communication systems.
2.1 Key Features
- Portaria Key: Dedicated button for direct communication with the building's concierge or reception.
- Lightweight Design: Compact and unobtrusive unit suitable for modern living spaces.
- Apartment and Condominium Use: Specifically designed for integration into multi-unit residential communication systems.
- Lock Key: Button to remotely open the main entrance door lock (requires compatible lock system).
2.2 Components and Controls

Figure 1: Front view of the TDMI 300 intercom, showing the handset on the left and the main unit with a numeric keypad, 'FLASH', '0', '#', '*' buttons, and 'PORTARIA' and 'Lock' keys on the right. The coiled cord connects the two parts.

Figure 2: Side profile of the TDMI 300 intercom, illustrating its compact and wall-mounted design. The Intelbras logo is visible on the side of the main unit.
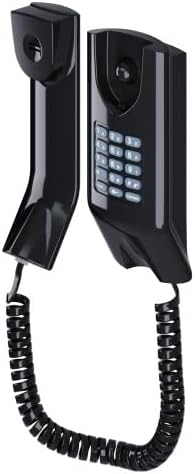
Figure 3: Angled perspective of the TDMI 300 intercom, highlighting how the handset and main unit are designed for wall installation, connected by a coiled cord.

Figure 4: A different angled view of the TDMI 300 intercom, providing a clear look at the numeric keypad and the ergonomic placement of the handset when docked.
3. Setup and Installation
The INTELBRAS TDMI 300 intercom is designed for wall mounting. Proper installation is crucial for optimal performance and safety. It is recommended that installation be performed by a qualified technician.
3.1 Installation Steps (General Guidelines)
- Choose Location: Select a suitable wall location, typically near the entrance of the apartment, ensuring easy access and clear audio.
- Prepare Wiring: Ensure the necessary wiring from the building's central intercom system is available at the chosen installation point. This typically involves two wires for audio and control.
- Mount the Unit: Securely attach the main intercom unit to the wall using appropriate screws and anchors (not included, typically provided by the building's installer).
- Connect Wiring: Connect the building's intercom wires to the designated terminals on the back of the TDMI 300 unit. Refer to the specific wiring diagram provided by your building's intercom system manufacturer or installer for precise connections.
- Attach Handset: Connect the coiled cord from the main unit to the handset.
- Test Functionality: After installation, test all functions, including receiving calls, making calls to the concierge, and operating the door lock.
Important: Incorrect wiring can damage the unit or the building's intercom system. Always consult with a professional if you are unsure about any installation steps.
4. Operating Instructions
The INTELBRAS TDMI 300 intercom is designed for straightforward operation.
4.1 Receiving a Call
- When a visitor calls your apartment from the building's main entrance panel, the intercom will ring.
- Lift the handset to answer the call and communicate with the visitor.
- To end the call, place the handset back on the main unit.
4.2 Calling the Concierge/Reception (Portaria)
- Lift the handset.
- Press the PORTARIA button. The intercom will connect you to the building's concierge or reception.
- Communicate as needed, then replace the handset to end the call.
4.3 Opening the Main Entrance Door Lock
- During an active call with a visitor at the main entrance, or after calling the concierge, you can open the door.
- Press the Lock button (often depicted with a key icon). This will activate the electric lock, allowing the visitor to enter.
- Ensure the door is clear before activating the lock.
4.4 Using the Numeric Keypad
- The numeric keypad (0-9, *, #) is typically used for advanced functions or direct dialing within the building's intercom network, if supported by your central system.
- Consult your building's intercom system administrator for specific dialing codes or functions.
- The FLASH button may be used for call transfer or other PBX-like functions, depending on the central system configuration.
5. Maintenance
Regular cleaning and proper care will ensure the longevity and optimal performance of your INTELBRAS TDMI 300 intercom.
5.1 Cleaning
- Use a soft, dry, or slightly damp cloth to clean the exterior of the intercom unit and handset.
- Do not use abrasive cleaners, solvents, or strong chemicals, as these can damage the finish.
- Ensure no liquid enters the unit's openings.
5.2 General Care
- Avoid exposing the unit to direct sunlight, extreme temperatures, or high humidity.
- Do not drop the unit or subject it to strong impacts.
- If the coiled cord becomes damaged, contact a qualified technician for replacement.
6. Troubleshooting
If you experience issues with your INTELBRAS TDMI 300 intercom, refer to the following common problems and solutions.
| Problem | Possible Cause | Solution |
|---|---|---|
| No sound from handset or speaker. | Loose wiring connection; faulty handset or unit; central system issue. | Check wiring connections. Ensure handset is properly seated. If problem persists, contact building management or a technician. |
| Intercom does not ring. | Central system issue; wiring problem; ringer disabled (if applicable). | Verify central intercom system status. Check wiring. Ensure ringer is not muted (TDMI 300 typically does not have a mute function, so this points to system issue). |
| Door lock does not open. | Incompatible lock system; wiring issue to lock; central system fault. | Confirm compatibility with building's electric lock. Check wiring. Contact building management or technician. |
| Cannot call concierge (Portaria). | Central system issue; incorrect wiring. | Verify central intercom system status. Check wiring. |
For issues not listed here or if solutions do not resolve the problem, please contact your building's administration or a qualified technical support professional.
7. Technical Specifications
| Feature | Detail |
|---|---|
| Brand | Intelbras |
| Model | TDMI 300 |
| Part Number | 4500026 |
| Product Type | Dedicated Apartment Intercom |
| Mounting Type | Wall Mount |
| Product Dimensions | 11.9 x 19.3 x 6.7 cm (approximately 4.69 x 7.60 x 2.64 inches) |
| Product Weight | 400 g (approximately 0.88 lbs) |
| Power Source | Not battery operated (powered by central intercom system) |
8. Warranty and Support
8.1 Manufacturer's Warranty
The INTELBRAS TDMI 300 intercom comes with a 1-year manufacturer's warranty. This warranty covers defects in materials and workmanship under normal use. Please retain your proof of purchase for warranty claims.
The warranty does not cover damage caused by improper installation, misuse, accidents, unauthorized repairs, or acts of nature.
8.2 Technical Support
For technical assistance, warranty claims, or further information regarding your INTELBRAS TDMI 300 intercom, please contact Intelbras customer support or visit the official Intelbras website. Contact details can typically be found on the product packaging or the Intelbras official website.
Intelbras Website: www.intelbras.com.br (Please note: This link is for informational purposes and may be subject to change.)


