
Introduction
This manual provides essential instructions for the safe operation, assembly, maintenance, and troubleshooting of your RYOBI ONE+ 18V 13-inch Cordless String Trimmer/Edger. Please read and understand all instructions before using the product. Keep this manual for future reference.

Image 1: The RYOBI ONE+ 18V 13-inch Cordless String Trimmer/Edger, shown with its included 4.0 Ah battery and charger.
Important Safety Information
Failure to follow these safety instructions may result in serious injury. Always prioritize safety when operating power tools.
- Eye and Ear Protection: Always wear appropriate eye protection (safety glasses or goggles) and ear protection when using this product.
- Bystander Safety: Be aware of flying debris. Keep bystanders, children, and pets at a safe distance (at least 50 feet/15 meters) from the operating area.
- Flammable Materials: Do not operate the trimmer near flammable liquids, gases, or dust. Sparks from the motor may ignite them.
- Hand and Foot Placement: Keep hands and feet away from the cutting path and all moving parts. Never reach under the trimmer head while the unit is running.
- Secure Grip: Maintain a firm grip on the trimmer with both hands during operation.
- Clear Work Area: Before starting, inspect the work area for objects that could be thrown or entangled in the cutting line, such as rocks, glass, wire, or string. Remove them.
- Weather Conditions: Do not use the trimmer in wet conditions or rain.
- Battery Safety: Use only the specified battery and charger. Do not charge batteries in damp or wet locations.
Setup and Assembly
Your RYOBI ONE+ 18V 13-inch Cordless String Trimmer/Edger requires minimal assembly. Ensure all components are present before beginning.
1. Unpacking and Inspection
- Carefully remove all contents from the packaging.
- Inspect the tool for any damage. Do not operate if damaged.
- Verify that all items listed in the package contents are present: trimmer, 4.0 Ah battery, and charger.
2. Guard Assembly
The debris guard must be installed before operation to protect against thrown objects.
- Align the guard with the mounting slots on the trimmer head.
- Secure the guard using the provided screws. Ensure it is firmly attached.
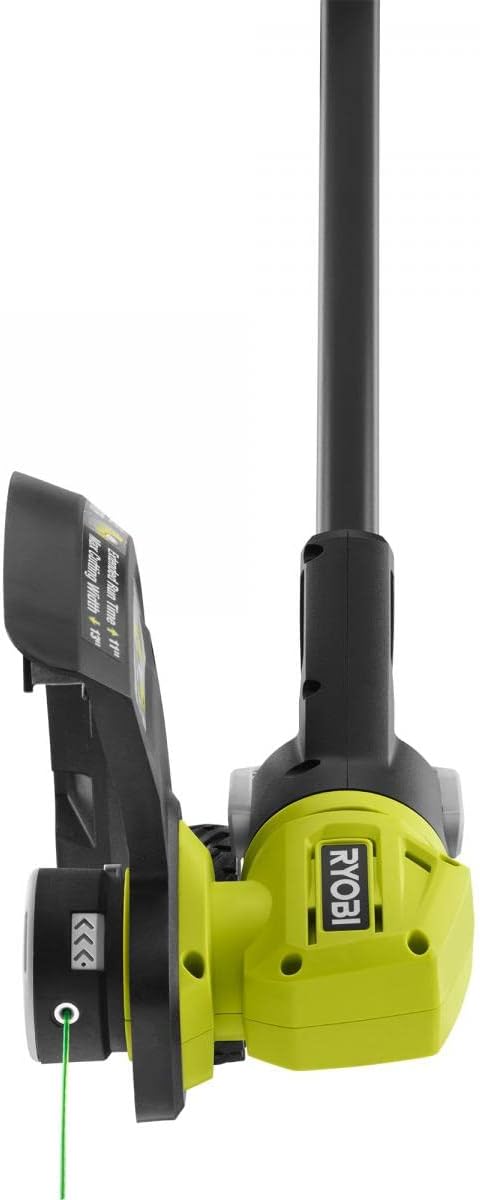
Image 2: Close-up view of the trimmer head, showing the cutting line and the installed debris guard.
3. Auxiliary Handle Adjustment
Adjust the auxiliary handle for comfortable and balanced operation.
- Loosen the handle adjustment knob.
- Slide the handle to the desired position.
- Tighten the knob securely.
4. Battery Charging and Installation
The included 4.0 Ah battery must be fully charged before first use.
- Connect the charger to a standard electrical outlet.
- Slide the battery onto the charger until it clicks into place.
- Allow the battery to charge until the indicator light shows a full charge. Refer to the charger manual for specific indicator details.
- Once charged, slide the battery into the battery port on the trimmer until it locks securely.
Operating Instructions
Familiarize yourself with the controls and functions before operating the trimmer/edger.
1. Starting and Stopping
- To Start: Press the safety lock-out button, then squeeze the variable speed trigger.
- To Stop: Release the variable speed trigger. The cutting line will stop rotating.
2. Trimming Operation
- Hold the trimmer firmly with both hands.
- Maintain a comfortable distance from your body.
- Use a sweeping motion, moving the trimmer from side to side.
- The auto-feed line head will automatically advance the line when the trigger is released and then re-engaged.
- Adjust the variable speed trigger for more control around delicate areas or obstacles.
3. Edging Operation
The trimmer can be easily converted into an edger.
- Ensure the trimmer is turned off and the battery is removed before adjusting.
- Locate the pivoting head mechanism (step-to-edge).
- Pivot the head 90 degrees to the edging position. It should lock into place.
- Reinstall the battery.
- For edging, guide the wheel along the edge of the pavement or desired line.

Image 3: The RYOBI ONE+ 18V 13-inch Cordless String Trimmer/Edger positioned for operation, demonstrating its ergonomic design.
4. Cutting Width Adjustment
The cutting width can be adjusted from 11 inches to 13 inches to optimize for runtime or wider coverage.
- Refer to the trimmer head for the adjustment mechanism, typically a rotating or sliding component on the guard.
- Adjust to the desired width and ensure it is securely locked.
Maintenance
Regular maintenance ensures optimal performance and extends the life of your tool. Always remove the battery before performing any maintenance.
1. Cleaning
- After each use, clean the trimmer head and guard to remove grass clippings, dirt, and debris.
- Use a damp cloth and mild soap. Do not use harsh chemicals or abrasive cleaners.
- Ensure ventilation openings are clear of debris to prevent overheating.
2. Trimmer Line Replacement
This trimmer is compatible with .065 and .080 inch diameter trimmer line.
- Remove the battery.
- Refer to the instructions on the trimmer head or in the detailed manual for specific line loading procedures for the auto-feed head.
- Typically, this involves aligning arrows on the spool and housing, then feeding new line through the eyelets and winding it by rotating the spool.
3. Battery and Charger Care
- Store batteries in a cool, dry place away from direct sunlight and moisture.
- Do not store batteries in a discharged state for extended periods. Charge them periodically.
- Keep the charger clean and free of debris.
Troubleshooting
This section addresses common issues you might encounter.
| Problem | Possible Cause | Solution |
|---|---|---|
| Trimmer does not start | Battery not installed correctly Battery discharged Safety lock-out not engaged |
Ensure battery is fully seated Charge battery fully Press safety lock-out button before squeezing trigger |
| Cutting line does not advance | Line tangled or jammed Insufficient line on spool Incorrect line diameter |
Remove battery and clear obstruction Replace line spool Use .065 or .080 inch diameter line |
| Reduced cutting performance | Dull or worn line Cutting too much material at once Battery low |
Replace line Take smaller passes Charge battery |
| Excessive vibration | Damaged trimmer head or spool Loose components |
Inspect and replace damaged parts Check all fasteners for tightness |
Specifications
| Feature | Detail |
|---|---|
| Model Number | P20180 |
| Brand | RYOBI |
| Power Source | 18V Battery Powered (ONE+ System) |
| Battery Included | 4.0 Ah Lithium-Ion |
| Charger Included | Yes |
| Cutting Width | Adjustable 11 in. to 13 in. |
| Compatible Line Diameter | .065 in. and .080 in. |
| Line Feed System | Auto-feed |
| Speed | Up to 5000 RPM |
| Item Weight | 7 Pounds |
| Product Dimensions | 28"L x 10"W |
| Assembly Required | No (Minimal assembly of guard/handle may be needed) |
| UPC | 715450308926 |
Warranty Information
This RYOBI ONE+ 18V 13-inch Cordless String Trimmer/Edger (Model P20180) is backed by a 3-year limited warranty. For specific terms, conditions, and registration details, please refer to the warranty card included with your product or visit the official RYOBI website.
Keep your proof of purchase for warranty claims.
Customer Support
If you have questions, require assistance, or need to order replacement parts, please contact RYOBI Customer Service. Contact information can typically be found on the RYOBI website or on the product packaging.
When contacting support, please have your model number (P20180) and serial number (if applicable) ready.


