
RYOBI RYOBI HEDGE TRIMMER
RYOBI 18V ONE+ 22" Hedge Trimmer Dual Action User Manual
Model: RYOBI HEDGE TRIMMER
1. Introduction
This manual provides essential information for the safe and effective operation, maintenance, and troubleshooting of your RYOBI 18V ONE+ 22" Hedge Trimmer Dual Action. Please read this manual thoroughly before using the product and retain it for future reference.
The RYOBI 22 in. 18V ONE+ Cordless Hedge Trimmer is designed for hedge maintenance around the house. Its lightweight and compact design ensures comfortable and easy operation. Featuring 22-inch dual-action blades and a 3/4-inch cut capacity, it is capable of handling various hedge types. The ergonomic handle provides enhanced control, and the integrated HEDGESWEEP feature helps clear clippings and debris during trimming. This tool is compatible with all RYOBI 18V ONE+ batteries.
2. Safety Information
Always follow basic safety precautions to reduce the risk of fire, electric shock, and personal injury when operating power tools. Keep this manual for future reference.
General Safety Rules:
- Read all instructions: Familiarize yourself with the controls and proper use of the hedge trimmer.
- Wear appropriate personal protective equipment (PPE): Always wear safety glasses or goggles, hearing protection, and heavy-duty gloves. Long pants and sturdy footwear are also recommended.
- Keep area clear: Ensure the work area is free of debris, children, and bystanders.
- Avoid accidental starting: Ensure the switch is in the OFF position before inserting the battery pack or carrying the tool.
- Do not overreach: Maintain proper footing and balance at all times.
- Inspect the tool: Before each use, check for damaged parts, loose fasteners, or any other condition that may affect its operation.
- Use the right tool: Do not force the tool; use it for its intended purpose only.
- Battery safety: Use only RYOBI 18V ONE+ batteries. Do not expose batteries to water or extreme temperatures.
- Blade safety: Blades are sharp. Handle with care. Always ensure the tool is off and the battery is removed before cleaning or performing maintenance.
3. Package Contents
Upon opening the package, verify that all items listed below are present and undamaged. If any parts are missing or damaged, contact RYOBI customer service.
- RYOBI 18V ONE+ 22" Hedge Trimmer Dual Action Unit
- Blade Sheath
- Operator's Manual (this document)
Note: Battery and charger are sold separately and are not included with this unit.
4. Setup and Assembly
The RYOBI 18V ONE+ 22" Hedge Trimmer comes largely pre-assembled. The primary setup involves installing the battery.
4.1 Battery Installation
- Ensure the hedge trimmer is turned OFF.
- Align the ribs on the battery pack with the grooves in the tool's battery port.
- Slide the battery pack into the tool until it clicks securely into place.
- To remove the battery, press the release latch and pull the battery pack out.
4.2 Blade Sheath Removal
Before operation, carefully remove the blade sheath from the cutting blades. Store the sheath in a safe place for re-installation after use.

Figure 4.1: RYOBI 18V ONE+ 22" Hedge Trimmer ready for use. This image shows the overall design, including the 22-inch dual-action blades and the wrap-around handle.
5. Operation
Follow these steps for safe and effective operation of your hedge trimmer.
5.1 Starting and Stopping
- Ensure the battery is fully charged and securely installed.
- To start the trimmer, grasp the wrap-around handle firmly with both hands. The trimmer requires both the front handle switch and the rear trigger switch to be depressed simultaneously for operation.
- Release either switch to stop the trimmer.
5.2 Trimming Techniques
- Horizontal Trimming: Hold the trimmer with the blades parallel to the ground. Sweep the trimmer in a smooth, arcing motion across the top of the hedge.
- Vertical Trimming: Hold the trimmer with the blades perpendicular to the ground. Start at the bottom of the hedge and sweep upwards, or vice versa, depending on comfort and control.
- HEDGESWEEP Feature: The integrated HEDGESWEEP debris remover helps clear clippings from the top of the hedge as you trim, improving visibility and efficiency.
- Cutting Capacity: The trimmer has a 3/4 inch cutting capacity. Do not attempt to cut branches thicker than this to avoid damaging the blades or motor.
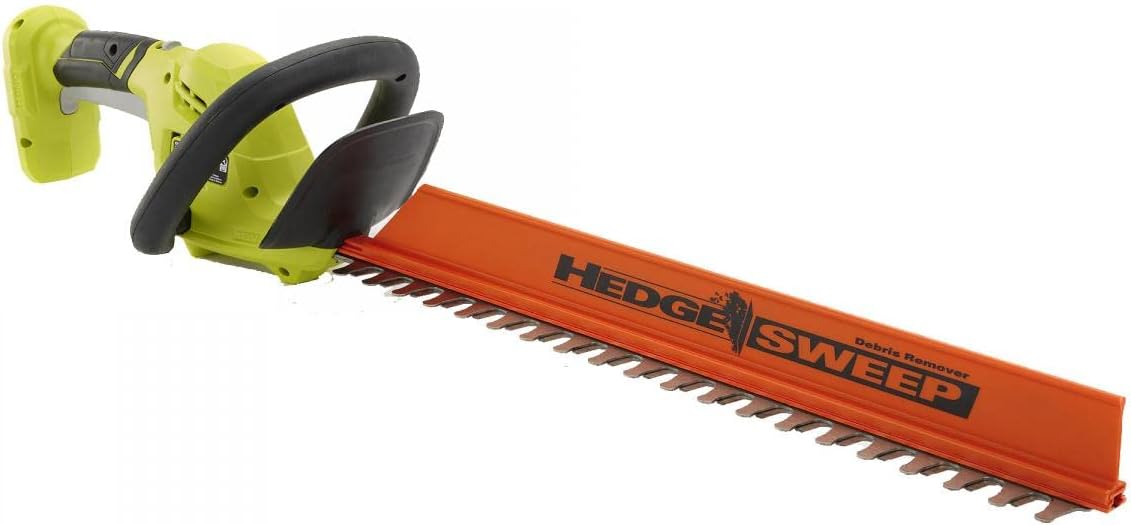
Figure 5.1: Detail of the HEDGESWEEP debris remover. This image highlights the innovative feature designed to clear clippings during operation.

Figure 5.2: Side profile of the RYOBI Hedge Trimmer. This view showcases the extended reach provided by the 22-inch dual-action blades.
6. Maintenance
Regular maintenance ensures optimal performance and extends the life of your hedge trimmer. Always remove the battery pack before performing any maintenance.
6.1 Cleaning
- After each use, clean the blades and exterior of the tool with a damp cloth.
- Remove any accumulated debris, sap, or leaves from the blades and vents.
- Do not use solvents or harsh chemicals, as they may damage plastic parts.
6.2 Blade Lubrication
To ensure smooth operation and prevent rust, lubricate the blades regularly, especially after cleaning or prolonged storage. Apply a light machine oil or blade lubricant along the cutting edge.
6.3 Storage
- Always re-install the blade sheath before storing the trimmer.
- Store the tool in a dry, secure place, out of reach of children.
- Remove the battery pack from the tool before storing for extended periods.
7. Troubleshooting
This section addresses common issues you might encounter. For problems not listed here, contact RYOBI customer service.
| Problem | Possible Cause | Solution |
|---|---|---|
| Trimmer does not start. | Battery not installed correctly or discharged. Both switches not depressed. | Ensure battery is fully charged and securely inserted. Depress both the front handle switch and rear trigger switch simultaneously. |
| Reduced cutting performance. | Blades are dull or dirty. Attempting to cut material too thick. | Clean and lubricate blades. If dull, consider professional sharpening or replacement. Do not exceed 3/4 inch cutting capacity. |
| Excessive vibration. | Damaged or bent blade. Loose components. | Inspect blades for damage. If damaged, replace. Check all fasteners for tightness. |
8. Specifications
| Feature | Specification |
|---|---|
| Brand | RYOBI |
| Model Number | RYOBI HEDGE TRIMMER |
| Power Source | Battery Powered (RYOBI 18V ONE+ System) |
| Blade Length | 22 Inches |
| Cutting Capacity | Up to 3/4 Inches |
| Blade Type | Dual-Action |
| Item Weight | 5.5 Pounds |
| Product Dimensions (L x W x H) | 28 x 7 x 8 inches |
| Material | Metal (Blades) |
| Color | GREEN |
| UPC | 715450204389 |
9. Warranty and Support
RYOBI products are manufactured to high-quality standards and are backed by a limited warranty. For specific warranty details, including duration and coverage, please refer to the warranty card included with your product or visit the official RYOBI website.
For technical assistance, replacement parts, or to locate an authorized service center, please contact RYOBI Customer Service. Keep your proof of purchase and product model number readily available when contacting support.
Online Support: www.ryobitools.com/support
Protection Plans: Extended protection plans may be available for purchase. These plans offer additional coverage beyond the standard manufacturer's warranty. For more information, inquire with your retailer or check online.
Related documentsRYOBI HEDGE TRIMMER


Ask a question about this manual
Ask about setup, troubleshooting, compatibility, parts, safety, or missing instructions. Manuals+ will review the question and use this page’s manual context to help answer it.