Introduction
This manual provides detailed instructions for the installation, operation, and maintenance of your REOLINK 12MP PoE IP Camera System. This system includes RLC-1212A bullet cameras and an RLN8-410 Network Video Recorder (NVR) with a 2TB hard drive, designed for comprehensive home security surveillance.
Package Contents
Verify that all items are present in your package:
- 2x REOLINK RLC-1212A 12MP PoE IP Cameras
- 2x 1-meter Network Cables
- 1x REOLINK RLN8-410 Network Video Recorder (NVR) with 2TB Built-in HDD
- Necessary mounting accessories for cameras

Image: Overview of the REOLINK 12MP PoE IP Camera System, showing two bullet cameras, the NVR unit, and a 2TB hard drive.
Setup and Installation
1. PoE Camera Installation
The RLC-1212A cameras utilize Power over Ethernet (PoE) technology, allowing both power and data transmission through a single network cable. This simplifies installation.
- Mounting the Camera: Choose a suitable outdoor location for optimal surveillance coverage. Securely mount the camera using the provided screws and mounting accessories. Ensure the camera is positioned to capture the desired area.
- Connecting the Network Cable: Connect one end of the network cable to the camera's Ethernet port. Connect the other end of the network cable to an available PoE port on the RLN8-410 NVR.
- Cable Management: Route the network cable securely to protect it from environmental elements and tampering.
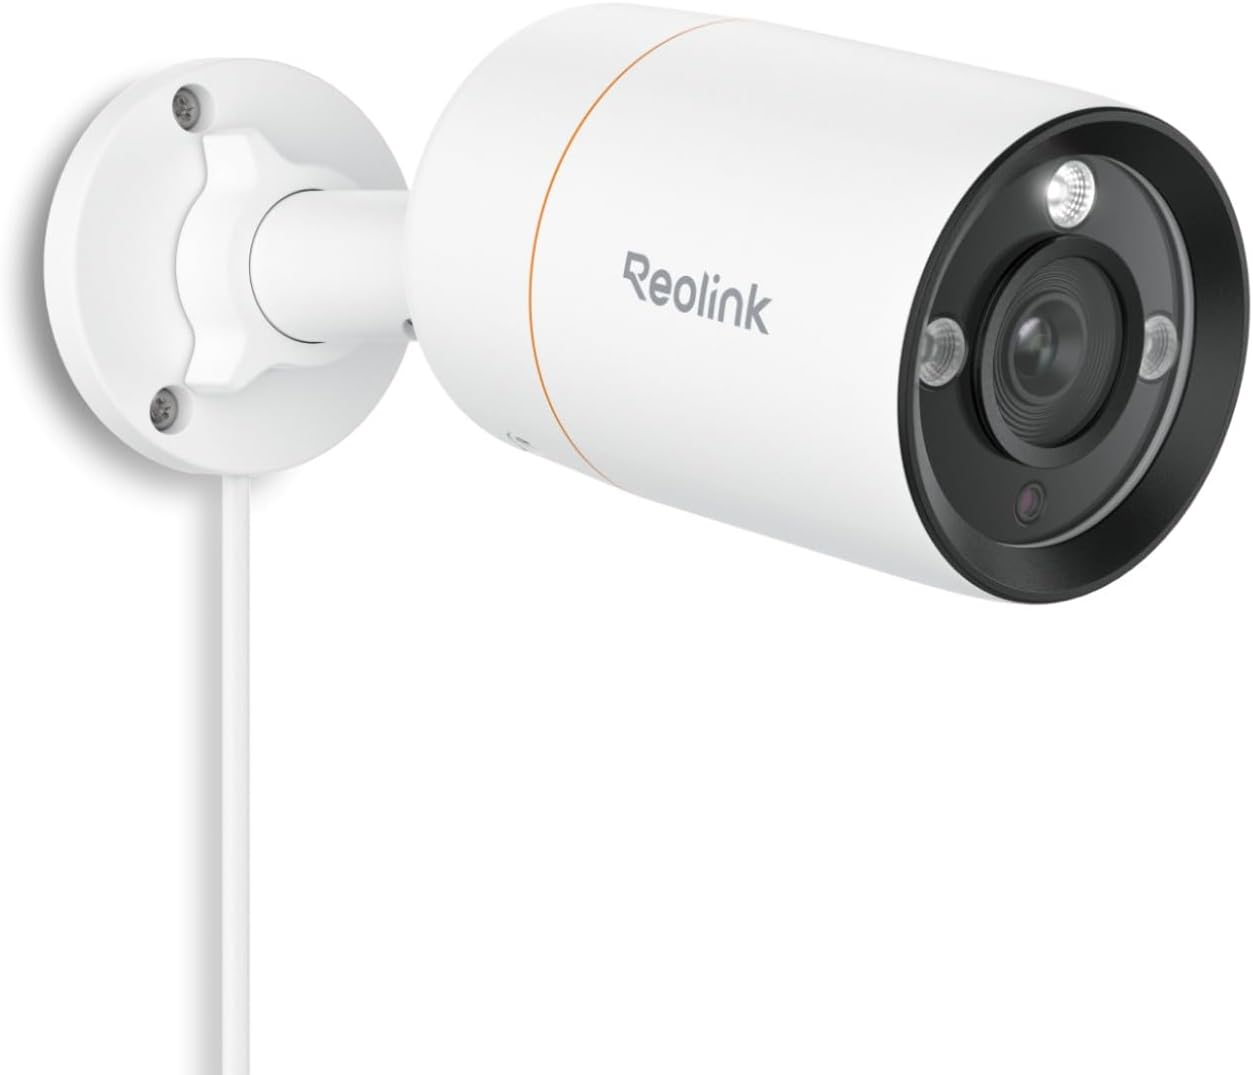
Image: A single REOLINK RLC-1212A bullet camera mounted on a wall, showing its design and cable connection.
2. NVR Setup (RLN8-410)
The NVR is the central recording and management unit for your camera system.
- Placement: Place the NVR in a secure, dry, and well-ventilated area.
- Connect Cameras: Connect the PoE cameras to the NVR's PoE ports as described above.
- Connect to Monitor: Connect the NVR to a monitor using an HDMI or VGA cable (not included) to view the live feed and configure settings.
- Connect to Network: Connect the NVR's LAN port to your router using a network cable for internet access and remote viewing capabilities.
- Power On: Connect the NVR to a power source using the provided power adapter. The NVR will power on automatically.
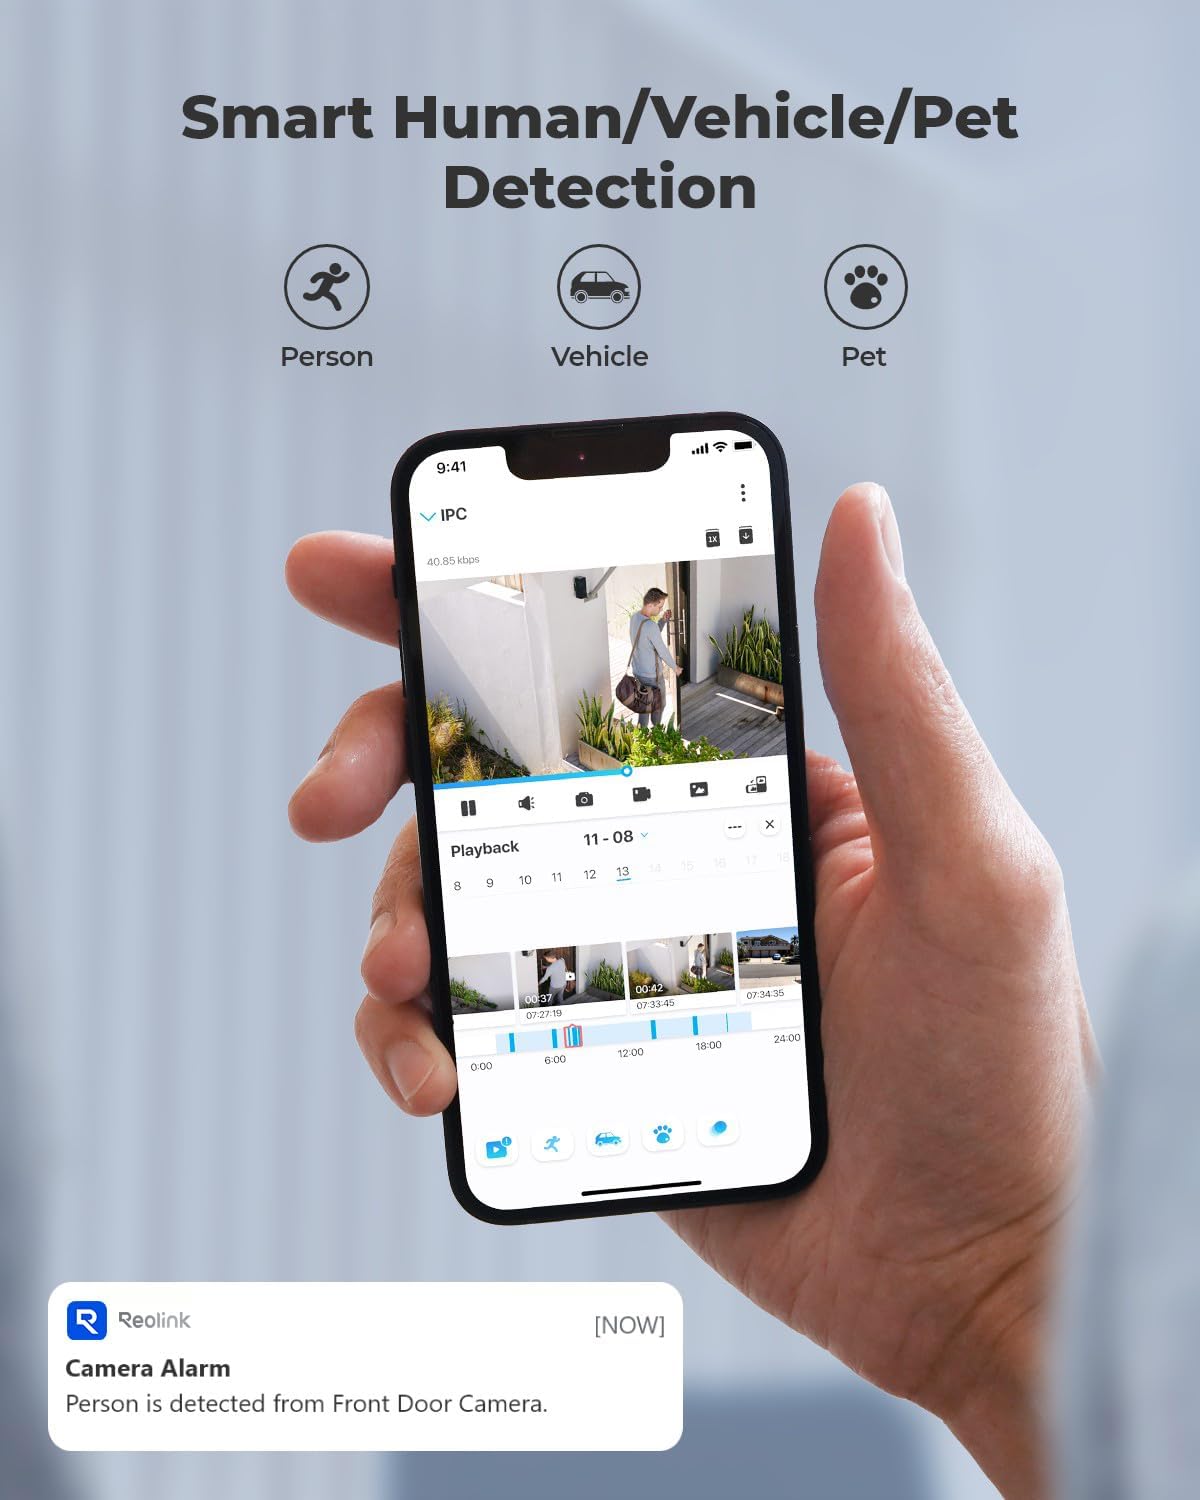
Image: Front view of the REOLINK RLN8-410 NVR, showing USB ports and status indicators.

Image: Rear view of the REOLINK RLN8-410 NVR, highlighting the 8 PoE ports and LAN connection.
Operating Instructions
1. Initial Configuration
Upon first power-up, follow the on-screen wizard on the connected monitor to set up basic NVR settings, including date/time, network configuration, and password creation.
2. Live View and Recording
- Live View: Access the live feed from all connected cameras via the NVR's monitor output or through the Reolink App/Client software.
- 24/7 Recording: The NVR is configured for continuous 24/7 recording to the 2TB hard drive. This ensures constant surveillance coverage.
- Event Recording: Configure event-triggered recording based on motion detection, human detection, vehicle detection, or pet detection to save storage space and focus on important events.

Image: A screen displaying a comparison of 12MP (4512x2512) and 8MP (3840x2160) clarity, showing a wide-angle view of a backyard with a pool, highlighting the detailed coverage.
3. Smart Detection Features
The RLC-1212A cameras are equipped with intelligent detection capabilities:
- Human Detection: Identifies human shapes, reducing false alarms from other movements.
- Vehicle Detection: Distinguishes vehicles from other objects.
- Pet Detection: Recognizes pets, minimizing unnecessary alerts.
These features can be configured via the NVR interface or the Reolink App/Client to send push notifications or email alerts upon detection.

Image: A smartphone screen showing the Reolink app interface with alerts for human, vehicle, and pet detection, alongside a live camera feed.
4. Color Night Vision
The RLC-1212A cameras feature 700lm spotlights, enabling full-color night vision for enhanced clarity in low-light conditions. The cameras can also utilize infrared (IR) light for black and white night vision when spotlights are not desired.
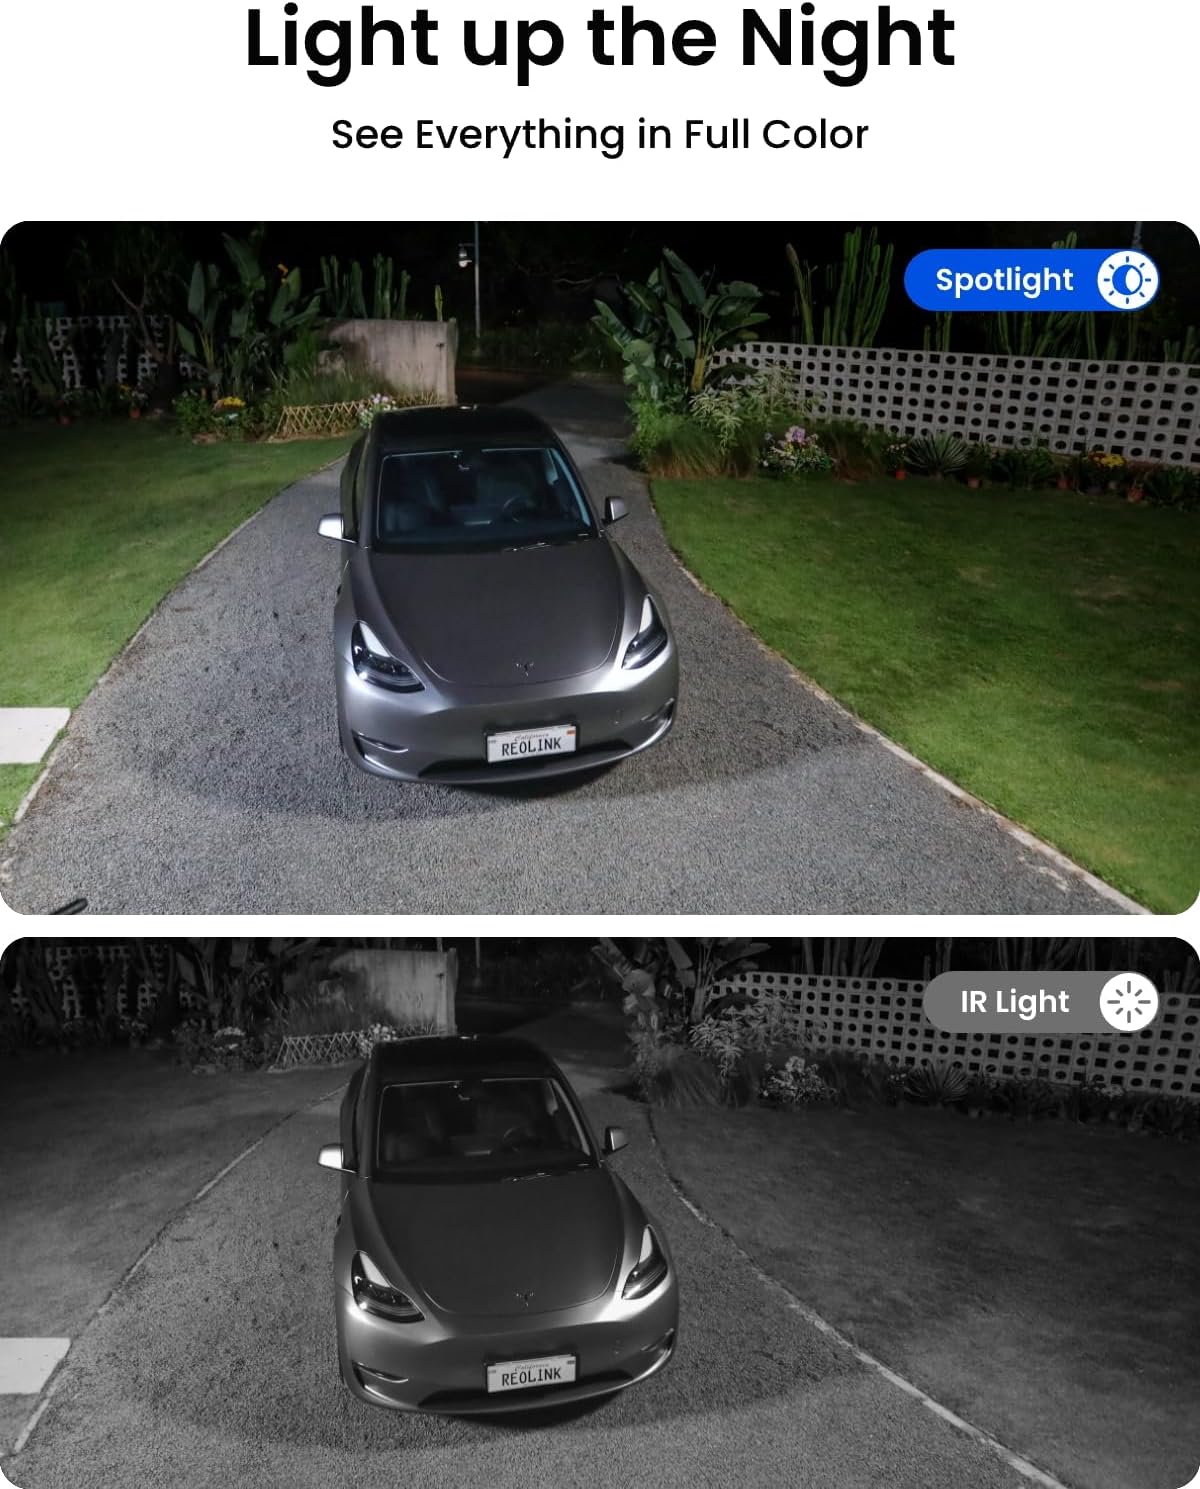
Image: A split image demonstrating the difference between color night vision (top, with spotlight) and infrared night vision (bottom, black and white) for a car in a driveway at night.
5. Remote Access
Access your camera system remotely using the Reolink App (for smartphones/tablets) or Reolink Client software (for computers). This allows you to view live feeds, playback recordings, and manage settings from anywhere with an internet connection.
- Download App/Client: Download the official Reolink App from your device's app store or the Reolink Client software from the official Reolink website.
- Add Device: Follow the in-app instructions to add your NVR to the application using its UID or IP address.

Image: A person viewing camera feeds on a smartphone, with a laptop and desktop computer also displaying the Reolink interface, illustrating remote access capabilities.
Maintenance
Regular maintenance ensures optimal performance and longevity of your security system:
- Clean Camera Lenses: Periodically clean camera lenses with a soft, damp cloth to remove dust, dirt, or water spots that may obscure the view.
- Check Cable Connections: Ensure all network and power cables are securely connected and free from damage.
- Firmware Updates: Regularly check for and install firmware updates for both cameras and the NVR to benefit from new features and security enhancements. These can typically be found on the official Reolink website.
- Hard Drive Health: Monitor the NVR's hard drive health through the system settings. Back up important recordings periodically.
- Environmental Protection: Ensure cameras are protected from direct, extreme weather conditions where possible, even though they are designed for outdoor use.
Troubleshooting
If you encounter issues with your REOLINK system, consider the following common troubleshooting steps:
- No Video Feed:
- Check power connections to the NVR and ensure cameras are properly connected to PoE ports.
- Verify network cable integrity.
- Restart the NVR.
- No Remote Access:
- Ensure the NVR is connected to the internet. Check your router and network settings.
- Verify that the Reolink App/Client is updated to the latest version.
- Check firewall settings on your router that might be blocking access.
- False Alarms:
- Adjust motion detection sensitivity settings in the NVR or app.
- Utilize human/vehicle/pet detection features to filter out irrelevant movements.
- Define specific motion detection zones to exclude areas with frequent non-threatening movement (e.g., trees swaying).
- Poor Night Vision:
- Clean the camera lens.
- Ensure there are no obstructions blocking the camera's view or reflecting IR light back into the lens.
- Check if the spotlights are enabled and functioning correctly for color night vision.
For further assistance, refer to the official Reolink support website or contact customer service.
Specifications
Key technical specifications for the REOLINK 12MP PoE IP Camera System:
| Feature | Specification |
|---|---|
| Brand | REOLINK |
| Model Numbers | RLC-1212A (Cameras), RLN8-410 (NVR) |
| Connectivity Technology | Wired (PoE) |
| Video Capture Resolution | 4032 x 3024 (12MP) |
| Special Features | Motion Sensor, Night Vision, Human/Vehicle/Pet Detection |
| Number of Channels (NVR) | 8 |
| Memory Storage Capacity (NVR) | 2 TB HDD (Built-in) |
| Power Source | Corded Electric |
| Operating System (NVR) | Linux-based system, embedded system, or proprietary OS |
| Recommended Uses | Surveillance |
| Low Light Technology | Night Color (700lm spotlights) |
| Frame Rate | 30 FPS or higher |
| Recording Mode | Event, Continuous |
| Hardware Interface (NVR) | USB 3.0 Type A |
| Lens Type | Fixed |
Customer Support
For technical support, warranty information, or further inquiries, please visit the official REOLINK website or contact their customer service department. Keep your product model numbers (RLC-1212A, RLN8-410) and purchase details readily available when seeking support.
Online Resources: Reolink Support Center


