1. Introduction
The XiaoR Geek XR DBit 2WD Robot Car Kit is an educational platform designed for STEM learning, compatible with micro:bit V1.5 and V2 boards (micro:bit board not included). This kit allows users to engage in graphical programming using Makecode, fostering hands-on skills and problem-solving abilities. It integrates various sensors and features to enable a range of interactive projects.

Figure 1: Fully assembled Microbit 2WD Robot Car Kit.
Key Features:
- Micro:bit Programming Kit: Utilizes Makecode graphical programming for easy learning and development.
- Multi-Functional: Equipped with ultrasonic and infrared sensors, LED lights, and a buzzer for diverse applications like line patrol, obstacle avoidance, distance measurement, and music programming.
- DIY Learning Kit: Designed for straightforward assembly, providing an engaging experience in electronics and robotics.
- Wireless Control: Supports IR remote control and Bluetooth connectivity via the XiaoR GEEK exclusive APP (Android/IOS).
- Expandable Design: The multi-functional expansion board includes reserved IO ports and holes for additional sensor integration.
Important Note: The micro:bit board and 18650 lithium battery (rechargeable) are not included in this kit and must be acquired separately for the car to function.
2. Components Overview
This section details the main components included in the Microbit 2WD Robot Car Kit. Familiarize yourself with each part before beginning assembly.

Figure 2: All components included in the kit, excluding the micro:bit board and 18650 battery.

Figure 3: Detailed view of the assembled robot car with key components labeled, including Ultrasonic sensor, IR sensor, Universal wheel, DC geared motor, High quality wheels, Light, XR Driver board, and Battery case.
Packing List:
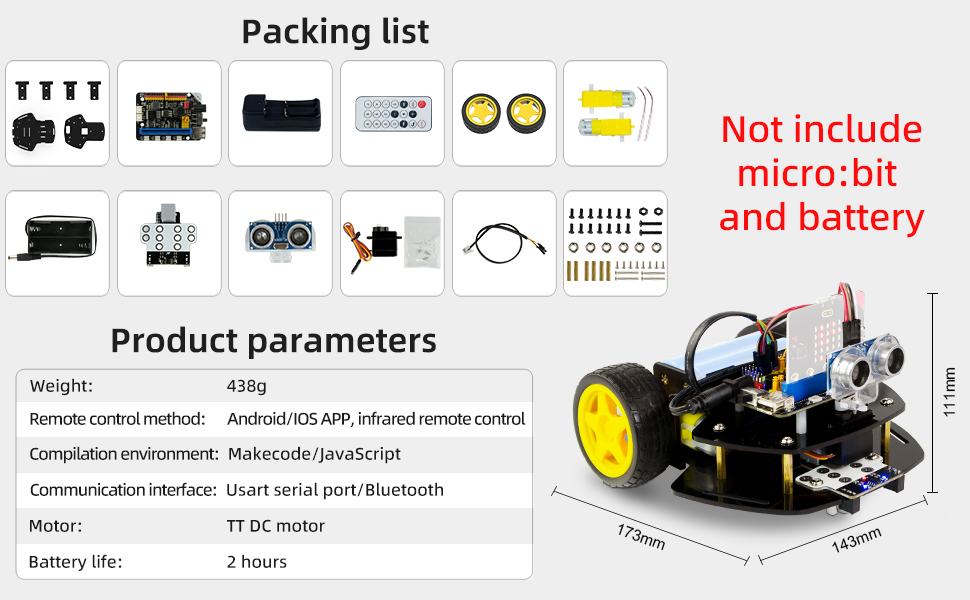
Figure 4: Visual representation of the packing list and product parameters.
- Robot Car Chassis (top and bottom plates)
- DC Geared Motors (2x)
- Wheels (2x) and Universal Wheel (1x)
- Ultrasonic Sensor Module
- IR Sensor Module
- XR Driver Board
- Battery Case (for 18650 battery, battery not included)
- IR Remote Control
- Various Screws, Nuts, and Standoffs for assembly
- Connecting Wires
- Servo Motor
3. Assembly Instructions
The assembly process for the XR DBit robot car is designed to be straightforward. Follow these steps carefully to build your robot.
- Prepare Components: Unpack all components and verify against the packing list. Ensure you have a micro:bit board and an 18650 lithium battery ready.
- Attach Motors: Secure the two DC geared motors to the bottom chassis plate using the provided screws.
- Mount Wheels: Press the yellow wheels onto the motor shafts. Attach the universal wheel to the front underside of the bottom chassis plate.
- Assemble Chassis: Connect the top and bottom chassis plates using the standoffs and screws.
- Install Driver Board: Mount the XR Driver Board onto the top chassis plate.
- Connect Motors to Driver Board: Wire the DC geared motors to the appropriate terminals on the XR Driver Board.
- Install Ultrasonic Sensor: Attach the ultrasonic sensor module to the front of the robot, typically on the top chassis plate, and connect its wires to the driver board.
- Install IR Sensor: Mount the IR sensor module to the front underside of the robot and connect its wires to the driver board.
- Insert Micro:bit: Carefully insert your micro:bit board into the dedicated slot on the XR Driver Board.
- Install Battery: Place the 18650 lithium battery into the battery case and connect the battery case to the XR Driver Board for power.
- Final Checks: Double-check all connections to ensure they are secure and correctly oriented.
For detailed visual guides, refer to the official XiaoRGEEK tutorials available online.
4. Operation
The XR DBit robot car offers various functionalities and control methods. This section outlines how to program and operate your robot.
4.1 Programming
The robot car is primarily programmed using the Makecode graphical programming environment. This platform allows for intuitive coding by dragging and dropping color-coded blocks.

Figure 5: Example of Makecode graphical programming interface on a laptop, showing how to drag and drop blocks to create code for the robot.
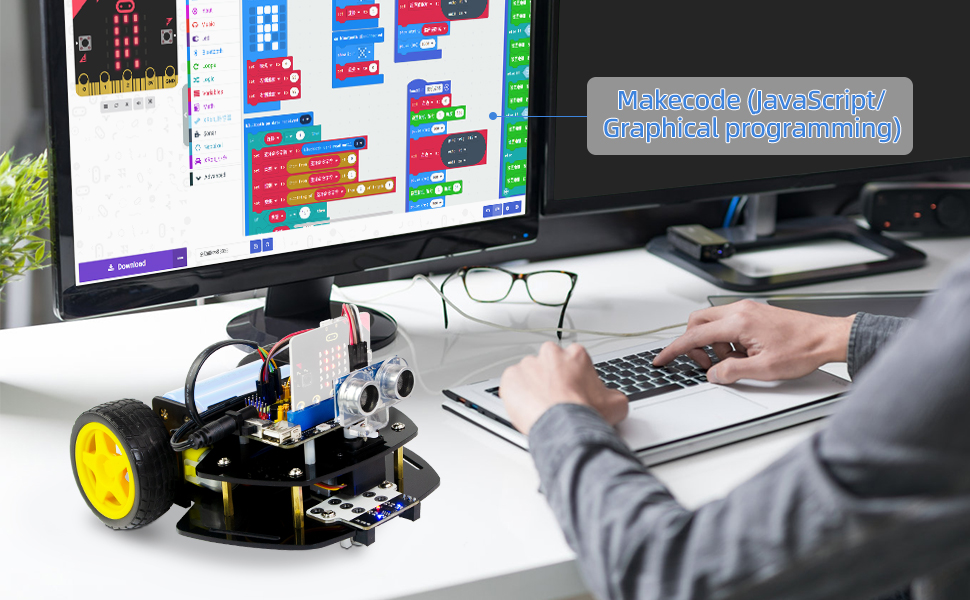
Figure 6: A user programming the robot car using Makecode (JavaScript/Graphical programming) on a computer.
- Access the Makecode editor online or through a dedicated application.
- Drag and drop programming blocks to create sequences for movement, sensor interaction, and other functions.
- Download the compiled code to your micro:bit board.
4.2 Core Functions
The robot car supports several interactive functions:

Figure 7: Visual representation of the robot car performing various functions: (1) Ultrasonic obstacle avoidance, (2) Ultrasonic ranging, (3) Line tracking, (4) Light show, (5) Playing music, and (6) Dot matrix display.
- Ultrasonic Obstacle Avoidance: The ultrasonic sensor detects objects in front of the robot, allowing it to navigate around them.
- Ultrasonic Ranging: Measure distances to objects using the ultrasonic sensor.
- Line Tracking: The infrared sensor enables the robot to follow a black line on a light surface.
- Light Show: Program the integrated LED lights for various visual effects.
- Music Programming: Utilize the buzzer to play programmed melodies or sounds.
- Dot Matrix Display: The micro:bit's LED matrix can be programmed to display patterns, text, or animations.
4.3 Control Methods
Control your robot car using either the included IR remote or a dedicated mobile application.

Figure 8: The robot car can be controlled via an IR remote control or a mobile application on a smartphone.
- IR Remote Control: Use the provided infrared remote to send commands to the robot. Ensure the IR receiver on the robot is unobstructed.
- Bluetooth APP Control: Download the exclusive XiaoR GEEK APP (available for Android and iOS) to control the robot via Bluetooth. Pair your mobile device with the micro:bit's built-in Bluetooth functionality.
4.4 Expansion Ports
The XR DBit expansion board provides numerous IO ports and reserved holes, allowing for the integration of additional sensors and modules to enhance the robot's capabilities.

Figure 9: The robot car demonstrating external sensors connected to its expansion ports, highlighting the flexibility for customization.
5. Maintenance
To ensure the longevity and optimal performance of your XR DBit robot car, follow these simple maintenance guidelines:
- Cleaning: Regularly clean the chassis and sensors with a soft, dry cloth to remove dust and debris. Avoid using liquids directly on electronic components.
- Battery Care: If using a rechargeable 18650 battery, ensure it is charged according to its specifications. Do not overcharge or completely drain the battery. Store the battery in a cool, dry place when not in use.
- Connections: Periodically check all wire connections to ensure they are secure. Loose connections can lead to intermittent operation or component failure.
- Storage: Store the robot car in a dry environment, away from extreme temperatures and direct sunlight.
- Software Updates: Keep your micro:bit firmware and any associated programming environments (like Makecode) updated to the latest versions for best compatibility and features.
6. Troubleshooting
This section provides solutions to common issues you might encounter with your robot car.
| Problem | Possible Cause | Solution |
|---|---|---|
| Robot does not power on. |
|
|
| Motors are not moving. |
|
|
| IR remote control not working. |
|
|
| Bluetooth APP control not connecting. |
|
|
7. Specifications
Detailed technical specifications for the XR DBit Robot Car Kit.
| Feature | Detail |
|---|---|
| Product Dimensions | 6.81 x 5.63 x 4.37 inches (173mm x 143mm x 111mm) |
| Item Weight | 15.4 ounces (approx. 438g) |
| Model Number | XR DBit |
| Manufacturer Recommended Age | 14 years and up |
| Compatibility | Micro:bit V1.5 / V2 (not included) |
| Remote Control Method | Android/iOS APP, Infrared remote control |
| Programming Environment | Makecode (JavaScript/Graphical) |
| Communication Interface | USART serial port/Bluetooth |
| Motor Type | TT DC motor |
| Estimated Battery Life | 2 hours (with 18650 battery, not included) |
8. Support and Contact
XiaoRGEEK is committed to providing comprehensive support for its products. If you encounter any issues, have questions about assembly, programming, or general operation, please refer to the following resources:
- Online Tutorials: Visit the official XiaoRGEEK website for detailed tutorials, programming examples, and project ideas.
- Technical Support: For specific technical assistance, please contact XiaoRGEEK customer support. Contact information can typically be found on the product packaging or the official website.
- Community Forums: Engage with other users and share knowledge on relevant online forums dedicated to micro:bit and robotics.
Your feedback is valuable and helps improve our products and support services.


