
Adviace G466-2400-W1
Instruction Manual: Adviace G466-2400-W1 Grill Replacement Parts
Cooking Grate Infrared Emitter for Charbroil Tru Infrared Grills
1. Introduction
Thank you for choosing Adviace G466-2400-W1 Cooking Grate Infrared Emitter replacement parts. These high-quality stainless steel emitters are designed to restore the performance of your compatible Charbroil Tru Infrared grill, ensuring even heat distribution and efficient cooking. This manual provides essential information for installation, operation, and maintenance.

Image: The Adviace G466-2400-W1 Cooking Grate Infrared Emitter replacement plates.
2. Compatibility
These replacement parts are specifically designed to fit a range of Charbroil Tru Infrared grill models. Please verify your grill's model number against the list below to ensure proper fitment.
- Charbroil 463242516
- Charbroil 463242515
- Charbroil 463355220
- Charbroil 463367016
- Charbroil 463342620
- Charbroil 463342420
- Charbroil 463246018
- Charbroil 463243016
- Charbroil 463346017
- Charbroil 463367516
- Charbroil 466242615
- Charbroil 466242515
- Charbroil 466242516
- Charbroil 466242616
- Charbroil 466243219

Image: Visual representation of compatible Charbroil grill models.
3. Product Specifications
The Adviace G466-2400-W1 replacement parts are manufactured to precise specifications to ensure optimal performance and durability.
Dimensions:
- Individual Emitter Plate: 17 1/8 inches (Length) x 8 1/8 inches (Width)
- Total (3-piece set): 17 1/8 inches (Length) x 24 3/8 inches (Width)
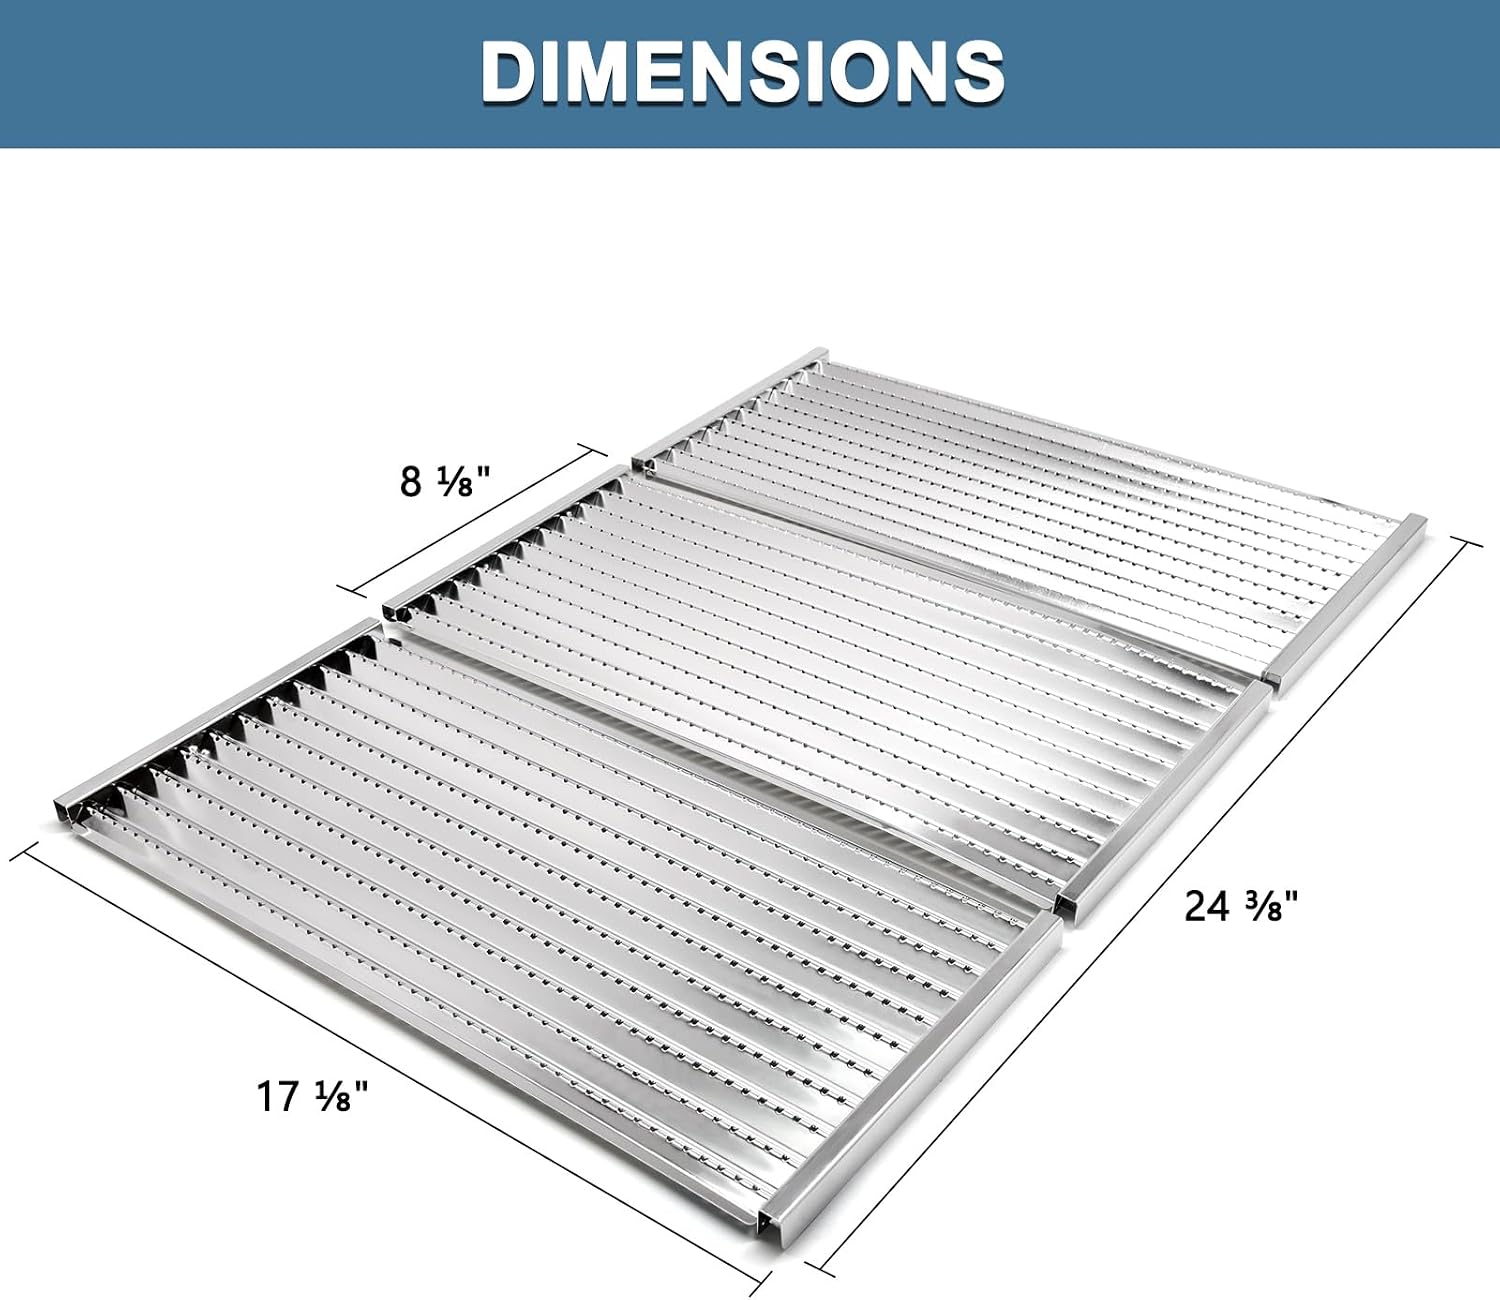
Image: Detailed dimensions of the replacement emitter plates.
Material:
- High-quality Stainless Steel
- Features: Rustproof, Anti-Corrosion

Image: Key material properties of the replacement parts.
Included with Purchase:
- 3 pcs G466-2400-W1 Cooking Grate Infrared Emitter Plates
4. Setup and Installation
Replacing your old grill emitter plates with the Adviace G466-2400-W1 parts is a straightforward process. Always ensure your grill is completely cool and disconnected from any fuel source before beginning installation.
- Preparation: Ensure the grill is off, cool, and the gas supply is turned off and disconnected. Open the grill lid.
- Remove Old Parts: Carefully lift and remove the existing cooking grates and infrared emitter plates from your grill. Note their original placement.
- Clean Grill Interior: This is an ideal time to clean any debris, grease, or rust from the grill's interior, especially the burner area and heat shields.
- Install New Emitters: Place the new Adviace G466-2400-W1 emitter plates into the grill. Ensure they sit correctly on the support ledges or brackets. The plates are designed to fit snugly side-by-side.
- Replace Cooking Grates: Once the emitter plates are in place, carefully set your cooking grates back on top of the new emitters.
- Final Check: Close the grill lid. Reconnect the gas supply and check for any leaks according to your grill's manufacturer instructions.

Image: A visual comparison showing a grill before and after installing the new emitter plates.

Image: The Adviace emitter plates installed, demonstrating a proper fit within the grill.
5. Operating Your Grill with New Emitters
After installation, your grill should perform as new, providing consistent and even heat. Follow your grill's original operating instructions for preheating, cooking, and temperature control.
- Preheating: Allow your grill to preheat thoroughly with the lid closed for 10-15 minutes to reach desired cooking temperatures and ensure the new emitters are properly heated.
- Even Cooking: The infrared emitters are designed to distribute heat evenly across the cooking surface, reducing flare-ups and enhancing searing capabilities.
- Temperature Zones: Utilize your grill's burner controls to create different temperature zones for versatile cooking.
6. Maintenance and Care
Proper maintenance will extend the life of your Adviace replacement parts and ensure continued optimal grill performance.
- Regular Cleaning: After each use, allow the grill to cool. Use a grill brush to scrape off any food residue from the cooking grates and emitter plates. For stubborn residue, preheat the grill for a few minutes to burn off excess, then brush.
- Deep Cleaning: Periodically, remove the cooking grates and emitter plates for a more thorough cleaning. Wash with warm, soapy water and a non-abrasive sponge or cloth. Rinse thoroughly and dry completely before returning to the grill.
- Stainless Steel Care: While the parts are rustproof and anti-corrosion, regular cleaning prevents buildup that could affect performance or appearance. Avoid harsh chemicals or abrasive tools that could scratch the stainless steel surface.

Image: Illustrates the non-magnetic nature of the stainless steel, indicating quality material.
7. Troubleshooting
If you encounter issues after installing your new emitter plates, consider the following common solutions:
- Parts Do Not Fit: Double-check your grill's exact model number against the compatibility list in Section 2. Ensure the emitter plates are oriented correctly and seated properly on all support points. Minor variations in grill manufacturing or previous damage to the grill frame could affect fit.
- Uneven Heating/Hot Spots: Verify that all emitter plates are installed flat and level. Ensure there are no obstructions beneath the plates or within the burner tubes. Clean any debris from the burner ports.
- Difficulty Cleaning: Ensure you are cleaning the plates while the grill is cool. For baked-on residue, preheating the grill for a short period (5-10 minutes) can help carbonize food particles, making them easier to brush off.
8. Customer Support
For further assistance, questions, or concerns regarding your Adviace G466-2400-W1 grill replacement parts, please contact the seller or manufacturer through the platform where the purchase was made. Provide your order details and a clear description of the issue for prompt support.
Ask a question about this manual
Ask about setup, troubleshooting, compatibility, parts, safety, or missing instructions. Manuals+ will review the question and use this page’s manual context to help answer it.