
Introduction
This manual provides detailed instructions for the safe and effective use of your Lightswim TENG-W400-ONE 1920P Endoscopic Inspection Camera. Please read this manual thoroughly before operation and retain it for future reference.
Package Contents
Verify that all items listed below are included in your package:
- Lightswim TENG-W400-ONE Endoscopic Inspection Camera (with integrated USB-C connector and LED light controller)
- Micro-USB Adapter
- Lightning Adapter (for iPhone/iPad)
- Hook Attachment
- Magnet Attachment
- Mirror Attachment
- User Manual
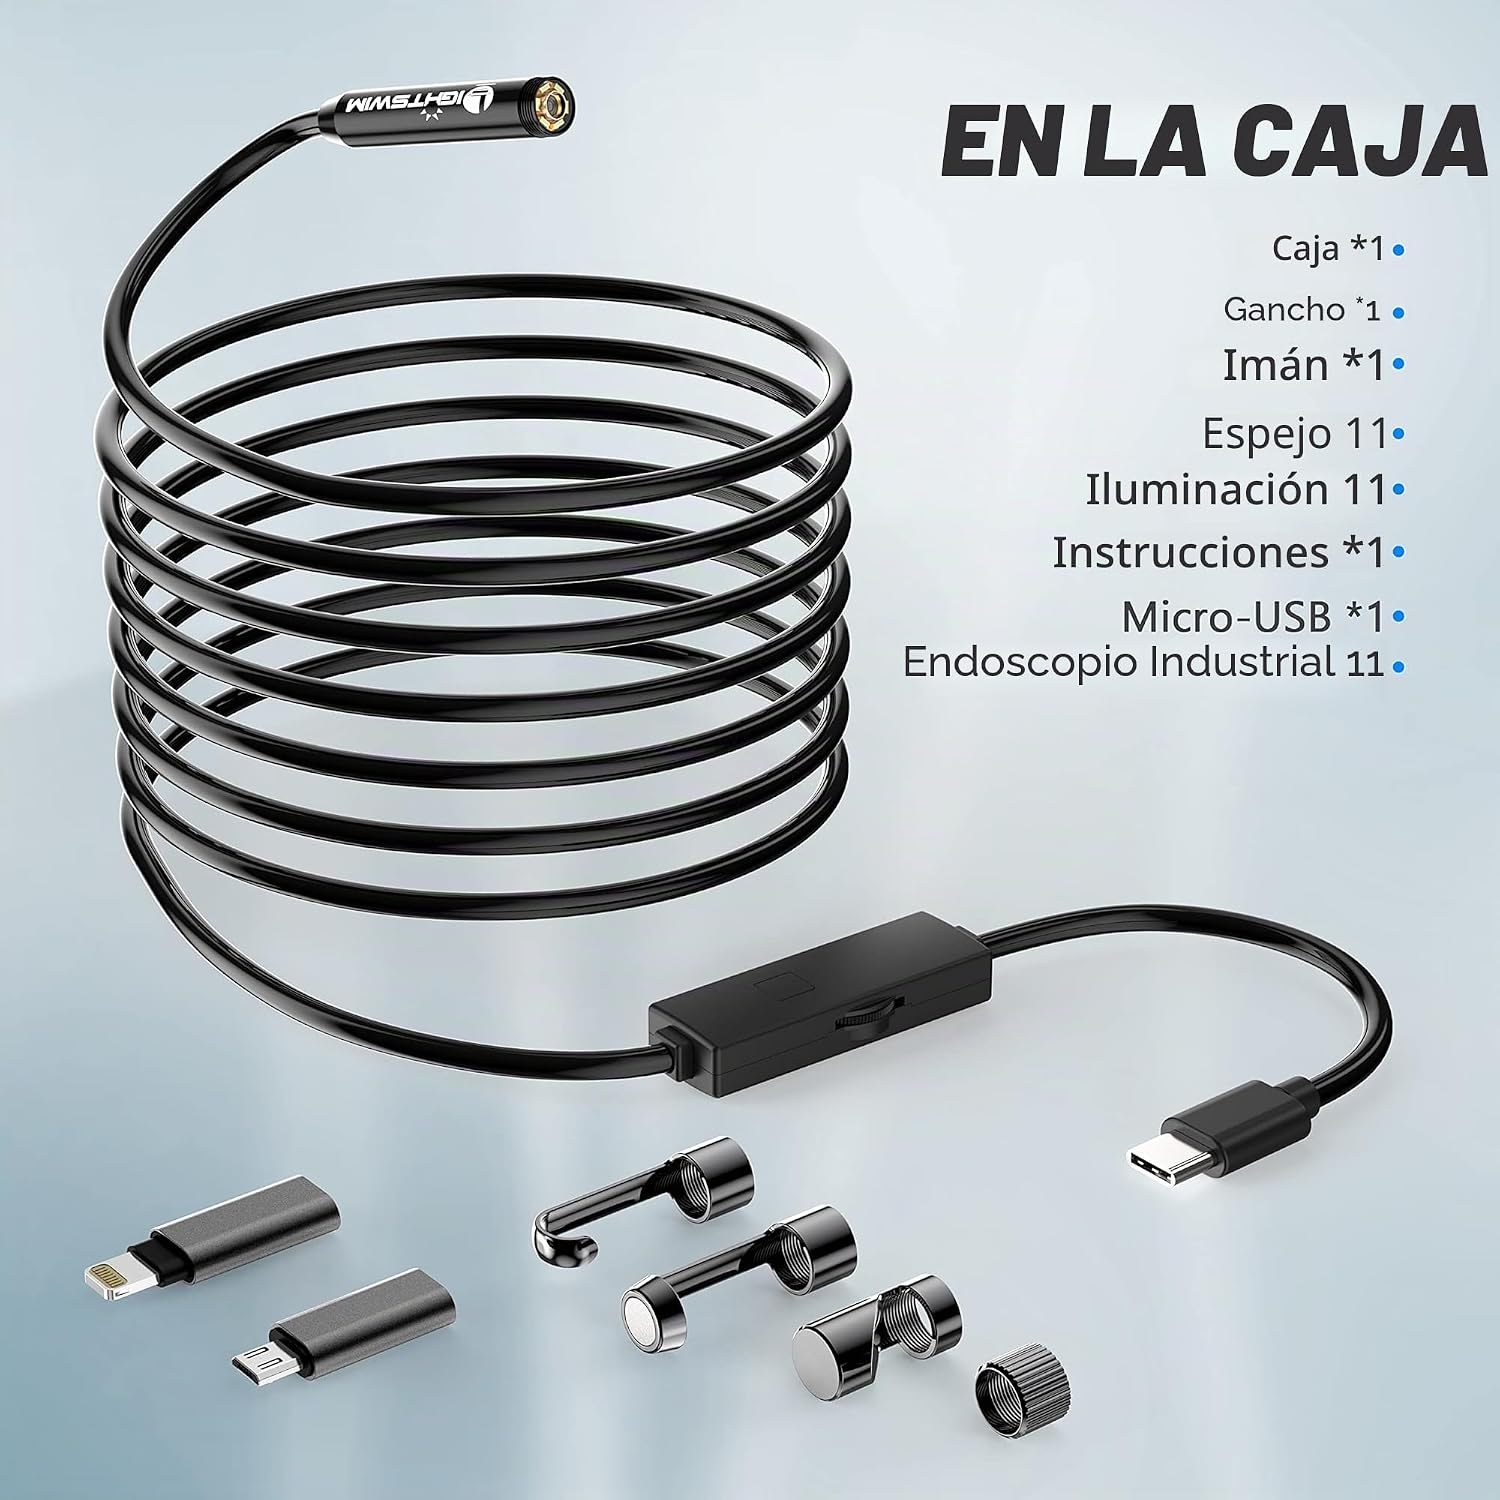
Figure 1: Contents included in the package.
Setup
1. Compatibility Check
- Android Devices: Requires Android 4.4 or higher with OTG (On-The-Go) and USB UVC (USB Video Class) functions. It is recommended to install a free app like "USB OTG CHECKER" to verify your device's compatibility before use.
- iOS Devices (iPhone/iPad): Requires iOS 9 or higher. These devices typically support plug-and-play functionality.
- Note: This endoscope camera is not compatible with computers or laptops.
2. App Installation
Download and install the "Useeplus" application from your device's respective app store (Google Play Store for Android, Apple App Store for iOS).
3. Connection Steps
- Select the appropriate adapter (Micro-USB or Lightning) for your smartphone or tablet.
- Connect the selected adapter to the USB-C end of the endoscope camera cable.
- Plug the assembled endoscope camera into your smartphone or tablet's charging port.
- For Android devices, if prompted, activate the "OTG function" in your phone's settings.
- Open the "Useeplus" app. You should see a live video feed from the camera on your screen.

Figure 2: Device compatibility and connection types.
Operating Instructions
Adjusting LED Lights
The endoscope camera features 8 adjustable LED lights around the lens. Use the dimmer wheel located on the cable to increase or decrease the brightness. This allows for clear visibility in various lighting conditions, from completely dark areas to dimly lit spaces.

Figure 3: Adjusting the LED light intensity.
Optimal Observation Distance
For the clearest image, position the camera lens between 7.5 cm and 12.5 cm (approximately 3 to 5 inches) from the object you are inspecting. Images may appear blurry if the camera is too close or too far from the subject.
Using Attachments
The included accessories (mirror, hook, and magnet) can be screwed onto the tip of the camera probe for specialized tasks:
- Mirror: Provides a side view, useful for inspecting walls of pipes or hard-to-reach corners.
- Hook: Can be used to retrieve small objects from confined spaces.
- Magnet: Useful for picking up small metallic items like screws or keys.
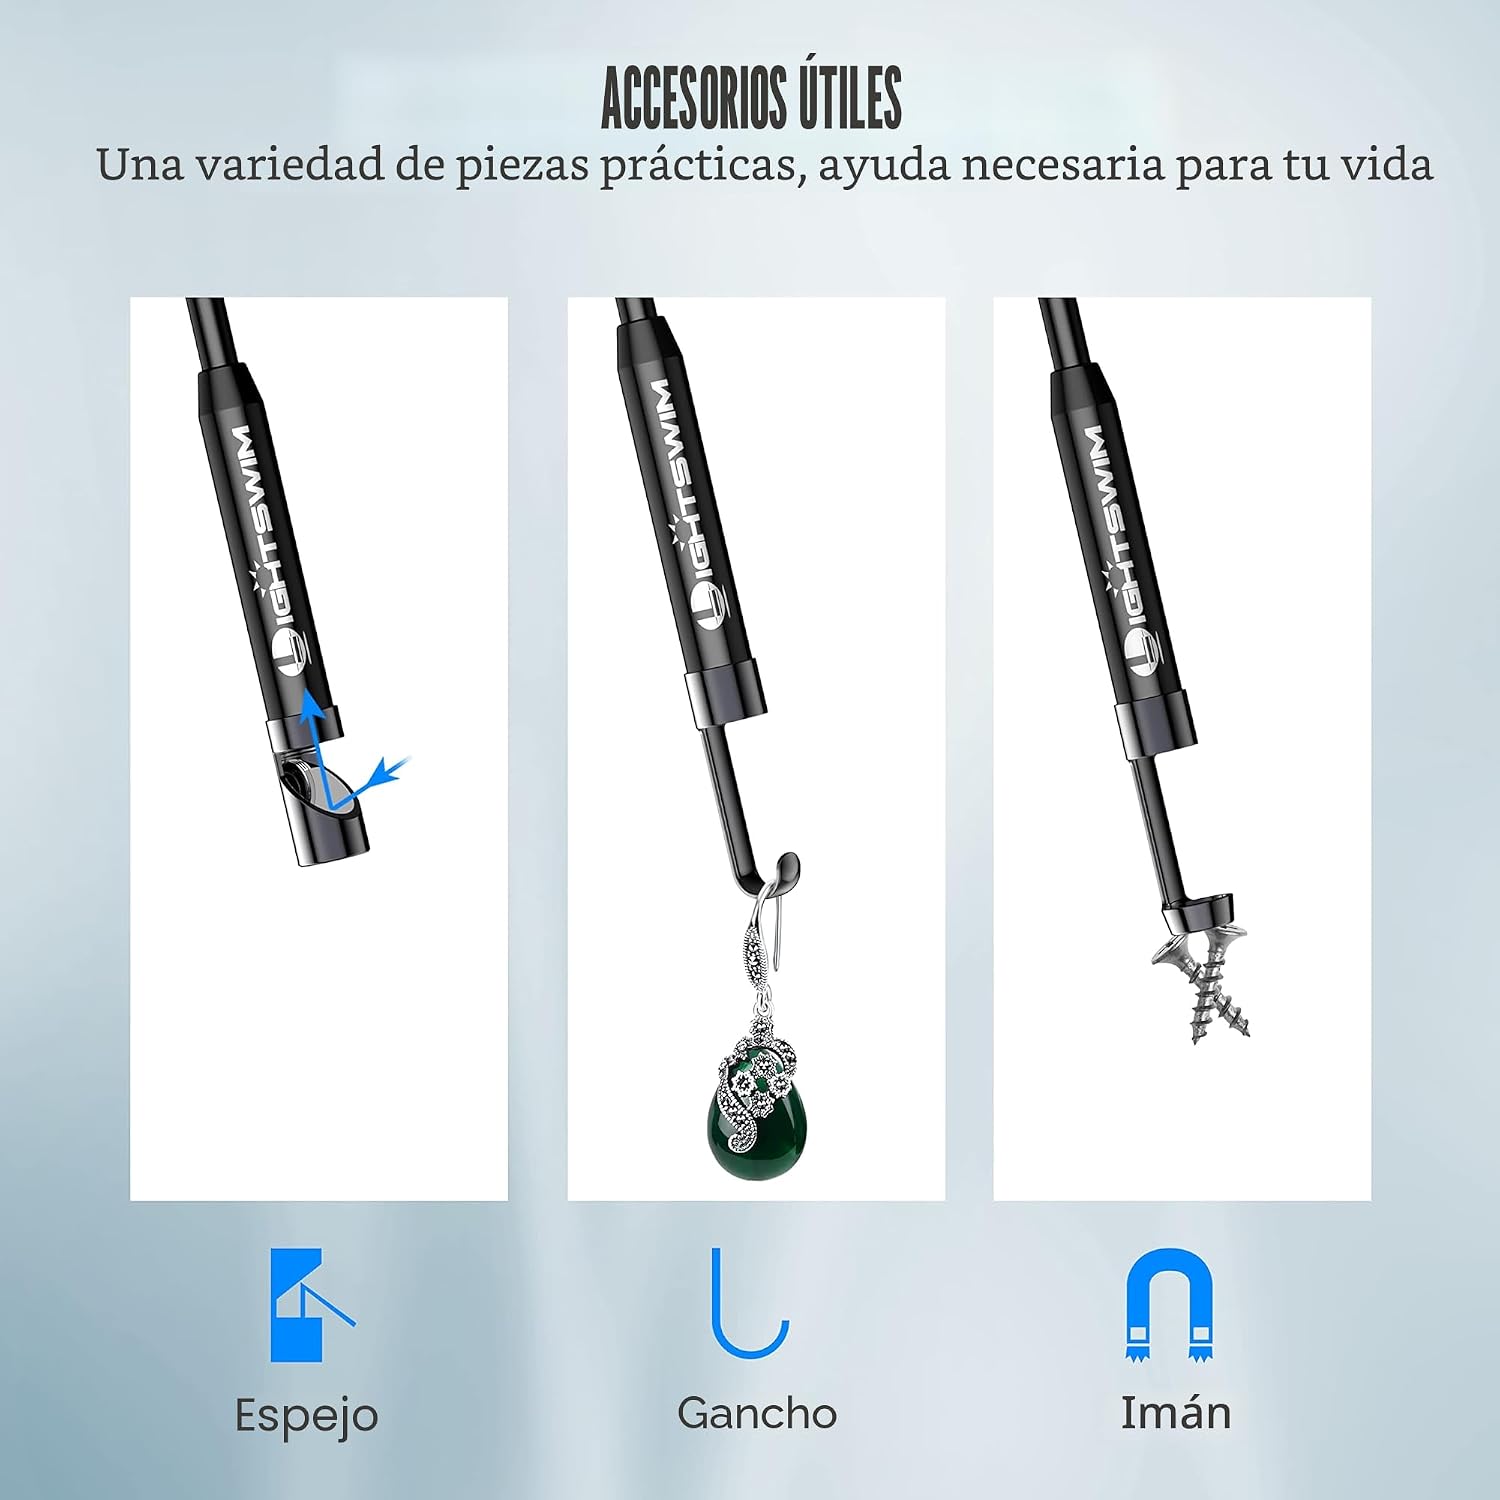
Figure 4: Included useful accessories.
Capturing Images and Videos
Within the "Useeplus" app interface, you will find options to capture still images or record videos. Follow the on-screen prompts to save your inspections.
Maintenance
Water Resistance
The camera probe itself is rated IP67 waterproof, meaning it can be submerged in water up to 1 meter for 30 minutes. This makes it suitable for inspecting wet environments like pipes or aquariums. However, the main cable, USB connectors, and your connected smartphone are NOT waterproof and should be kept dry.

Figure 5: Waterproof design of the camera probe.
Cleaning and Storage
- After use, especially in dirty or wet conditions, gently wipe the camera lens and probe with a soft, dry cloth. For stubborn dirt, a slightly damp cloth can be used, ensuring no moisture enters the non-waterproof parts.
- Do not use harsh chemicals, solvents, or abrasive cleaners on any part of the device.
- Store the endoscope camera in a cool, dry place, away from direct sunlight and extreme temperatures.
Troubleshooting
No Image or Connection
- Ensure the "Useeplus" app is correctly installed and open on your device.
- For Android users, confirm your phone supports OTG and USB UVC functions. Check your phone's settings to ensure the OTG function is enabled.
- Verify that all cable connections (endoscope to adapter, adapter to phone) are secure and fully inserted.
- Try restarting the "Useeplus" app or your smartphone.
- Ensure you are using the correct adapter for your specific phone model (USB-C, Micro-USB, or Lightning).
Blurry Image
- Adjust the distance between the camera lens and the object. The optimal focus range is between 7.5 cm and 12.5 cm (3 to 5 inches).
- Adjust the brightness of the LED lights using the dimmer wheel to prevent overexposure or underexposure, which can affect image clarity.
- Clean the camera lens if there is any dirt or debris obstructing the view.
App Crashes or Freezes
- Close the "Useeplus" app completely and reopen it.
- Ensure your smartphone's operating system is up to date.
- Clear the cache of the "Useeplus" app through your phone's application settings.
Specifications
| Feature | Specification |
|---|---|
| Model Number | TENG-W400-ONE |
| Resolution | 1920x1440 (2.0 MP) |
| Cable Length | 5 meters (16.5 feet) |
| Probe Diameter | 7.9 mm |
| Waterproof Rating | IP67 (camera probe only) |
| LED Lights | 8 adjustable LEDs |
| Optimal Focal Length | 7.5 cm - 12.5 cm (3-5 inches) |
| Viewing Angle | 70 degrees |
| Connectivity | USB (Type-C, Micro-USB, Lightning adapters included) |
| Compatible Devices | Android 4.4+ (with OTG/UVC), iOS 9+ |
| Product Dimensions | 13 x 13 x 6 cm; 272 g |
Applications
The Lightswim TENG-W400-ONE Endoscopic Inspection Camera is suitable for a wide range of inspection tasks, including but not limited to:
- Automotive maintenance (engine inspection, spark plug holes)
- Plumbing (pipe inspection, drain blockages)
- Home inspection (behind walls, under appliances, HVAC systems)
- Industrial machinery inspection
- Precision assembly and electronics inspection

Figure 6: Examples of multi-function applications.

Figure 7: Flexible cable design for enhanced control.
Warranty and Support
Lightswim products are designed for reliability and performance. For any technical assistance, troubleshooting, or warranty inquiries, please contact Lightswim customer support through the retailer where the product was purchased. Please retain your proof of purchase for warranty validation.