
Important Safety Information
Always wear appropriate safety gear, including eye protection and gloves, when using this product. Be aware of potential flying debris when trimming. Always follow the instructions for proper attachment and battery handling to avoid injury.
- Read and understand all instructions before operating the power head.
- Keep hands, face, and feet clear of all moving parts.
- Ensure the work area is clear of bystanders and pets.
- Do not operate the power head in wet conditions.
- Always remove the battery pack before making adjustments, changing accessories, or storing the tool.
Product Overview
Description
The Ryobi Expand-It 18-Volt Lithium-Ion Cordless Power Head is designed to be attachment-capable, allowing users to connect various Expand-It accessories such as string trimmers, pruners, pole saws, or hedge trimmers. This power head operates with any Ryobi 18V battery, providing versatility and interchangeability with other Ryobi 18V tools. It features a brushless motor for maximum power and durability, a dual-speed switch for precise control, and a variable speed trigger for cutting control.
Key Features
- Attachment Capable: Works with RYOBI Expand-It Attachments.
- 18V Compatibility: Operates with all Ryobi 18V batteries (battery and charger not included).
- Dual Speed Switch: Provides accurate and precise control for various tasks.
- Variable Speed Trigger: Offers enhanced cutting control.
- Brushless Motor: Engineered for maximum power and durability.
- Included Handle Assembly: For comfortable and controlled operation.

Package Contents
The Ryobi Expand-It 18-Volt Cordless Power Head package includes:
- Ryobi Expand-It 18-Volt Cordless Power Head
- Handle Assembly
Note: This power head does NOT include any attachments, battery, or charger. These items must be purchased separately.
Setup
1. Handle Assembly
- Loosen the knob on the handle assembly.
- Slide the handle onto the power head shaft to a comfortable operating position.
- Tighten the knob securely to fix the handle in place.
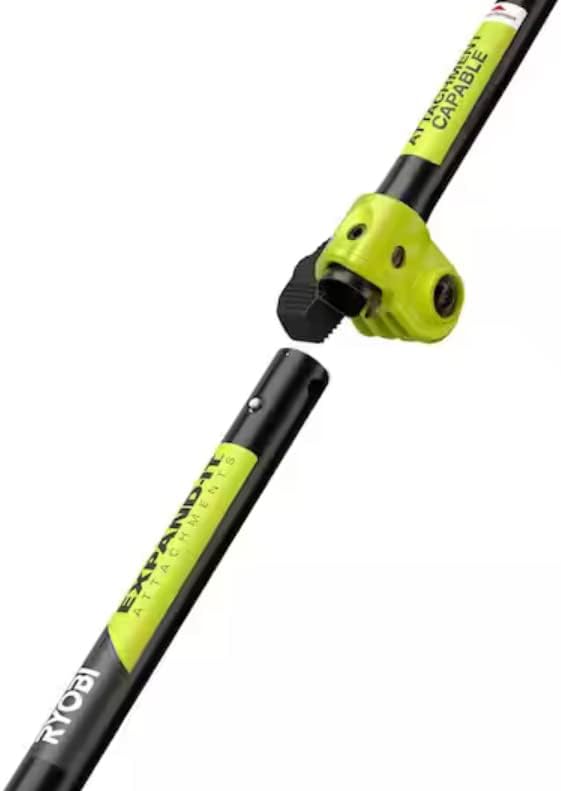
2. Attaching Accessories
- Ensure the power head is turned off and the battery is removed.
- Align the male end of the Expand-It attachment with the female coupling on the power head shaft.
- Push the attachment into the power head until it clicks into place.
- Tighten the coupling knob on the power head to secure the attachment.
- To remove, loosen the coupling knob and press the release button on the attachment, then pull apart.
3. Battery Installation
- Ensure the power head is turned off.
- Align the ribs on the battery pack with the grooves in the power head's battery port.
- Slide the battery pack into the power head until it latches securely.
- To remove, press the battery release button and pull the battery pack out.
Operating Instructions
1. Starting the Power Head
- Ensure a fully charged 18V battery is installed and an attachment is securely fastened.
- Hold the power head firmly with both hands.
- Engage the safety switch (if present) and then press the variable speed trigger to start the motor.
2. Speed Control
- Dual Speed Switch: Use the dual speed switch located on the handle to select between high and low-speed settings. Low speed is suitable for lighter tasks and extended battery life, while high speed provides maximum power for demanding applications.
- Variable Speed Trigger: The trigger allows for fine-tuning of the speed within the selected high or low range. Press the trigger gently for slower speeds and apply more pressure for increased speed.
Maintenance
- Cleaning: After each use, clean the power head and attachment with a dry cloth. Remove any debris, grass, or dirt from vents and moving parts. Do not use water or solvents.
- Inspection: Regularly inspect the power head and attachments for any signs of damage, loose fasteners, or worn parts. Replace damaged parts immediately.
- Storage: Store the power head in a dry, secure location out of reach of children. Remove the battery pack before storing.
Troubleshooting
| Problem | Possible Cause | Solution |
|---|---|---|
| Power head does not start | Battery not installed correctly Battery discharged Safety switch not engaged | Ensure battery is fully seated Charge battery pack Engage safety switch before pressing trigger |
| Loss of power during operation | Battery low Overload on attachment | Recharge battery Reduce load, clear obstruction, or use high-speed setting |
| Attachment not secure | Coupling knob loose Attachment not fully engaged | Tighten coupling knob Ensure attachment clicks into place and knob is tightened |
Specifications
| Feature | Specification |
|---|---|
| Brand | RYOBI |
| Model Number | P20104VNM |
| Power Source | Battery Powered (18V Lithium-Ion) |
| Product Dimensions | 34"L x 6"W |
| Speed | Up to 8000 RPM |
| Assembly Required | Yes |
| Cordless | Yes |
| UPC | 728370633900 |
Warranty and Support
For warranty information, technical support, or to purchase replacement parts, please refer to the official RYOBI website or contact RYOBI customer service directly. Keep your purchase receipt as proof of purchase for warranty claims.
RYOBI products are designed for durability and performance. Should you encounter any issues not covered in this manual, professional assistance is recommended.


