
1. Introduction
Thank you for choosing the Alphasonik NA1000.2 Neuron Series 1000 Watts Max 2-Channel Car Amplifier. This amplifier is designed to deliver powerful and clear audio performance for your vehicle's sound system. Featuring a Class A/B design, multi-channel bridgeable capabilities, and a 4-way protection circuitry, it ensures reliable operation and high-quality sound reproduction. This manual provides detailed instructions for installation, operation, and maintenance to help you get the most out of your amplifier.

Image 1.1: The Alphasonik NA1000.2 Neuron Series 1000 Watts Max 2-Channel Car Amplifier, shown with its included remote bass knob and connecting cable.
2. Safety Information
Please read all instructions carefully before installing and operating your amplifier. Failure to follow these guidelines may result in damage to the amplifier, vehicle, or personal injury. Keep this manual for future reference.
- Professional Installation Recommended: For optimal performance and safety, professional installation by an authorized Alphasonik dealer is highly recommended.
- Power Source: Ensure the vehicle's battery is disconnected before making any power connections to prevent electrical shorts.
- Wiring: Use appropriate gauge wiring for power, ground, and speaker connections as specified in the installation section. Improper wiring can lead to overheating and damage.
- Mounting: Mount the amplifier securely in a dry, well-ventilated area, away from direct sunlight, heat sources, and moisture. Ensure adequate airflow around the heat sink.
- Volume Levels: Prolonged exposure to high volume levels can cause hearing damage. Adjust volume to a comfortable level.
- Protection Circuitry: The amplifier features a 4-way protection circuitry (Thermal, Short Circuit, Overload, and DC Offset) to safeguard against damage. If the protection indicator illuminates, refer to the troubleshooting section.
3. What's in the Box
Carefully unpack the contents and ensure all items are present:
- 1 x Alphasonik NA1000.2 Neuron Series 1000 Watts Max 2-Channel Class A/B Amplifier
- 1 x Remote Bass Knob with Connector Cable
- 1 x Operations Manual (this document)
- 1 x Mounting Hardware Set (screws, Allen wrenches)

Image 3.1: All components included in the Alphasonik NA1000.2 amplifier package.
4. Features
The Alphasonik NA1000.2 amplifier is equipped with advanced features for superior audio control and protection:
- Nickel Plated Terminals: For enhanced conductivity and corrosion resistance.
- Extruded Aluminum Heat Sink: Efficiently dissipates heat to maintain optimal operating temperature.
- Low Level Input (RCA): Standard RCA inputs for connecting to head units with pre-amp outputs.
- High Level Input: Allows connection to factory or aftermarket head units without RCA outputs.
- Low Level Output: RCA outputs for daisy-chaining multiple amplifiers.
- Remote Bass Knob Included: Provides convenient control over bass levels from the driver's seat.
- Mil Spec Double-Sided Glass Epoxy Circuit Board: Ensures durability and reliable performance.
- 4-Way Protection Circuitry: Comprehensive protection against Thermal, Short Circuit, Overload, and DC Offset conditions.
- Variable Low-Pass Crossover (LPF): Adjustable from 50Hz - 250Hz for precise control over subwoofer frequencies.
- High-Pass Crossover (HPF): Adjustable from 60Hz - 1.2kHz for filtering out low frequencies from full-range speakers.
- Variable Input Sensitivity: Adjustable from 200mV - 6V to match various head unit output levels.
- 45Hz Bass Boost: Adjustable from 0 - 12dB to enhance low-frequency response.
- ATC Fuse: 30 Amp x 1 for circuit protection.
5. Setup and Installation
Proper installation is crucial for the performance and longevity of your amplifier. Always disconnect the vehicle's battery before beginning installation.
5.1. Mounting the Amplifier
- Choose a mounting location that is dry, well-ventilated, and provides sufficient space for wiring and airflow around the amplifier's heat sink. Avoid mounting on carpet or in enclosed spaces without ventilation.
- Use the provided mounting hardware to securely fasten the amplifier to a solid surface in your vehicle.
5.2. Power, Ground, and Remote Connections
Refer to Image 5.1 for the power input terminal block.
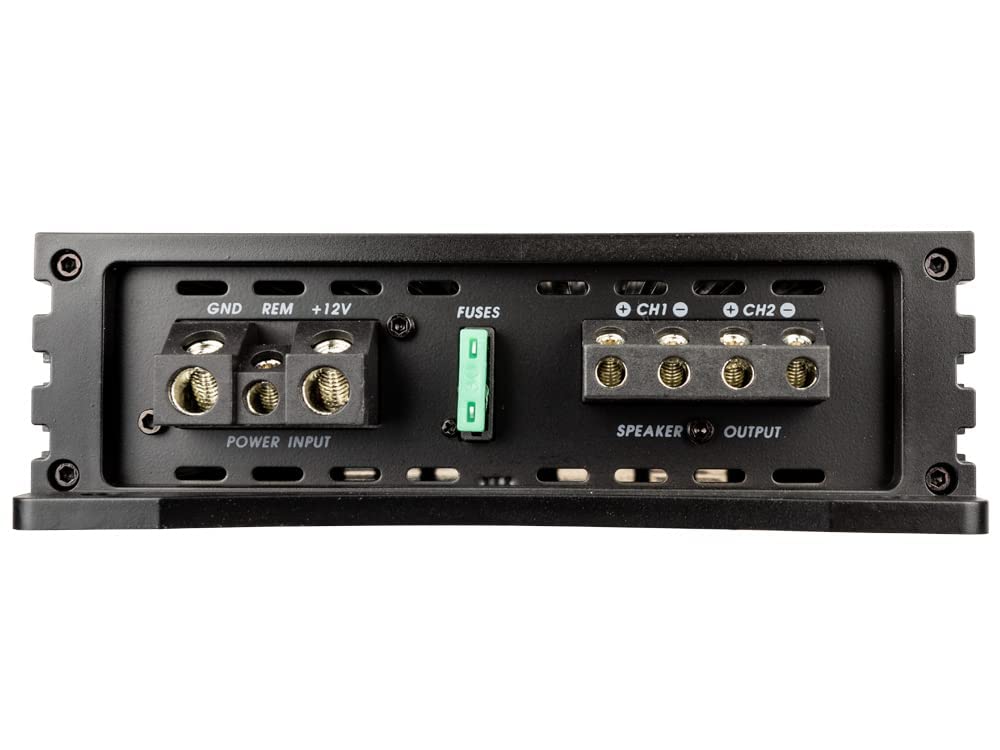
Image 5.1: Rear panel of the amplifier, detailing power input, fuse, and speaker output connections.

Image 5.2: Detailed view of the Power Input terminals (GND, REM, +12V).
- Power (+12V): Connect a high-quality power cable (minimum 8-gauge recommended for 1000W) directly from the vehicle's positive battery terminal to the +12V terminal on the amplifier. Install an in-line fuse holder (30A fuse) within 18 inches of the battery.
- Ground (GND): Connect a power cable of the same gauge from the GND terminal on the amplifier to a clean, unpainted metal surface on the vehicle's chassis. Ensure a solid, low-resistance connection.
- Remote (REM): Connect a remote turn-on wire from your head unit's remote output to the REM terminal on the amplifier. This wire signals the amplifier to turn on when the head unit is active.
5.3. Signal Input Connections
The NA1000.2 supports both Low-Level (RCA) and High-Level inputs. Refer to Image 5.3 for the input/control panel.

Image 5.3: Front panel of the amplifier, detailing input connections and control adjustments.

Image 5.4: Detailed view of RCA Input/Output.

Image 5.5: Detailed view of High-Input terminal.
- Low-Level Input (RCA): Connect RCA cables from your head unit's pre-amp outputs (Front, Rear, or Subwoofer) to the INPUT CH1 and CH2 RCA jacks on the amplifier.
- High-Level Input: If your head unit does not have RCA outputs, use the provided high-level input connector. Connect your speaker wires from the head unit's speaker outputs to the corresponding terminals on the high-level input connector.
- Low-Level Output (RCA): If you are connecting additional amplifiers, use the OUTPUT CH1 and CH2 RCA jacks to send the audio signal to the next amplifier.
5.4. Speaker Output Connections
Connect your speakers to the SPEAKER OUTPUT terminals on the amplifier (refer to Image 5.1). Ensure correct polarity (+ to + and - to -) for each speaker.
- Stereo Mode (2-Channel): Connect one speaker to CH1 (+ and -) and another speaker to CH2 (+ and -). The amplifier will deliver 2 x 250W @ 4 Ohms or 2 x 500W @ 2 Ohms.
- Bridged Mode (Mono, 1-Channel): For higher power output to a single subwoofer, the amplifier can be bridged. Connect the subwoofer's positive (+) terminal to the CH1 (+) terminal and the subwoofer's negative (-) terminal to the CH2 (-) terminal. The amplifier will deliver 1 x 1000W @ 4 Ohm in bridged mode. Ensure your subwoofer is rated for 4 Ohm impedance when bridging.
5.5. Remote Bass Knob Installation
The remote bass knob allows for convenient adjustment of bass levels from the driver's seat. Refer to Image 5.6 for the remote bass knob.

Image 5.6: The Alphasonik Neuron Series remote bass knob.

Image 5.7: Detailed view of the remote bass knob.
- Mount the remote bass knob in a convenient location within reach of the driver.
- Connect the included cable from the remote bass knob to the 'REMOTE' port on the amplifier (refer to Image 5.3).
6. Operating Instructions
Once installed, adjust the amplifier settings for optimal sound performance. Refer to Image 5.3 for the control panel layout.
6.1. Gain Adjustment (Input Sensitivity)
- The GAIN control matches the amplifier's input sensitivity to the output voltage of your head unit.
- Start with the GAIN control set to minimum (Min).
- Turn your head unit volume up to about 75% of its maximum.
- Slowly increase the GAIN control on the amplifier until you hear slight distortion, then back it off slightly until the sound is clear.
6.2. Crossover Settings (LPF/HPF)
- MODE Switch: Set the MODE switch to LPF (Low-Pass Filter), HPF (High-Pass Filter), or FULL (Full Range) depending on your speaker configuration.
- LPF (Low-Pass Filter): When set to LPF, the amplifier will only pass frequencies below the set point. This is typically used for subwoofers. Adjust the LPF knob between 50Hz and 250Hz.
- HPF (High-Pass Filter): When set to HPF, the amplifier will only pass frequencies above the set point. This is typically used for full-range speakers to prevent them from playing damaging low frequencies. Adjust the HPF knob between 60Hz and 1.2kHz.
6.3. Bass Boost
- The BASS BOOST control provides an adjustable boost at 45Hz.
- Adjust the BASS BOOST knob from 0dB to 12dB to enhance low-frequency impact. Use sparingly to avoid distortion or damage to speakers.
7. Maintenance
Regular maintenance ensures the longevity and optimal performance of your amplifier.
- Cleaning: Periodically wipe the amplifier's exterior with a soft, dry cloth. Do not use harsh chemicals or abrasive cleaners.
- Ventilation: Ensure the heat sink fins are free from dust and debris to maintain proper cooling.
- Connections: Periodically check all power, ground, remote, and speaker connections to ensure they are secure and free from corrosion. Loose connections can cause performance issues or damage.
- Fuse Replacement: If the fuse blows, replace it only with a fuse of the same type and rating (30 Amp ATC fuse). Using a fuse with a higher rating can cause severe damage to the amplifier or vehicle's electrical system.
8. Troubleshooting
If you experience issues with your Alphasonik NA1000.2 amplifier, consult the following table before contacting support.
| Problem | Possible Cause | Solution |
|---|---|---|
| No Power / Power LED Off | Blown fuse; Loose power/ground/remote connection; No remote turn-on signal. | Check and replace fuse; Verify all power, ground, and remote connections are secure; Check head unit's remote output. |
| Protection LED On | Short circuit in speaker wiring; Overheating (thermal protection); Speaker impedance too low; DC offset. | Check speaker wiring for shorts; Ensure proper ventilation, allow amplifier to cool; Verify speaker impedance matches amplifier's rating; Consult professional for DC offset issue. |
| No Sound Output | Loose RCA/speaker connections; Incorrect gain setting; Head unit not sending signal; Amplifier in protection mode. | Check all signal and speaker connections; Adjust gain; Verify head unit is on and sending signal; Refer to 'Protection LED On' solution. |
| Distorted Sound | Gain set too high; Speaker impedance mismatch; Damaged speakers; Incorrect crossover settings. | Reduce gain setting; Verify speaker impedance; Test speakers with another amplifier; Adjust LPF/HPF settings. |
| Engine Noise / Whine | Poor ground connection; RCA cables too close to power cables; Ground loop. | Ensure solid ground connection; Reroute RCA cables away from power cables; Install a ground loop isolator. |
9. Specifications
Detailed technical specifications for the Alphasonik NA1000.2 Neuron Series Amplifier:
| Specification | Value |
|---|---|
| Model Number | APH-NA1000.2 |
| Number of Channels | 2 |
| Power Output (RMS) | 2 x 250W @ 4 Ohms 2 x 500W @ 2 Ohms |
| Bridged Power Output (RMS) | 1 x 1000W @ 4 Ohm |
| Amplifier Class | Class A/B |
| Low-Pass Crossover (LPF) | Variable: 50Hz - 250Hz |
| High-Pass Crossover (HPF) | Variable: 60Hz - 1.2kHz |
| Input Sensitivity | Variable: 200mV - 6V |
| Bass Boost | 0 - 12dB @ 45Hz |
| Fuse Rating | 30 Amp x 1 (ATC) |
| Protection Circuitry | Thermal, Short Circuit, Overload, DC Offset |
| Product Dimensions (L x W x H) | 7.01" x 8.66" x 2.09" (178 x 220 x 53mm) |
| Mounting Type | Surface Mount |
10. Warranty and Support
Alphasonik products are designed and manufactured to the highest quality standards. For specific warranty information regarding your NA1000.2 amplifier, please refer to the warranty card included with your product or visit the official Alphasonik website. Keep your proof of purchase for warranty claims.
For technical support, troubleshooting assistance, or service inquiries, please contact Alphasonik customer support through their official website or the contact information provided in your product packaging. You can also visit the Alphasonik store on Amazon for more information: Alphasonik Store.

