
Introduction
This manual provides comprehensive instructions for the safe operation, setup, maintenance, and troubleshooting of your Cotwodfa F188 GPS Drone. Please read this manual thoroughly before operating the drone to ensure proper function and safety.
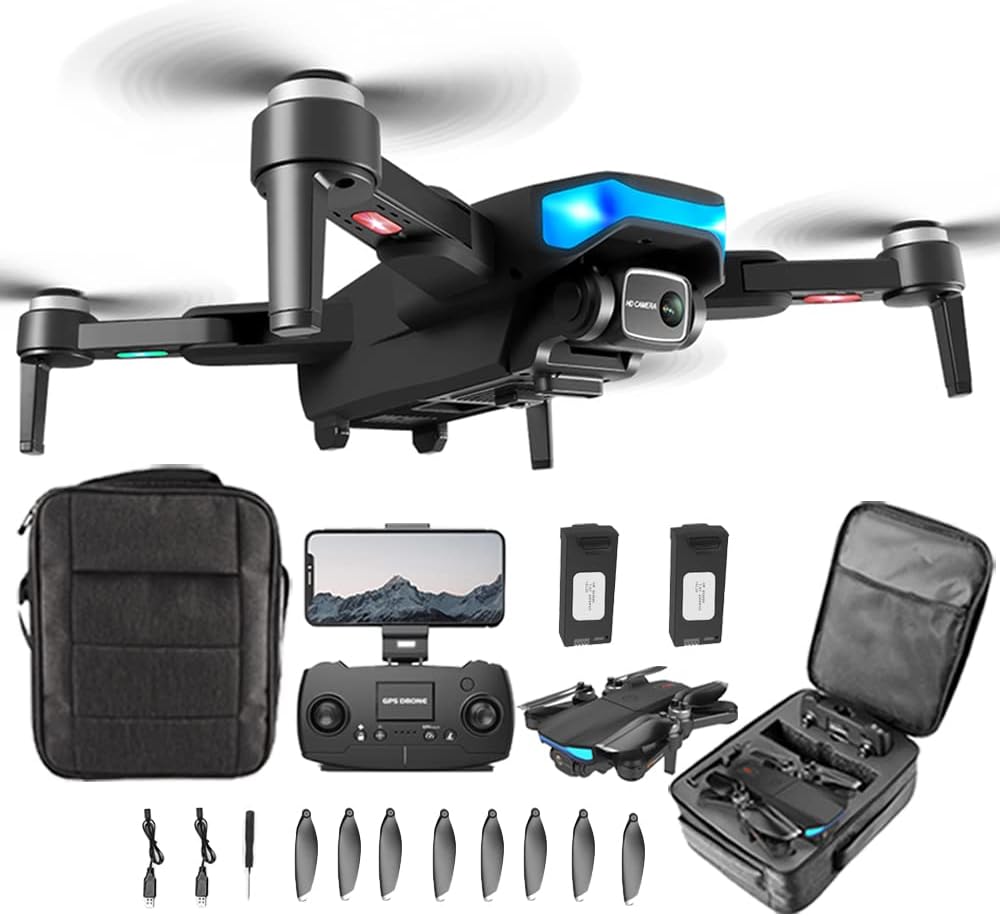
Image: The F188 GPS Drone, remote controller, two batteries, carrying cases, and spare propellers.
Setup Guide
1. Power On and Linking
- Place the drone on a flat, stable surface.
- Power on the drone first, then power on the remote controller. The drone will automatically link to the remote controller.
2. Gyroscope Calibration
- After successful linking, long press the Calibration button (indicated by a compass icon) on the remote controller until you hear a beeping sound.
- Observe the drone's front and rear lights. They will change from fast flashing to steady on, indicating successful gyroscope calibration.
3. Geomagnetism Calibration
- For the aircraft, long press the Geomagnetism button (indicated by a globe icon) on the remote controller until you hear another beeping sound.
- Pick up the drone and rotate it horizontally clockwise until you hear a beeping sound.
- Then, rotate the drone with its camera facing downward, vertically clockwise, until you hear another beeping sound.
4. Satellite Signal Search (Outdoor Flight)
Be patient while the drone searches for satellite signals. When you hear a beeping sound or check the satellite signal indicator in the upper right corner of the APP, if the number of stars is more than 9, the satellite search is successful, and takeoff operation can be carried out.
Video: Demonstrates the initial setup process including powering on, linking, gyroscope and geomagnetism calibration, and satellite signal acquisition for the F188 GPS Drone.
Operating Instructions
Basic Flight Controls
After successful satellite acquisition (for outdoor flight) or GPS function turned off (for indoor flight), short press the unlock button on the lower left corner of the remote control. The propellers will start spinning. Push the throttle stick slightly to take off.
- Rise: Push the left joystick (throttle) up.
- Drop: Pull the left joystick (throttle) down.
- Turn Left/Right (Yaw): Move the left joystick (yaw) left or right.
- Go Ahead/Backward (Pitch): Push the right joystick (pitch) up or down.
- Fly Left/Right (Roll): Move the right joystick (roll) left or right.
ESC Camera Control
The drone features an ESC (Electronic Speed Control) camera. Use the designated button or dial on the remote controller to adjust the camera angle during flight.

Image: Close-up of the F188 drone's 6K HD wide-angle dual camera, highlighting its 110° pitch and wide-angle capabilities.
APP Operation
- Scan the QR code in the manual to download and install the compatible APP (e.g., HFunPro) on your smartphone.
- Turn on your phone's Wi-Fi and connect to the drone's Wi-Fi network (e.g., HY-GPS-002-6K-xxxx).
- Once connected, open the APP.
- Mount your phone securely onto the remote controller's holder to view the live feed and access advanced flight features.
Intelligent Flight Functions (via APP)
- GPS Flight Planning (Waypoint Flight): Click on the Flight Planning icon in the APP. Design your desired flight path by tapping points on the screen. The drone will automatically follow the drawn trajectory.
- Follow Me Mode: Activate this mode in the APP, and the drone will automatically follow your movement, capturing video or photos.
- Point of Interest (Intelligent Surround): Select a target in the APP, and the drone will orbit around it, maintaining a set distance and altitude, ideal for capturing cinematic shots.

Image: The F188 drone demonstrating Trajectory Pointing Flight, where the drone follows a pre-defined path on a map.
Maintenance
- Cleaning: Regularly wipe down the drone and remote controller with a soft, dry cloth. Avoid using harsh chemicals.
- Propeller Check: Inspect propellers for any damage (cracks, bends) before each flight. Replace damaged propellers immediately using the provided spares.
- Battery Care: Store batteries in a cool, dry place. Do not overcharge or over-discharge. If not used for extended periods, charge them to about 50% capacity.
- Storage: When not in use, store the drone and all accessories in the provided carrying case to protect them from dust and physical damage.
Troubleshooting
- Drone Not Taking Off (Outdoor): Ensure GPS is turned on and both gyroscope and geomagnetism are successfully calibrated. The satellite signal indicator in the APP should show more than 9 stars.
- Drone Not Taking Off (Indoor): Ensure GPS is turned OFF. Indoor flight relies on optical flow positioning.
- Unstable Flight: Re-calibrate the gyroscope and geomagnetism. Check for damaged propellers. Ensure flight is conducted in calm weather conditions.
- No Image Transmission: Verify your phone is connected to the drone's Wi-Fi network. Restart the drone, remote, and APP.
- Short Flight Time: Ensure batteries are fully charged. Check for any obstructions to propellers or excessive wind resistance during flight.
Specifications
| Feature | Detail |
|---|---|
| Brand | Cotwodfa |
| Model Name | F188 |
| Special Features | First Person View (FPV), Integrated GPS, Long Battery Life, Long Distance Control, One Button Return |
| Age Range (Description) | Adult |
| Color | Grey |
| Video Capture Resolution | 6K |
| Connectivity Technology | Wi-Fi |
| Included Components | Battery, Carrying Case |
| Skill Level | Beginner |
| Item Weight | 249 Grams |
| Video Capture Format | MP4 |
| Remote Control Technology | Radio Frequency |
| Control Type | Remote Control |
| Media Type | SD |
| Material | Nylon, Plastic |
| Battery Cell Composition | Lithium Ion |
| Product Dimensions | 9"L x 7"W x 3"H |
Charging
Proper charging ensures optimal battery life and performance.
- Drone Battery: When the drone battery is charging, the green light on the battery flashes. When it is fully charged, the green light remains steady on.
- Remote Control: When the remote control is charging, the green light on the remote control is always on. When it is fully charged, the green light turns off.
Video: Demonstrates the charging process for both the drone battery and the remote controller, showing the indicator light behavior.
Warranty and Support
For any questions or issues before or after your purchase, please feel free to contact our customer service. We are committed to providing satisfactory resolution to your concerns.
Please refer to your purchase documentation for specific warranty details.