1. Safety Instructions
Read and understand all safety warnings and instructions before operating this post hole digger. Failure to follow these instructions may result in serious injury or death.
- Personal Protective Equipment (PPE): Always wear appropriate safety gear, including eye protection, hearing protection, heavy-duty gloves, and sturdy footwear. Avoid loose clothing that could get caught in moving parts.
- Fuel Safety: Gasoline is highly flammable. Handle fuel in a well-ventilated area, away from sparks, open flames, or heat sources. Do not smoke while refueling. Allow the engine to cool before refueling.
- Operating Environment: Operate the digger on stable, level ground. Do not use the auger on a slope steeper than 15 degrees. Clear the work area of bystanders, especially children and pets. Be aware of underground utilities (electrical lines, gas lines, water lines) before digging.
- Kickback Hazard: The auger can kick back if it strikes a rock, root, or other obstruction. Maintain a firm grip on both handles and keep your knees bent to absorb potential kickback forces.
- Engine Operation: Ensure the engine is off and the auger bit has stopped rotating before performing any adjustments, maintenance, or clearing obstructions.
- Ventilation: Operate the engine in a well-ventilated outdoor area. Engine exhaust contains carbon monoxide, a colorless, odorless, and deadly gas.
2. Package Contents
Verify that all components are present upon unpacking:
- 52cc 2.4 HP Post Hole Digger Power Head
- 8-inch Diameter, 30-inch Length Drill Bit
- Fuel Mixing Bottle
- Basic Tool Kit (wrenches, spark plug wrench/screwdriver)
- Instruction Manual

Image: The BILT HARD 52cc Gas Powered Post Hole Digger with the 8-inch auger bit attached.
3. Assembly
Follow these steps to assemble your post hole digger:
- Attach Handles: Securely attach the anti-vibration, anti-slip grip handles to the power head using the provided hardware. Ensure the exhaust is pointing away from the operator's position.
- Connect Auger Bit: Insert the 3/4-inch standard shaft of the auger drill bit into the output shaft of the power head. Align the holes and insert the shear pin to secure the bit. Use the provided cotter pin or R-clip to prevent the shear pin from dislodging.

Image: Close-up view of the 3/4-inch shaft connection point, illustrating where the auger bit attaches to the power head.
4. Setup
Proper setup is essential for safe and efficient operation.
4.1 Fuel Mixing
This engine requires a 25:1 gasoline to 2-stroke oil mixing ratio. Use fresh, unleaded gasoline with an octane rating of 87 or higher and high-quality 2-stroke engine oil specifically designed for air-cooled engines.
- Use the provided mixing bottle to ensure accurate ratios.
- Pour the correct amount of 2-stroke oil into the mixing bottle first, then add gasoline up to the indicated mark for a 25:1 ratio. If no 25:1 mark is present, fill gasoline to the line and add 2-stroke oil slightly above the 30:1 mark.
- Securely cap the bottle and shake well to thoroughly mix the fuel.
- Pour the mixed fuel into the digger's translucent fuel tank (capacity: 40.58 fl.oz).
Important: Running the engine with an incorrect fuel mixture (too little oil) will cause severe engine damage and void the warranty. The engine should produce a slight amount of smoke during operation; if not, the oil ratio may be too low.
4.2 Initial Engine Preparation
For the first start-up or after prolonged storage:
- Remove the spark plug using the provided wrench.
- Add a few drops of 2-stroke oil directly into the spark plug hole to lubricate the cylinder walls and rings.
- Pull the starter rope several times to distribute the oil, tilting the engine in different directions.
- Reinstall the spark plug and connect the spark plug wire.

Image: A person operating the post hole digger, with an overlay highlighting key specifications such as 52cc 2.4 HP Engine, 40.58 fl.oz Fuel Tank, 7500 RPM Engine Speed, and 34:1 Reduction Gear Ratio.
5. Operating Instructions
Follow these steps for safe and effective operation:
5.1 Starting the Engine
- Ensure the ON/OFF switch is in the 'ON' position.
- Press the primer bulb several times until fuel is visible.
- Engage the choke lever.
- Pull the starter rope firmly and steadily until the engine attempts to start (usually 1-3 pulls).
- Once the engine 'pops' or briefly starts, disengage the choke.
- Pull the starter rope again until the engine fully starts.
- Allow the engine to warm up for a minute or two before applying throttle.
5.2 Digging Holes
The digger features anti-vibration and anti-slip grip handles for improved control.
- Position the auger bit at the desired digging location.
- Maintain a balanced stance with bent knees to prepare for potential kickback.
- Press the security lever (H-1) and then the throttle (H-4) to engage the auger.
- Apply steady downward pressure while allowing the auger to bore into the soil.
- Periodically lift the auger slightly to clear loose soil from the hole and prevent it from binding.
- If the auger encounters a hard obstruction (rock, thick root), release the throttle immediately to prevent kickback. Attempt to reposition or clear the obstruction manually.
- Once the desired depth is reached, release the throttle and allow the auger to stop rotating before removing it from the hole.

Image: A diagram illustrating the hand controls: H-1 Security Lever, H-2 Locking Lever, H-3 Switch, H-4 Throttle, and H-5 Adjustment Knob.

Image: A top-down perspective of an individual operating the BILT HARD post hole digger, actively boring into the ground.

Image: A collage demonstrating the multipurpose applications of the auger, such as digging holes for decks, fence posts, tree planting, signs, landscaping, and soil sampling.
6. Maintenance
Regular maintenance ensures longevity and optimal performance.
- Fuel Storage: Before storing the unit for an extended period, drain all fuel from the tank. Run the engine until it completely runs out of fuel to clear the carburetor. This prevents fuel degradation and carburetor issues.
- Gear Oil Lubrication: Gear oil has been added at the factory. After approximately 25 working hours, check and add gear oil as needed. Refer to the gear oil port on the gearbox.
- Cleaning: After each use, clean the auger bit and power head of dirt and debris. Inspect for any damage or loose fasteners.
- Spark Plug: Periodically inspect and clean the spark plug. Replace if worn or fouled.
7. Troubleshooting
Refer to this section for common issues and their solutions.
| Problem | Possible Cause | Solution |
|---|---|---|
| Engine will not start |
|
|
| Engine starts then stalls |
|
|
| Auger not digging effectively or binds |
|
|
| Fuel or oil leak from gearbox |
|
|
8. Specifications
Technical details for the BILT HARD Post Hole Digger.
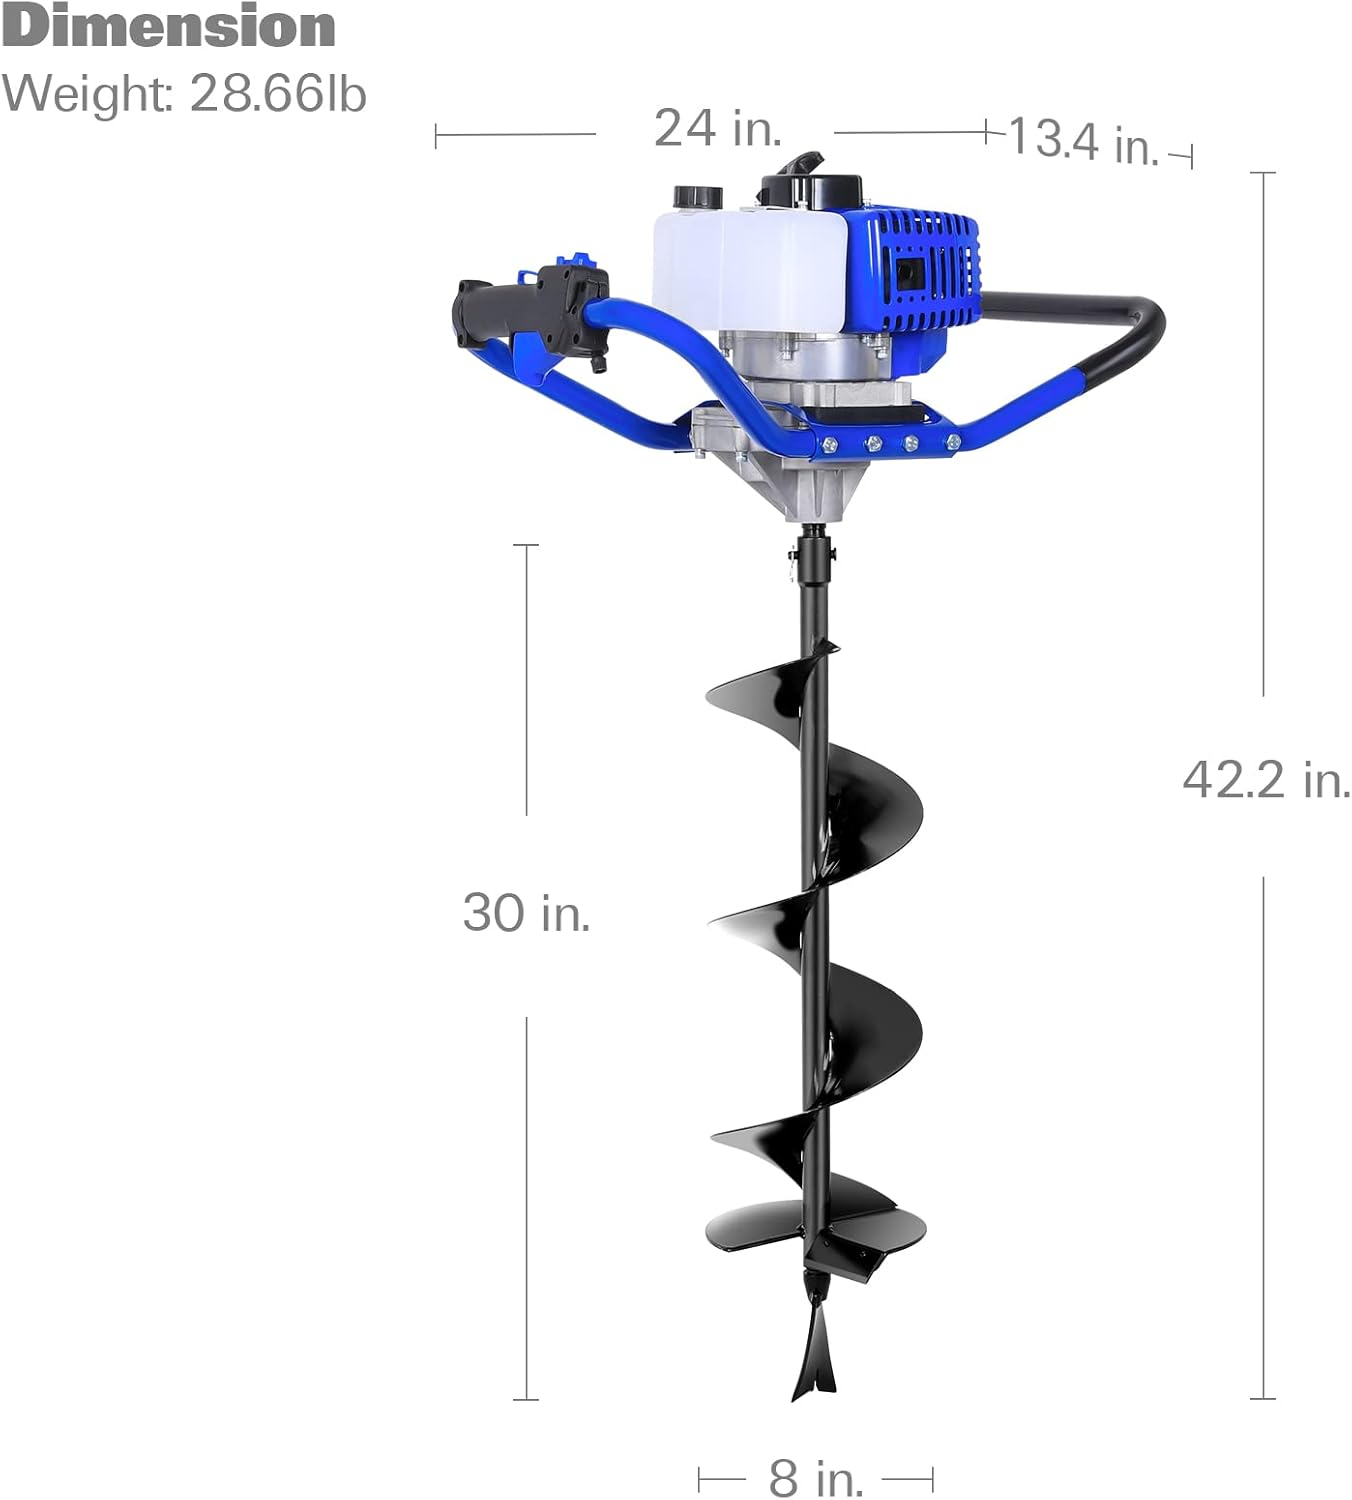
Image: A diagram illustrating the dimensions of the post hole digger, including its overall height (42.2 in), width (24 in), depth (13.4 in), auger length (30 in), and auger diameter (8 in). The total weight is 28.66 lbs.
| Feature | Detail |
|---|---|
| Engine Type | 52cc 2-Stroke Gas Engine |
| Horsepower | 2.4 HP |
| Max Engine Speed | 7500 RPM |
| Max Torque | 55.49 ft-lb |
| Auger Bit Speed | 260 RPM |
| Fuel Mixing Ratio | 25:1 (Gasoline:2-Stroke Oil) |
| Fuel Tank Capacity | 40.58 fl.oz |
| Auger Bit Diameter | 8 inches |
| Auger Bit Length | 30 inches |
| Shaft Size | 3/4 inch Standard |
| Item Weight | 28.7 pounds |
| Product Dimensions | 24 x 13.4 x 42.2 inches |
| Handle Material | Anti-slip |
9. Warranty and Support
For warranty information and customer support, please note the following:
- Amazon does not handle the return of gasoline-related products.
- If you have any questions or concerns regarding your BILT HARD Post Hole Digger, please contact BILT HARD directly via Amazon email or through our official website. Our support team is available to assist you.


