1. Product Overview
The Bkiyougo Universal Duplicator Remote Control is designed to copy fixed and learning code remote controls operating at 433.92 MHz. It is compatible with a wide range of common fixed and learning code chips, making it suitable for various applications such as garage doors, electric gates, and other remote-controlled systems.
Each remote features four buttons for precise device control and is constructed from durable ABS plastic, ensuring longevity. Its compact design allows for easy storage and portability.

Figure 1: Bkiyougo Universal Duplicator Remote Controls. These remotes are designed for cloning existing 433.92 MHz fixed and learning code remotes.
2. Specifications
- Model Number: KSTHD*2
- Brand: Bkiyougo
- Frequency: 433.92 MHz
- Compatible Chips: 2264, 2260, 1527, FP527, 2240, SMC918, and others.
- Material: ABS
- Dimensions: Approximately 0.39 x 0.79 x 0.39 inches (0.394 x 1.38 x 2.76 inches based on image)
- Item Weight: 2.12 ounces
- Batteries: 2 CR2032 batteries (included)
- Number of Buttons: 4
- Special Feature: Ergonomic design
- Compatible Devices: Automatic sliding gate openers, garage doors, gates.
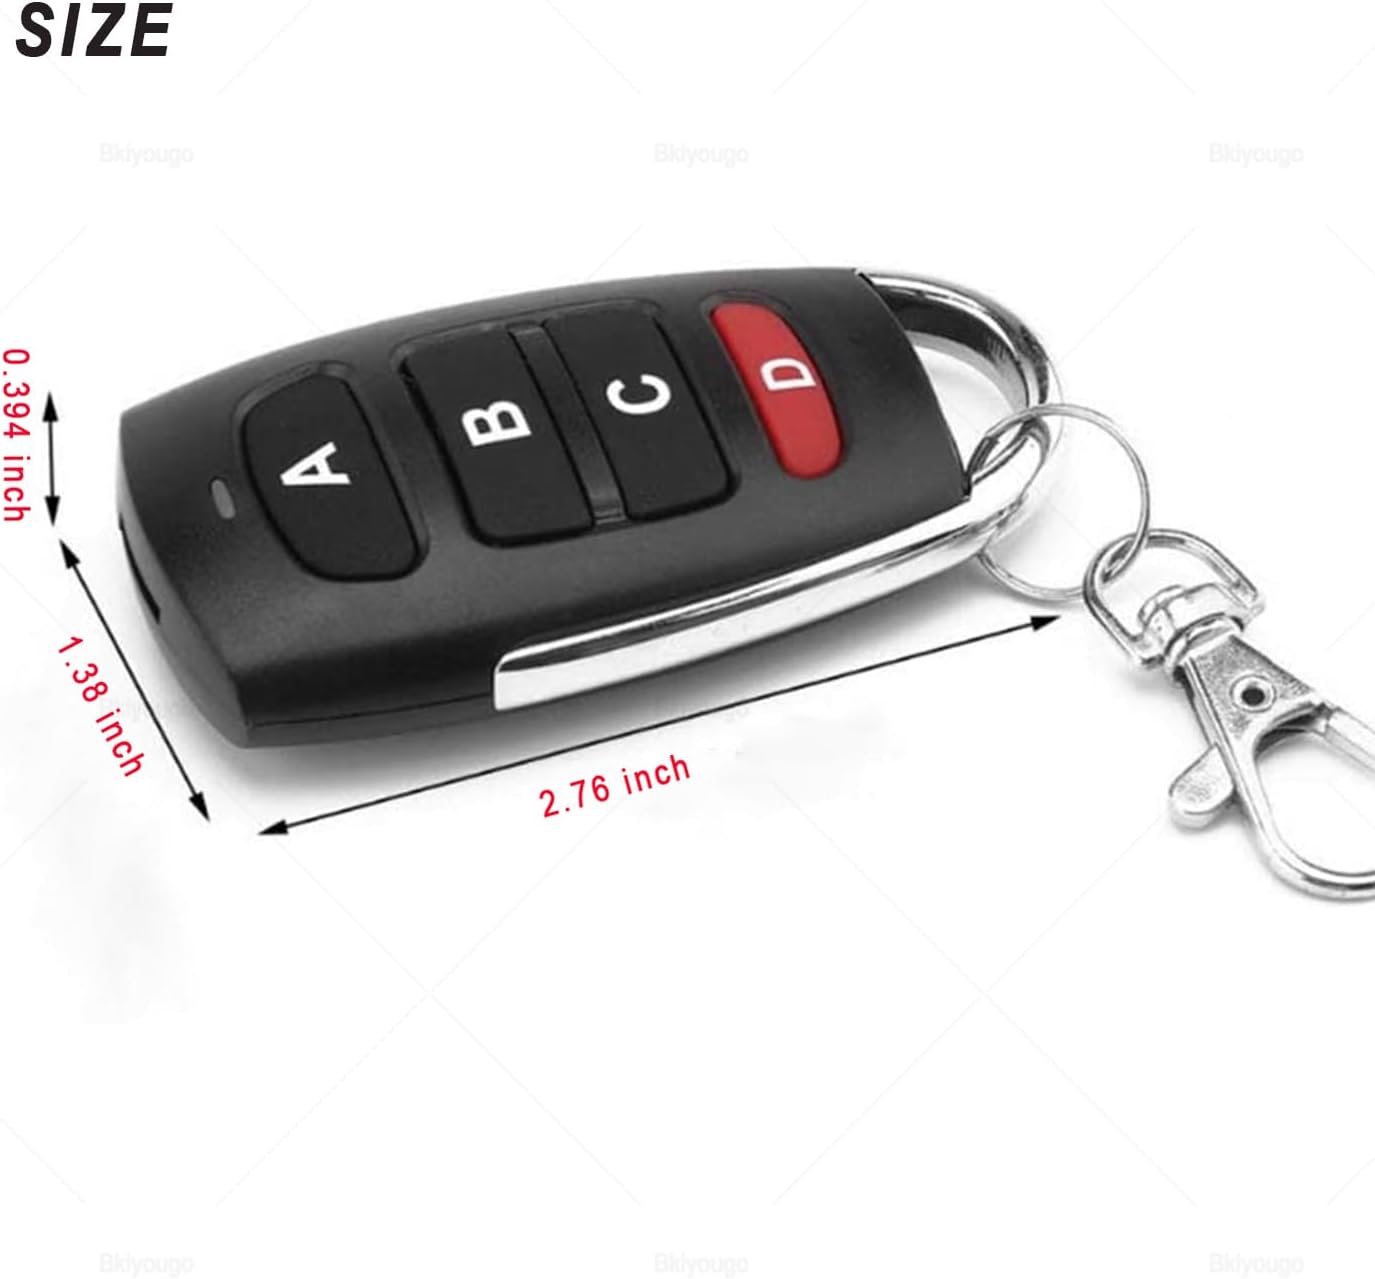
Figure 2: Remote Control Dimensions. The remote is compact for easy handling and storage.
3. Setup and Duplication Instructions
Before duplicating an existing remote, ensure your original remote operates at 433.92 MHz and uses a compatible chip type (e.g., 2264, 2260, 1527, FP527, 2240, SMC918). This duplicator remote is designed for fixed and learning code systems.
3.1. Clearing Existing Codes (Factory Reset)
- Simultaneously press and hold buttons A and B on the duplicator remote.
- Continue holding until the LED indicator flashes continuously (typically three quick flashes followed by continuous flashing).
- Release both buttons.
- To verify the code is cleared, press any button on the duplicator remote. If the LED indicator flashes once and then turns off (instead of blinking continuously), the code has been successfully cleared.

Figure 3: Clearing Codes. Pressing A and B together initiates the code clearing process.
Tip: If you accidentally clear the code, it can be recovered. Press and hold buttons C and D simultaneously until the LED indicator flashes continuously. This will restore the previously deleted data.
3.2. Duplicating an Existing Remote Control
- After clearing the old code from the duplicator remote (as per Section 3.1), place the original remote control and the duplicator remote side-by-side, ideally within 1 cm of each other.
- Press and hold the desired button on your original remote that you wish to copy.
- While still holding the button on the original remote, press and hold the corresponding button on the duplicator remote (e.g., if copying button A on original, press button A on duplicator).
- Continue holding both buttons until the LED indicator on the duplicator remote flashes three times quickly, then blinks continuously. This indicates successful duplication.
- Release both buttons. Repeat this process for any other buttons you wish to duplicate.

Figure 4: Duplicating Codes. Hold the original and duplicator remotes close and press corresponding buttons.
Note: Some remote controls have lower transmission power. If duplication fails, repeat step 2 of the cloning process. Ensure there is no interference during the operation. If issues persist, try moving to a different location or adjusting the distance between the remotes slightly.
4. Operation
Once successfully programmed, the duplicator remote functions identically to your original remote. Simply press the corresponding button (A, B, C, or D) to activate the linked function, such as opening or closing a garage door or gate.
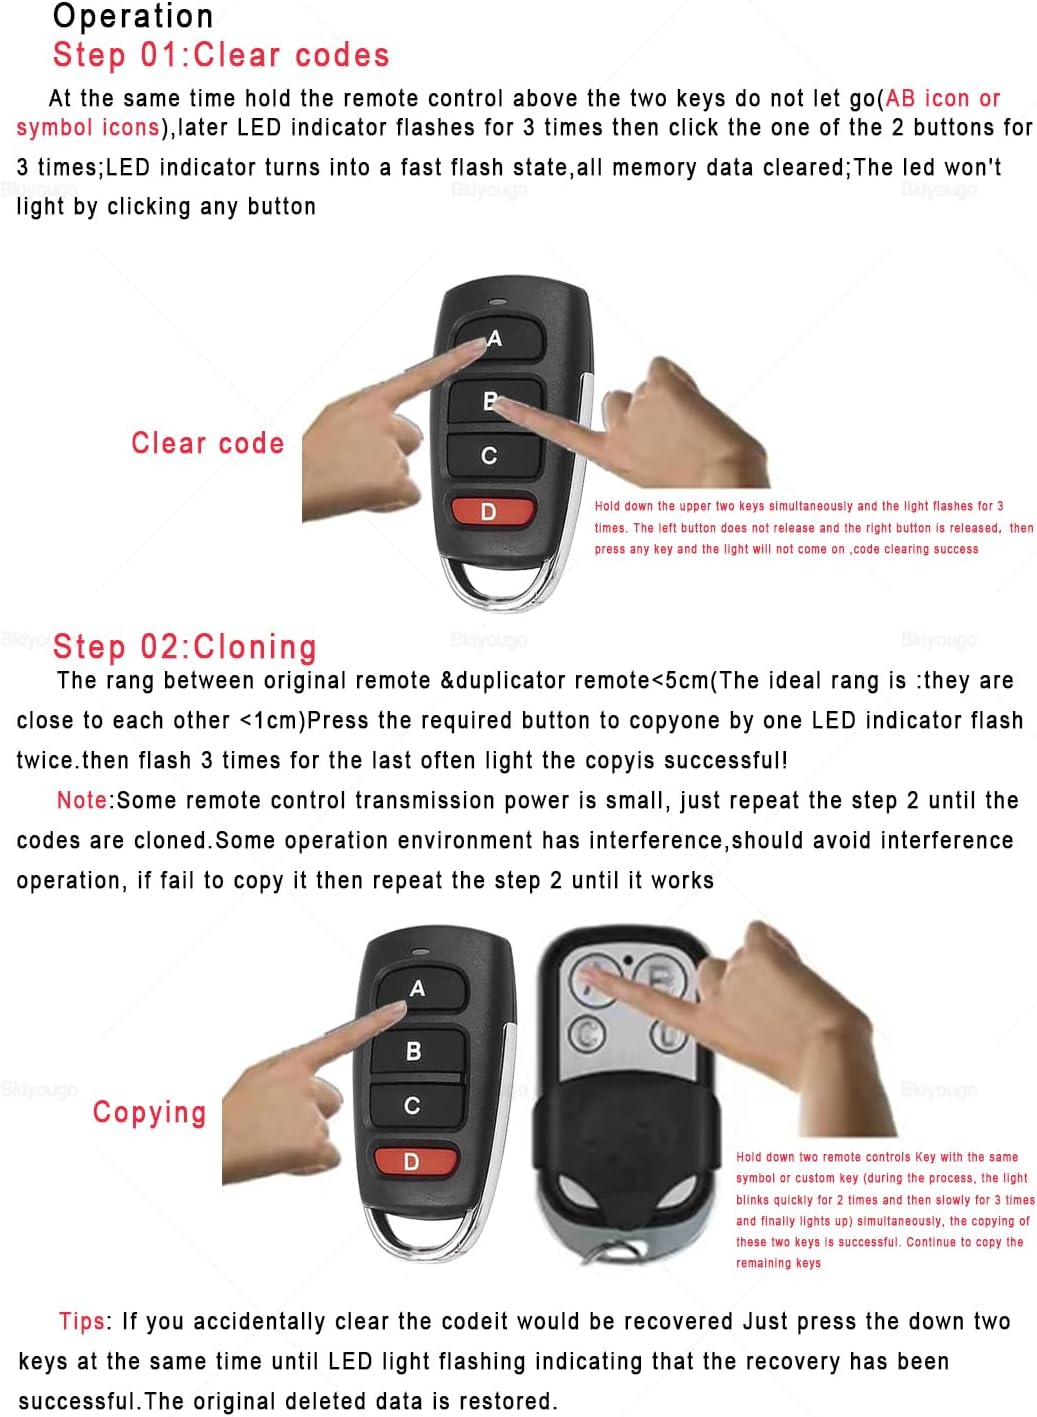
Figure 5: Remote in Use. The duplicator remote can control various 433.92 MHz devices.
5. Compatibility
This remote is designed to copy 99.99% of common fixed and learning code remote controls operating at 433.92 MHz. It is compatible with chips such as 2264, 2260, 1527, FP527, 2240, SMC918. Please verify your original remote's frequency and chip type before attempting to duplicate.
Important: This duplicator remote is not compatible with all rolling code systems. Please refer to the provided compatibility lists or contact support if your remote uses a rolling code not listed as compatible.
5.1. Identifying Transmission Frequency and Chip
To determine the transmission frequency and chip model of your original remote, you may need to open its casing. The frequency is often printed on a crystal oscillator (usually a silver component), and the coded chip number is typically found on the main integrated circuit.

Figure 6: Internal Components. Locating frequency and chip information within an original remote.
5.2. Compatible Brands and Models (433.92 MHz)
The following tables list some compatible brands and models. This list is not exhaustive. If your model is not listed, please check its frequency and chip type.

Figure 7: International Compatibility List. A selection of compatible remote control models.

Figure 8: Additional Compatibility Examples. Visual examples of compatible and incompatible remotes.

Figure 9: Rolling Code Compatibility. A list of some 433MHz rolling code brands that may be compatible.
6. Troubleshooting
- Remote not duplicating:
- Ensure the duplicator remote's codes are cleared before attempting to copy.
- Verify the original remote's frequency is 433.92 MHz and its chip type is compatible.
- Place the original and duplicator remotes very close (within 1 cm) during the duplication process.
- Repeat the duplication steps, ensuring buttons are held down firmly and for the required duration until the LED indicator responds correctly.
- Check for potential radio frequency interference in the area. Try duplicating in a different location.
- Some original remotes have low transmission power; try holding them at slightly different angles or distances.
- Duplicated remote has short range or intermittent function:
- This can indicate an incomplete or weak duplication. Try clearing the duplicator remote and repeating the duplication process carefully.
- Ensure the duplicator remote's battery is not low.
- Verify the original remote is functioning correctly and has good range.
- LED indicator does not flash:
- Check if the battery is correctly installed and has sufficient charge.
- Ensure buttons are pressed firmly.
- Remote does not control device after duplication:
- Confirm that the original remote is working correctly with the device.
- Re-verify that the original remote's frequency and chip type are compatible with this duplicator. This duplicator is primarily for fixed and learning codes, and some rolling codes.
- Ensure the duplication process was completed successfully for each button.
7. Maintenance
7.1. Battery Replacement
The remote control uses two CR2032 lithium manganese dioxide batteries. When the remote's range decreases or the LED indicator becomes dim, it may be time to replace the batteries.
- Carefully open the remote control casing. This may require a small screwdriver or prying tool.
- Locate the two CR2032 batteries.
- Remove the old batteries and insert new CR2032 batteries, ensuring correct polarity (+/-).
- Close the remote control casing securely.
Caution: Dispose of old batteries responsibly according to local regulations. Keep batteries out of reach of children.
8. Warranty and Support
For warranty information or technical support, please refer to the seller's contact details or the product packaging. Bkiyougo aims to provide comprehensive after-sales service to address any product-related concerns.
For further assistance, you may visit the Bkiyougo Store on Amazon.


