
AnyTone ARES II
AnyTone ARES II 10 Meter Radio User Manual
Model: ARES II
Introduction
This manual provides detailed instructions for the installation, operation, and maintenance of your AnyTone ARES II 10 Meter Radio. Please read this manual thoroughly before operating the device to ensure proper function and safety. The AnyTone ARES II is a high-power mobile transceiver designed for 10-meter band communication, featuring multiple modes (PA/FM/AM/USB/LSB), CTCSS/DCS, and various programmable functions.

Image: The AnyTone ARES II 10 Meter Radio with its included microphone, showcasing the front panel controls and display.
Safety Information
- Do not operate the radio in explosive atmospheres or near flammable materials.
- Ensure proper ventilation to prevent overheating.
- Connect the radio to a stable 13.8V DC power source. Incorrect voltage can damage the unit.
- Do not expose the radio to water or excessive moisture. This product is not water-resistant.
- Avoid prolonged exposure to high RF power output.
- Only use approved accessories and replacement parts.
Package Contents
Verify that all items listed below are included in your package:
- AnyTone ARES II 10 Meter Radio (1 piece)
- Microphone (1 piece)
- Mounting Bracket (1 piece)
- DC Power Cable (1 piece)
- Microphone Hanger (1 piece)
- Non-slip Mats (2 pieces)
- Screws for bracket (2 pieces)
- Pads for bracket (2 pieces)
- Adjusting screws (2 pieces)
- Spare Fuses (10A, 250V) (1 piece)
- Self-tapping Screws (2 pieces)
- Pads (2 pieces)

Image: Visual representation of all items included in the AnyTone ARES II product package, including the radio, microphone, mounting bracket, power cord, and various small accessories.
Product Overview
Front Panel Controls and Indicators
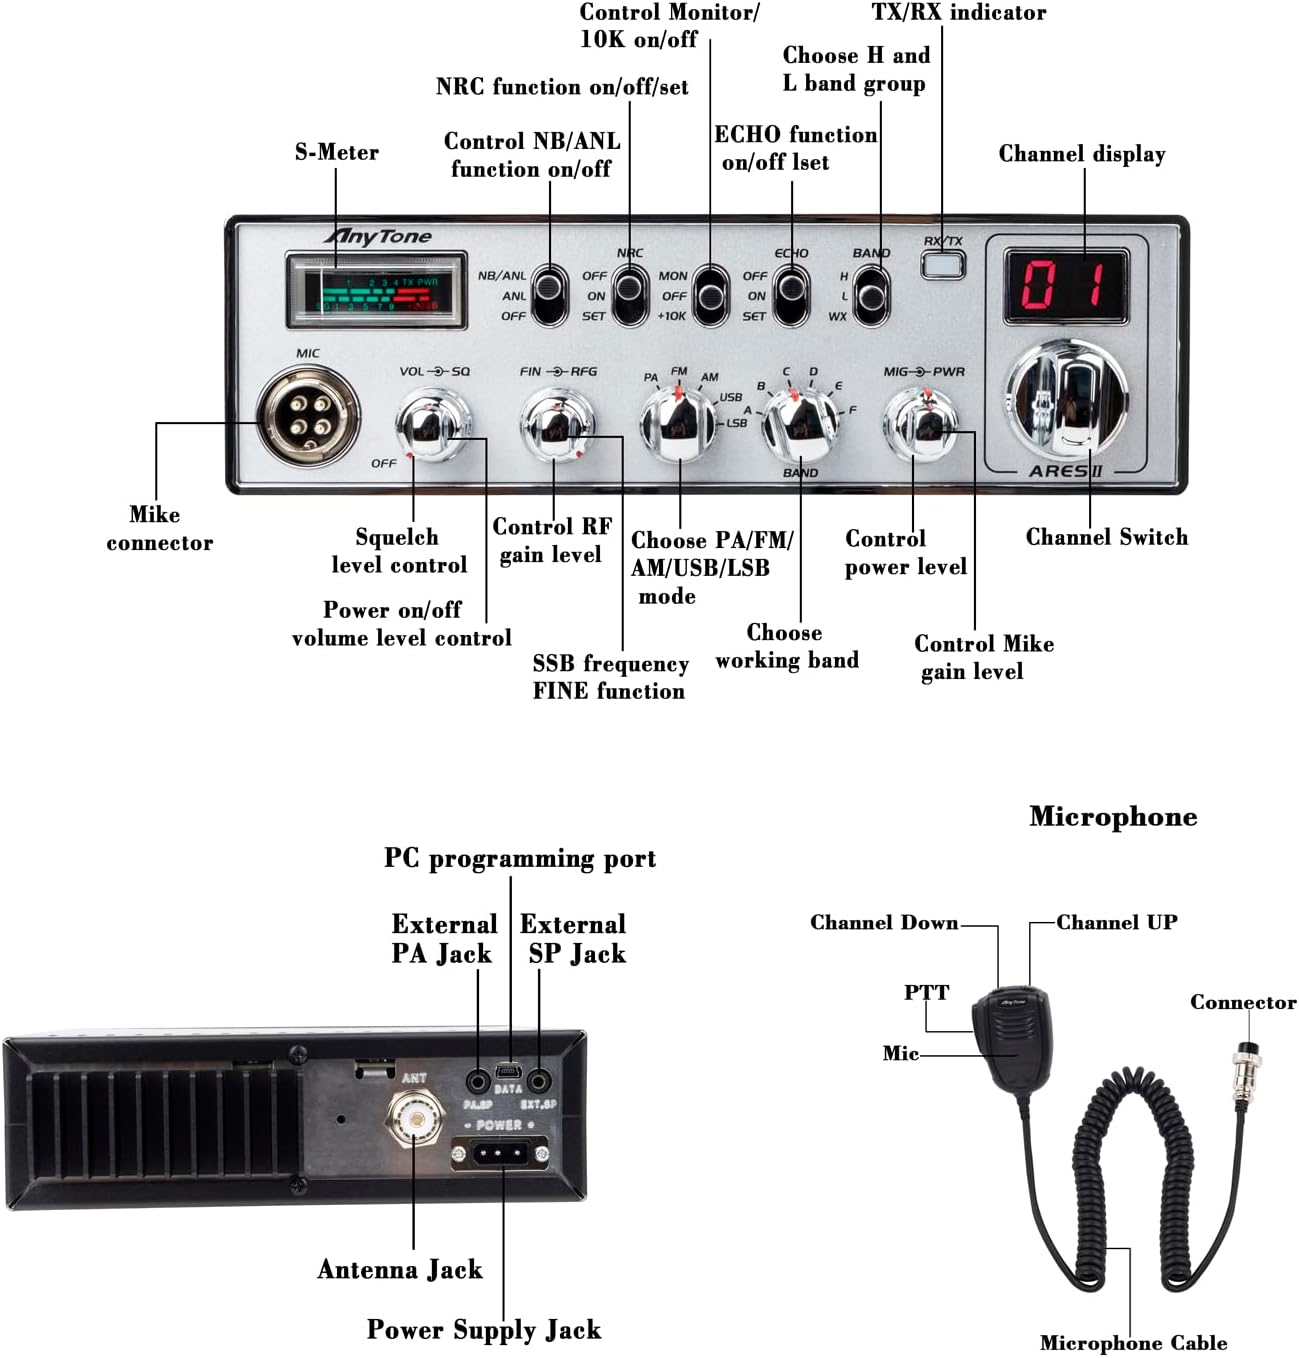
Image: Detailed diagram of the AnyTone ARES II front panel, indicating the function of each knob, button, and display element.
- S-Meter: Displays signal strength (RX RSSI) and power output (PWR).
- NB/ANL: Noise Blanker / Automatic Noise Limiter function control.
- NRC: Digital Noise Reduction control for RX & TX.
- MON/SET/+10KHz: Monitor function, menu setting, and +10KHz frequency shift.
- ECHO: Echo function control.
- BAND: Selects frequency band (H, L, A, B, C, D, E, F).
- RX/TX Indicator: Illuminates for receiving (RX) or transmitting (TX).
- Channel Display: Shows the current operating channel.
- Channel Switch: Rotary knob for selecting channels.
- MIG-PWR: Microphone Gain and RF Power adjustment.
- PA/FM/AM/USB/LSB Mode Selector: Chooses the operating mode.
- FIN-RFG: SSB frequency FINE adjustment and RF Gain control.
- VOL-SQ: Power On/Off, Volume Level, and Squelch Level control.
- MIC Connector: Port for connecting the microphone.
Rear Panel Connections

Image: Detailed view of the AnyTone ARES II rear panel, showing the antenna jack, power supply jack, PC programming port, and external speaker/PA jacks.
- ANT: Antenna Jack (SO-239 type).
- DATA: PC Programming Port.
- PA/SP: External PA Jack / External Speaker Jack.
- POWER: DC Power Supply Jack (13.8V DC).
Microphone
The included microphone features a Push-To-Talk (PTT) button and channel up/down buttons for convenient operation.
- PTT: Press to transmit, release to receive.
- Channel UP/DOWN: Buttons to change the operating channel.
Setup
1. Mounting the Radio
Use the provided mounting bracket and screws to secure the radio in a suitable location within your vehicle or operating station. Ensure the location allows for adequate ventilation and easy access to controls.
2. Power Connection
Connect the supplied DC power cable to the POWER jack on the rear of the radio. Connect the red wire to the positive (+) terminal of your 13.8V DC power source and the black wire to the negative (-) terminal. Ensure the connection is secure and correctly polarized to prevent damage.
3. Antenna Connection
Connect a suitable 10-meter band antenna to the ANT jack on the rear of the radio. Use a high-quality coaxial cable with a PL-259 connector. Ensure the antenna is properly tuned for the 10-meter band to achieve optimal performance and prevent damage to the radio's final amplifier.
4. Microphone Connection
Plug the microphone cable into the MIC connector on the front panel of the radio. Secure the microphone using the provided microphone hanger.
Operating Instructions
1. Power On/Off and Volume
- Rotate the VOL-SQ knob clockwise to turn the radio ON. Continue rotating to adjust the listening volume.
- Rotate the VOL-SQ knob counter-clockwise until it clicks to turn the radio OFF.
2. Channel Selection
- Use the Channel Switch knob on the front panel to select the desired operating channel.
- Alternatively, use the UP/DOWN buttons on the microphone to change channels.
3. Mode Selection
- Rotate the PA/FM/AM/USB/LSB knob to select the desired operating mode:
- PA: Public Address mode (requires external PA speaker).
- FM: Frequency Modulation.
- AM: Amplitude Modulation.
- USB: Upper Sideband.
- LSB: Lower Sideband.
4. Squelch Adjustment (SQ)
- Rotate the VOL-SQ knob clockwise past the volume control to adjust the squelch level. Adjust until background noise is suppressed, but weak signals can still be heard.
- The radio also features an Automatic Squelch (ASQ) function for automatic noise suppression.
5. RF Gain Adjustment (RFG)
- Use the FIN-RFG knob to adjust the receiver's RF gain. This helps to reduce strong signal interference.
6. Microphone Gain and RF Power Adjustment (MIG-PWR)
- The MIG-PWR knob controls both microphone gain and RF power output. Adjust microphone gain for clear voice transmission and RF power for desired output level.
7. Digital Noise Reduction (NRC)
- Press the NRC button to activate or deactivate the digital noise reduction for both receiving (RX) and transmitting (TX).
8. Echo Function
- Press the ECHO button to enable or disable the echo effect on your transmission.
9. CTCSS/DCS Codes
The radio supports CTCSS/DCS codes for selective calling. Refer to the full programming software manual for detailed instructions on setting these codes via PC.
10. PC Programmable Features
The AnyTone ARES II can be programmed via PC for advanced settings, including frequency customization, CTCSS/DCS codes, and other parameters. Software can be downloaded from the AnyTone official website. Connect the radio to your PC using a compatible programming cable via the DATA port on the rear panel.
Maintenance
- Cleaning: Use a soft, dry cloth to clean the radio's exterior. Do not use harsh chemicals or abrasive cleaners.
- Connections: Periodically check all cable connections (power, antenna, microphone) for security and corrosion.
- Ventilation: Ensure the radio's heat sinks and ventilation slots are free from dust and obstructions to prevent overheating.
- Fuse Replacement: If the radio does not power on, check the inline fuse on the DC power cable. Replace with a fuse of the same rating (10A, 250V).
Troubleshooting
| Problem | Possible Cause | Solution |
|---|---|---|
| Radio does not power on. | No power, incorrect wiring, blown fuse. | Check power cable connections, verify 13.8V DC supply, replace fuse if blown. |
| No reception or poor reception. | Antenna issue, squelch too high, incorrect mode. | Check antenna connection and tuning, lower squelch level, ensure correct operating mode. |
| Cannot transmit or low power output. | Microphone not connected, RF power set too low, SWR issue. | Ensure microphone is connected, adjust MIG-PWR knob, check antenna SWR. |
| Excessive noise on reception. | Squelch too low, external interference, NB/ANL/NRC off. | Increase squelch level, activate NB/ANL/NRC functions, identify and mitigate interference sources. |
Specifications
| Feature | Specification |
|---|---|
| Model Number | ARES II |
| Frequency Range | 28.000-29.695 MHz (Default), 140-170 MHz (Weather Channel) |
| Number of Channels | 40 (programmable) in each band |
| Operating Modes | PA/FM/AM/USB/LSB |
| Max Power Output | FM: 40W, AM: 12W, SSB: 35W |
| Power Supply | 13.8 Volts DC |
| Special Features | Automatic Squelch, Echo Function, Noise Reduction (NRC), PC programmable, VOX Function, CTCSS/DCS |
| Dimensions (L x W x H) | 287mm x 200mm x 61mm (11.3 x 7.87 x 2.4 inches) |
| Weight | 1.5 kg (3.3 pounds) |
| FCC ID | T4K-ARESII |
| Serial Number Example | 0915241380133 |
Warranty and Support
The AnyTone ARES II radio comes with a 1-year warranty from the date of purchase. For technical support, software downloads, or any queries regarding the product, please visit the official AnyTone website or contact the seller directly. Prompt assistance will be provided.
Related documentsARES II


Ask a question about this manual
Ask about setup, troubleshooting, compatibility, parts, safety, or missing instructions. Manuals+ will review the question and use this page’s manual context to help answer it.