
1. Introduction
The RME ADI-2/4 Pro SE is a high-performance AD/DA converter designed for professional audio applications. It offers exceptional versatility, functioning as a reference-quality headphone and front amplifier, an interface for measurement systems up to 768 kHz, a multi-format converter, or an S/PDIF or ADAT playback system. This device also features DSD compatibility and a built-in phono preamplifier for high-quality vinyl digitization. Equipped with RME's legendary SteadyClock FS technology, it ensures unprecedented immunity to jitter, delivering pristine audio.
2. Product Overview
Front Panel

The front panel features a high-resolution IPS display, a large volume encoder, dedicated buttons for I/O, EQ, and Setup, along with two headphone outputs (PH 3/4 and PH 1/2) and control buttons for navigation.
Rear Panel
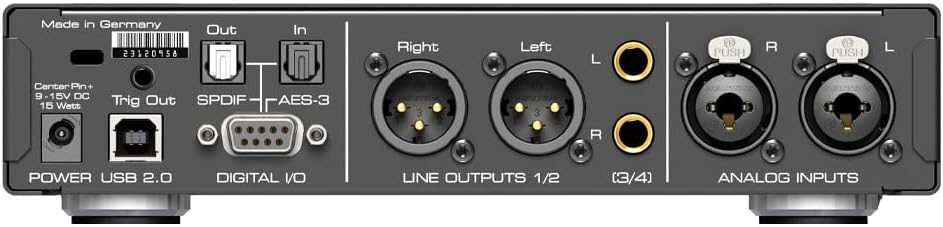
The rear panel provides connectivity for power, USB 2.0, digital I/O (S/PDIF optical and coaxial, AES-3), balanced analog line outputs (XLR), unbalanced analog line outputs (RCA), and balanced analog inputs (XLR) with additional unbalanced RCA inputs.
3. Setup
3.1 Unpacking
Carefully remove the ADI-2/4 Pro SE from its packaging. Ensure all components listed in the packing list are present, including the unit, power supply, and USB cable.
3.2 Connecting the Device
- Power Connection: Connect the provided power supply to the 9-15V DC input on the rear panel and then to a suitable power outlet.
- USB Connection: Use the supplied USB 2.0 cable to connect the ADI-2/4 Pro SE to your computer.
- Analog I/O: Connect your analog audio sources (e.g., microphones, instruments, turntables) to the Analog Inputs (XLR or RCA) and your monitoring system (e.g., studio monitors, amplifiers) to the Line Outputs (XLR or RCA).
- Digital I/O: For digital audio connections, use the S/PDIF (optical or coaxial) or AES-3 ports as required by your setup.
- Headphones: Plug your headphones into the 6.3mm (1/4") jacks on the front panel. The unit also features a super-low noise 4.4mm balanced Pentaconn connector for IEMs.
4. Operation
4.1 Front Panel Controls
- VOLUME Knob: Controls the output volume for selected outputs. Pressing it often accesses mute or specific menu functions.
- I/O Button: Toggles between input and output selection modes.
- EQ Button: Accesses the equalizer settings.
- SETUP Button: Enters the main setup menu for advanced configurations.
- Navigation Buttons (A, B, PRESS, T): Used for navigating menus, confirming selections, and adjusting parameters on the IPS display.
4.2 Basic Operation
Upon powering on, the unit will display its current status. Use the I/O button to select the desired input and output channels. The large volume knob adjusts the output level. Navigate through menus using the A, B, PRESS, and T buttons to configure sample rates, DSD compatibility, and activate the built-in phono preamplifier for vinyl digitization.
4.3 Headphone Outputs
The ADI-2/4 Pro SE features a dual Extreme Power headphone amplifier, capable of driving a wide range of headphones. The 4.4mm balanced Pentaconn connector is specifically designed for low-noise performance with In-Ear Monitors (IEMs).
4.4 DSP Effects
The unit includes built-in DSP effects. Access these via the EQ or SETUP menus to apply processing such as equalization, dynamics, and other enhancements to your audio signals.
4.5 DigiCheck Tool
RME's indispensable DigiCheck tool can be used in conjunction with the ADI-2/4 Pro SE for comprehensive audio analysis and measurement. Refer to the DigiCheck software manual for detailed usage instructions.
5. Maintenance
5.1 Cleaning
To clean the unit, use a soft, dry cloth. For stubborn marks, a slightly damp cloth with a mild, non-abrasive cleaner can be used. Ensure the unit is powered off and disconnected from all sources before cleaning. Avoid using harsh chemicals or abrasive materials.
5.2 Firmware Updates
RME periodically releases firmware updates to improve performance and add new features. Visit the official RME website to check for the latest firmware and follow the provided instructions for updating your device. Always back up your settings before performing a firmware update.
6. Troubleshooting
- No Power: Ensure the power supply is securely connected to the unit and a working power outlet. Check the power adapter for any damage.
- No Sound Output: Verify that the correct input and output channels are selected on the unit. Check all cable connections (analog and digital). Ensure the volume is not muted or set too low. Confirm that your monitoring system is powered on and functioning correctly.
- Connection Issues (USB): Try a different USB port on your computer. Ensure the correct drivers are installed for the ADI-2/4 Pro SE. Restart your computer and the unit.
- Display Not Working: Check power connection. If the unit powers on but the display is blank, contact RME support.
- Distorted Audio: Check input levels to prevent clipping. Ensure sample rates are matched across all devices in your audio chain. Inspect cables for damage.
If you encounter persistent issues not covered here, please refer to the comprehensive manual available on the RME website or contact RME technical support.
7. Specifications
| Feature | Specification |
|---|---|
| Model Number | ADI-24PROSE |
| Product Dimensions | 13.95 x 8.75 x 3.4 inches |
| Item Weight | 5.68 pounds |
| Manufacturer | RME |
| ASIN | B0BZTYZDMV |
| Date First Available | October 28, 2022 |
| Max Sample Rate | 768 kHz |
| Headphone Amplifier | Dual Extreme Power |
| Jitter Suppression | SteadyClock FS |
8. Warranty Information
The RME ADI-2/4 Pro SE is covered by a manufacturer's warranty. For specific terms and conditions, please refer to the warranty documentation included with your product or visit the official RME website. Extended protection plans may also be available for purchase from authorized retailers.
9. Support
For technical support, driver downloads, firmware updates, and additional documentation, please visit the official RME website:
You may also contact RME customer service directly through the contact information provided on their website.


