
1. Introduction
Thank you for choosing the Calor Airglide SV8024C0 Express Steam Station. This appliance is designed to provide efficient and powerful steam ironing for all your garments. With its advanced features like a large 1.8L removable water tank, 6.6 Bar steam pressure, and a powerful 460g/min steam jet, it ensures excellent ironing results. Please read this manual carefully before first use to ensure safe and optimal operation.
2. Important Safety Instructions
Always follow basic safety precautions when using electrical appliances to reduce the risk of fire, electric shock, and personal injury.
- Read all instructions before use.
- Do not leave the iron unattended while it is connected to the power supply or while it is hot.
- Do not immerse the appliance, power cord, or plug in water or other liquids.
- Keep the appliance out of reach of children and pets.
- Use the appliance only for its intended purpose.
- Always unplug the appliance from the electrical outlet when filling with water, emptying, or when not in use.
- Do not operate the appliance with a damaged cord or plug, or if it has been dropped or damaged.
- Place the steam station on a stable, heat-resistant surface.
- The soleplate and steam are extremely hot and can cause burns. Avoid direct contact.
- Only use tap water in the water tank.
3. Product Overview
Familiarize yourself with the main components of your Airglide Calor SV8024C0 Express Steam Station.
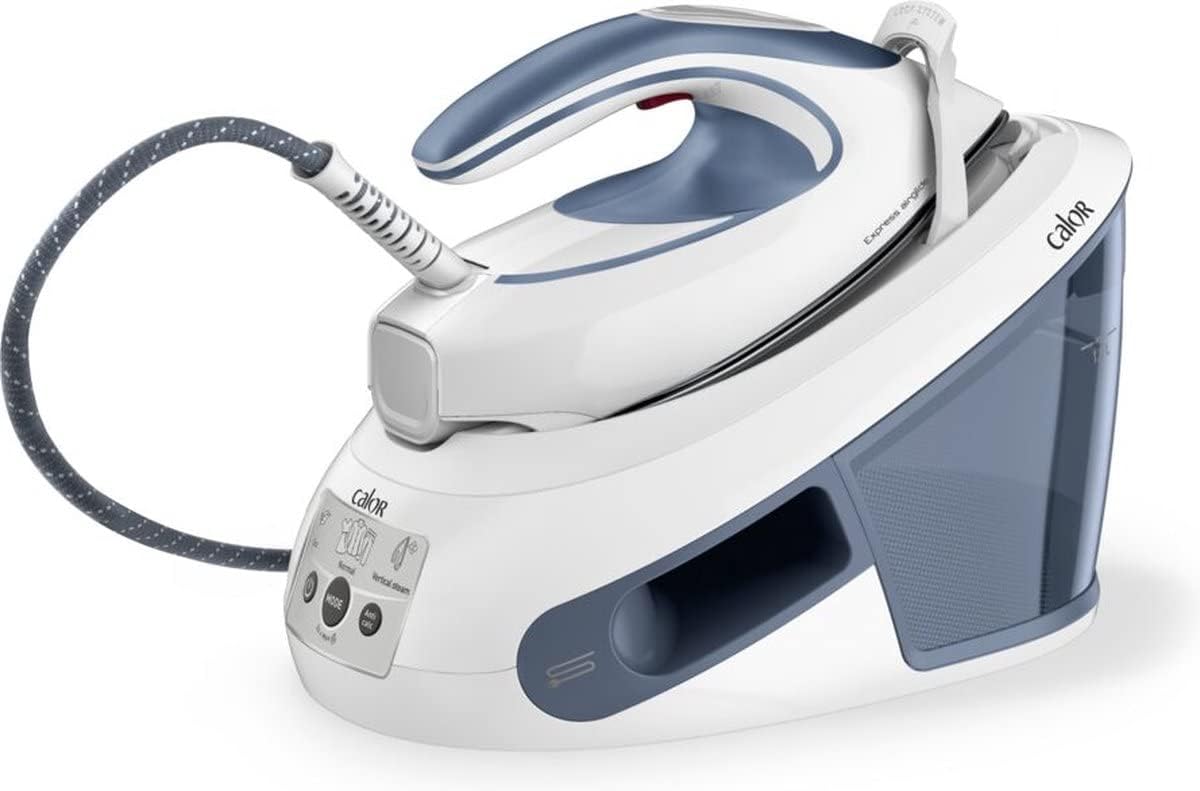
Figure 3.1: Front view of the Calor Airglide SV8024C0 Express Steam Station, showing the iron resting on its base unit. The large, transparent water tank is visible on the right side of the base.

Figure 3.2: Side view of the steam station, highlighting the 1.8L removable water tank with a "MAX 1.8L" indicator. The steam hose connects the iron to the base unit.

Figure 3.3: Top view of the steam station's base, showing the control panel. Buttons for Eco mode, Normal mode, Vertical Steam, and Anti-Calc are visible, along with the power button and a "Mode" selector.

Figure 3.4: A person demonstrating the portability of the steam station by carrying it using the integrated handle.
Key Components:
- Iron Unit: Features a Durilium soleplate for smooth gliding.
- Steam Generator Base: Houses the water tank, heating element, and pump.
- Removable Water Tank: 1.8L capacity for extended ironing sessions.
- Steam Hose: Connects the iron to the base, delivering high-pressure steam.
- Control Panel: Buttons for power, mode selection (Eco, Normal), vertical steam, and anti-calc.
- Lock System: Secures the iron to the base for safe transport.
- Power Cord: 1.6m length.
4. Setup and First Use
4.1 Unpacking
Carefully remove all packaging materials and ensure all components are present. Retain packaging for future storage or transport.
4.2 Filling the Water Tank
- Ensure the steam station is unplugged from the power outlet.
- Remove the removable water tank from the base unit.
- Fill the tank with clean tap water up to the "MAX" line (1.8L). Do not overfill.
- Replace the water tank securely into the base unit.
4.3 Initial Power On
- Place the steam station on a stable, flat, and heat-resistant surface.
- Unwind the power cord and plug it into a grounded electrical outlet.
- Press the Power button on the control panel. The indicator light will illuminate.
- Allow approximately 2 minutes for the appliance to warm up. The indicator light will change or stop flashing when ready for use.
5. Operating Instructions
5.1 Ironing Modes
The Airglide SV8024C0 features automatic temperature adjustment, eliminating the need for manual temperature settings based on fabric type.
- Normal Mode: Provides continuous steam for most fabrics.
- Eco Mode: Reduces steam output for energy saving, suitable for delicate fabrics or less stubborn creases. Select by pressing the "Mode" button until the Eco indicator lights up.
- Steam Boost (Pressing Effect): For stubborn creases, press the steam trigger on the iron multiple times to activate the powerful 460g/min steam jet.
- Vertical Steam: Ideal for refreshing garments, curtains, or drapes. Hold the iron vertically a few centimeters from the fabric and press the steam trigger.
5.2 Ironing Process
- Ensure the water tank is filled and the appliance is heated.
- Place the garment on the ironing board.
- Press the steam trigger on the iron handle to release steam as you glide the iron over the fabric.
- For dry ironing, simply do not press the steam trigger.
- When finished, place the iron back on its base.
5.3 Auto Shut-Off
For safety and energy saving, the appliance is equipped with an auto shut-off feature. If left unused for a certain period, it will automatically turn off. To restart, press the power button.
6. Maintenance and Care
Regular maintenance ensures the longevity and optimal performance of your steam station.
6.1 Anti-Limescale System (Automatic Anti-Calc)
Your steam station features an automatic anti-limescale system. When the "Anti-Calc" indicator light illuminates, it's time to perform the descaling procedure.
- Ensure the appliance is unplugged and completely cool.
- Refer to the specific descaling instructions in your full product manual for the exact procedure, which typically involves rinsing the collector or performing a self-cleaning cycle.
- Regular descaling prevents mineral buildup and maintains steam performance.
6.2 Cleaning the Soleplate
- Allow the iron to cool completely.
- Wipe the Durilium soleplate with a damp cloth. Do not use abrasive cleaners or metallic scouring pads.
- For stubborn marks, a specialized soleplate cleaner may be used, following its instructions.
6.3 Storage
- Empty the water tank after each use.
- Allow the appliance to cool completely before storing.
- Secure the iron to the base using the lock system.
- Store the steam station in a dry, safe place, out of reach of children.
7. Troubleshooting
If you encounter issues with your steam station, refer to the table below for common problems and solutions.
| Problem | Possible Cause | Solution |
|---|---|---|
| No steam is produced. | Water tank is empty. Appliance not heated up. Steam trigger not pressed. | Refill the water tank. Wait for the appliance to reach operating temperature (approx. 2 min). Press and hold the steam trigger on the iron handle. |
| Water leaks from the soleplate. | Iron not hot enough. Steam boost used too frequently. | Allow the iron to heat up fully before using steam. Allow a few seconds between steam boosts. |
| "Anti-Calc" light is on. | Descaling is required. | Perform the descaling procedure as outlined in Section 6.1. |
| Appliance does not turn on. | Not plugged in. Power outlet issue. Auto shut-off activated. | Ensure the power cord is securely plugged into a working outlet. Check the circuit breaker. Press the power button to restart. |
If the problem persists after trying these solutions, please contact customer support.
8. Technical Specifications
| Feature | Detail |
|---|---|
| Model Number | SV8024C0 |
| Brand | Calor |
| Power | 2800 W |
| Continuous Steam Output | 120 g/min |
| Steam Jet Performance | 460 g/min |
| Steam Pressure | 6.6 Bar |
| Water Tank Capacity | 1.8 L (1800 ml) |
| Warm-up Time | 2 min |
| Soleplate Material | Durilium / Ceramic |
| Cable Length | 1.6 m |
| Special Features | Auto Shut-Off, Removable Water Tank, Automatic Anti-Limescale, Lock System, ECO Setting, Comfortable Handle, Transparent Water Tank |
| Dimensions (W x D x H) | 210mm x 360mm x 260mm |
| Weight | 3340 grams |
| Color | Blue |
9. Warranty and Support
For detailed information regarding your product's warranty, please refer to the warranty card included with your purchase or visit the official Calor website.
For technical support, spare parts, or service, please contact Calor customer service. Contact details can typically be found on the manufacturer's website or in the full product manual.
