
1. Product Overview
The Coolski Commercial Ice Maker Machine IM450 is designed for high-volume ice production in commercial environments such as restaurants, bars, cafes, and hotels. This robust unit is capable of producing up to 204 kg (450 lb) of clear ice daily, with a storage capacity of 136 kg (300 lb).
Each ice-making cycle efficiently produces 195 premium ice cubes within 8-15 minutes, ensuring a consistent supply during peak demand. Constructed from heavy-duty stainless steel, the machine offers durability and ease of maintenance. Its compact 56 cm (22 inch) width allows for efficient use of space.

Image 1.1: Coolski Commercial Ice Maker Machine IM450 in a commercial setting.

Image 1.2: Overview of ice production capabilities, including daily output and cycle efficiency.
2. Setup and Installation
Proper installation is crucial for the optimal performance and longevity of your ice maker. Ensure the machine is placed on a stable, level surface in a well-ventilated area, away from direct sunlight or heat sources. This unit is designed as an air-cooled freestanding machine.
2.1 Included Components
- Ice Maker Unit
- Ice Bin
- Ice Scoops (x2)
- Water Filter (x1)
- Extra Filter Element (x1)
- Inlet Water Hose (x2)
- Drain Hose (x2)
- Steel Legs (x4)
- Basic Installation Tools
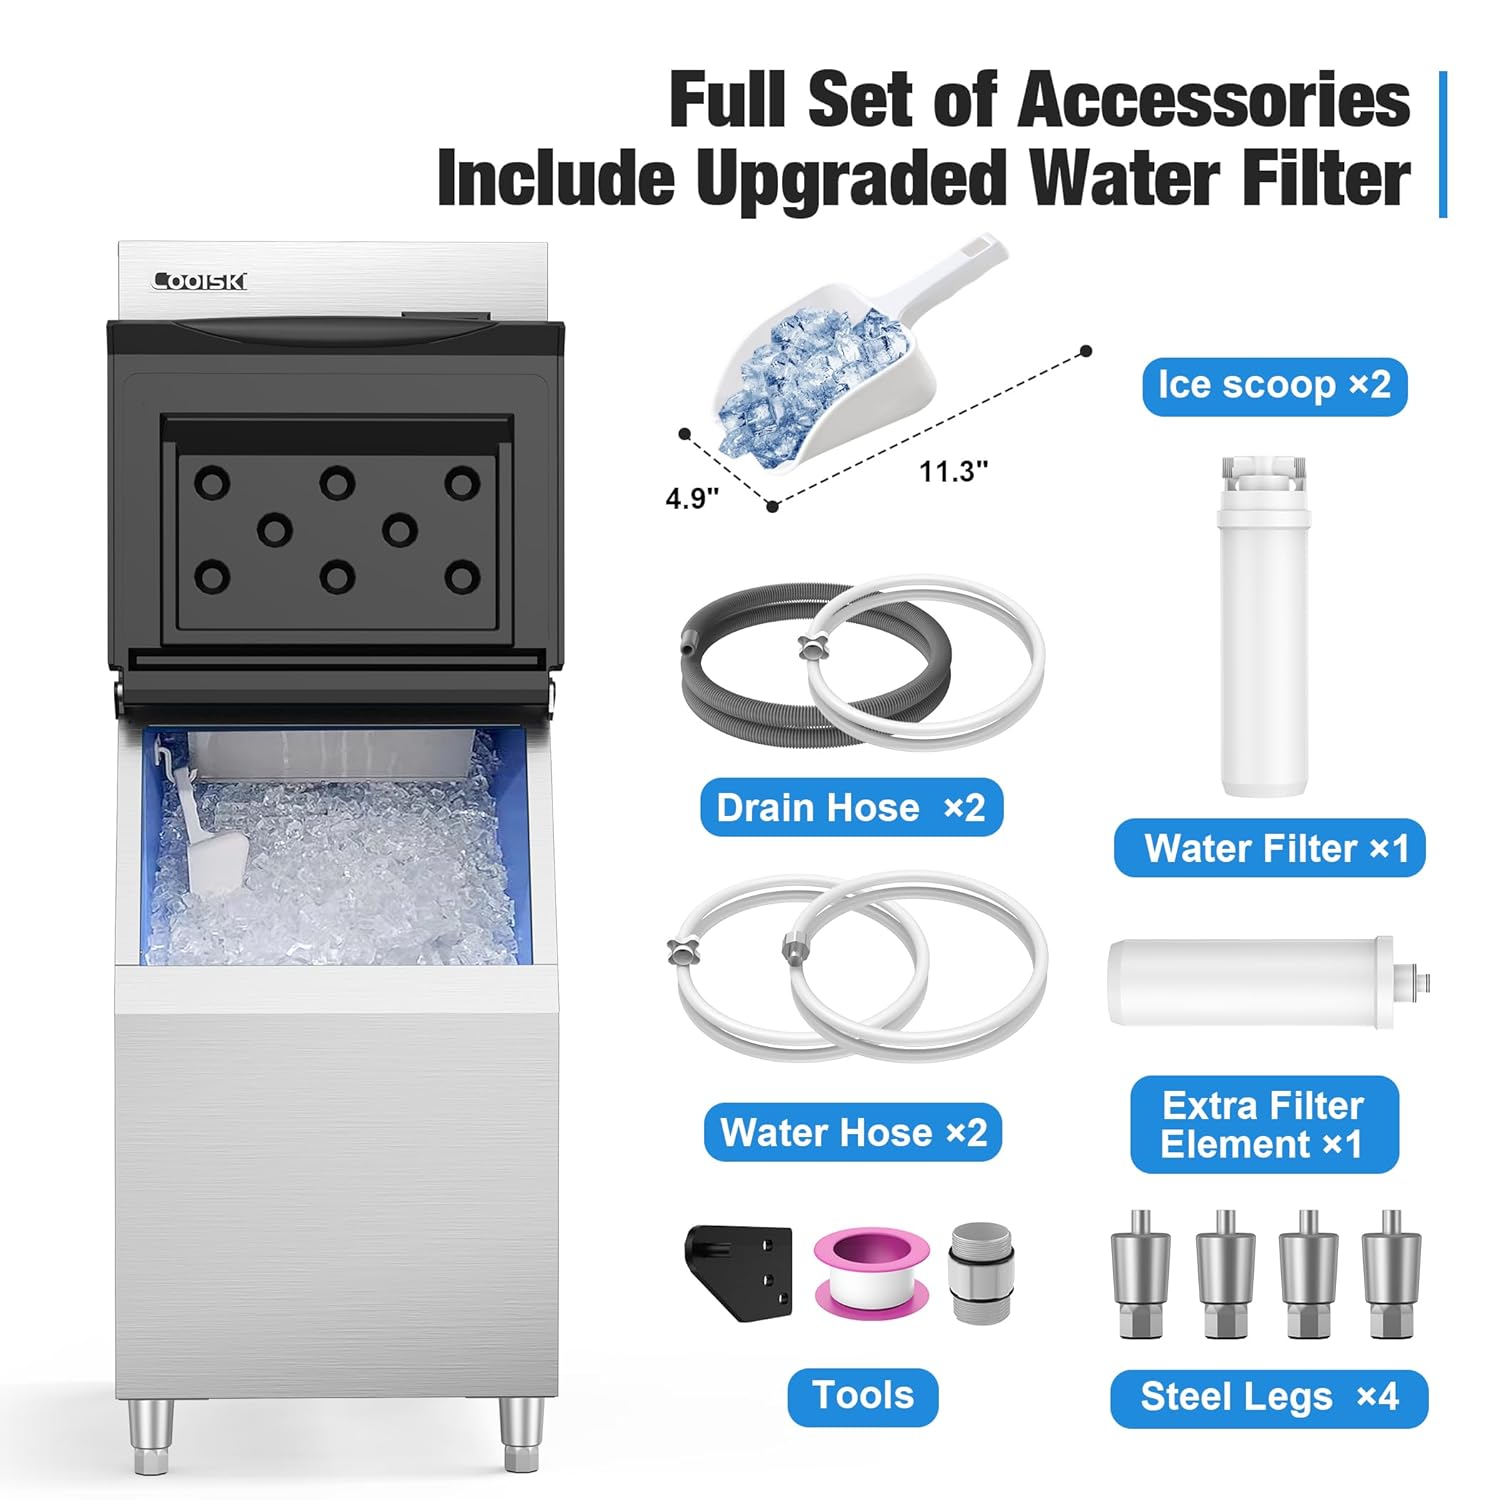
Image 2.1: All accessories included with the ice maker for installation and operation.
2.2 Connection Guide
- Install Steel Legs: Attach the four steel legs to the bottom of the ice maker unit.
- Water Supply Connection: Connect one end of the inlet water hose to a potable water supply and the other end to the water inlet on the ice maker. Install the provided water filter in-line with the water supply for optimal ice quality and machine protection.
- Drainage Connection: Connect the drain hose to the water outlet on the ice maker and route it to a suitable floor drain, ensuring a continuous downward slope for proper drainage.
- Power Connection: Plug the power cord into a dedicated 115V electrical outlet. Ensure the power switch is in the OFF position before plugging in.
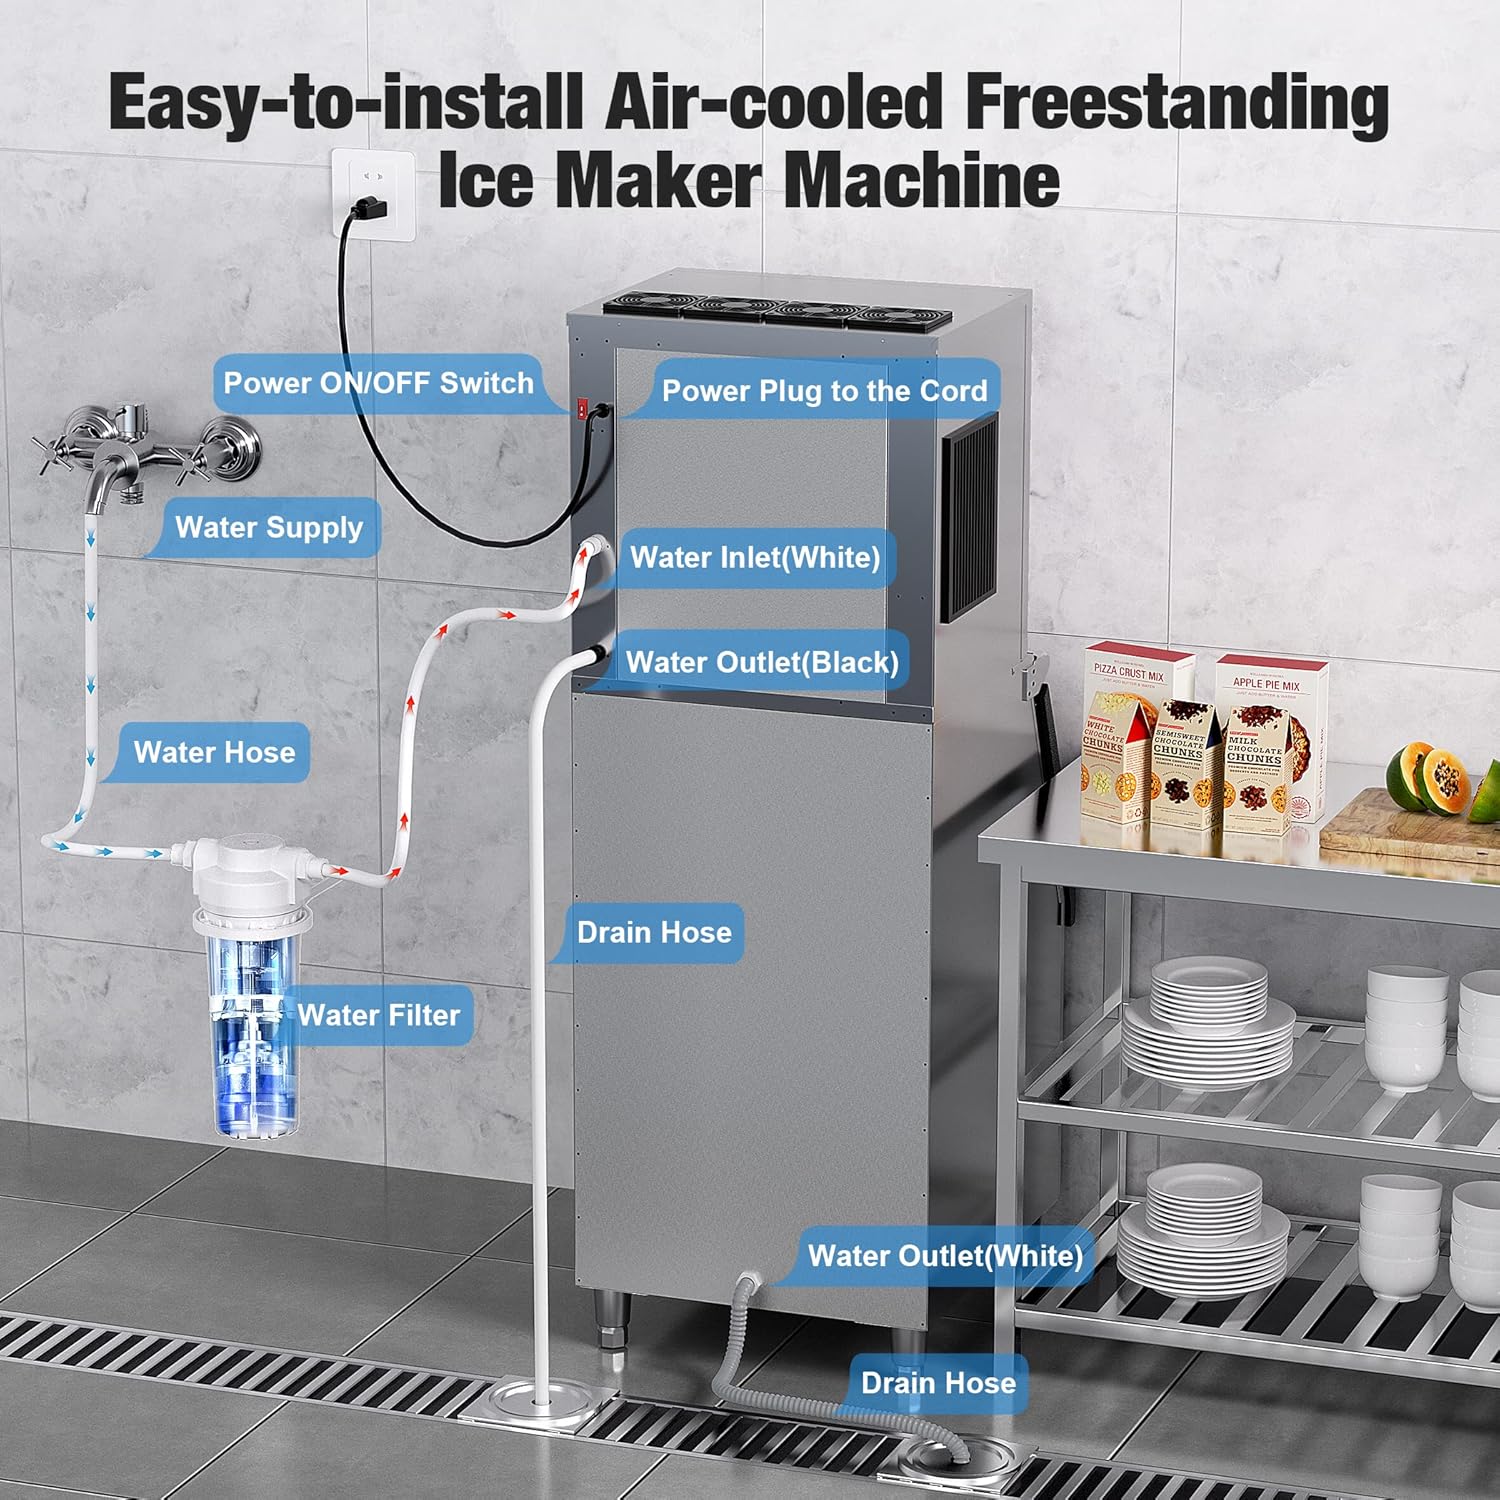
Image 2.2: Diagram illustrating the water, drain, and power connections for installation.
3. Operating Instructions
The Coolski IM450 features an advanced LCD control panel for easy operation and monitoring.
3.1 LCD Control Panel Functions
The LCD screen provides real-time information and allows control over various settings:

Image 3.1: Detailed view of the LCD control panel and its various indicators and buttons.
- Process Mode: Displays the current operational status (e.g., ice making, defrosting).
- Auto Clean: Initiates the automatic self-cleaning cycle.
- Thickness Adjustable: Allows adjustment of ice cube thickness.
- Reservation Function: Set a timer for the machine to start or stop ice production.
- Power Supply: Indicates power status.
- On/Off: Power button.
- Mode: Switches between different operating modes.
- Cleaning/Setting: Accesses cleaning functions and other settings.
- Make an Appointment/Increase: Used for setting reservations or increasing values.
- Increase Ice Thickness: Adjusts ice cube size.
- Reduce Ice Thickness and Control Blue Light: Adjusts ice cube size and controls internal lighting.
- Temperature Display: Shows internal temperature.
- Fault Icon: Illuminates to indicate an error or malfunction.
- The Ice is Full: Indicator when the ice bin is full.
3.2 Adjusting Ice Cube Thickness
The IM450 allows you to customize ice cube thickness to suit various beverage and food needs. Use the 'Thickness Adjustable' function on the LCD panel to select your preferred size:
- Thin (5-8 minutes): Ideal for smoothies and seafood presentations.
- Medium (8-11 minutes): Suitable for general beverages and cocktails.
- Thick (11-15 minutes): Best for beer buckets and whiskeys, offering slower melt rates.

Image 3.2: Visual guide to different ice cube thicknesses and their recommended uses.
4. Maintenance
Regular maintenance ensures the efficiency and longevity of your Coolski ice maker.
4.1 Self-Cleaning Mode
Utilize the 'Auto Clean' function on the LCD panel regularly to maintain hygiene and prevent mineral buildup within the ice-making system. Follow the on-screen prompts for the cleaning cycle.
4.2 Water Filter Replacement
The included water filter helps remove impurities and heavy metals, improving ice quality and protecting the machine. Replace the filter element periodically (typically every 3-6 months, depending on water quality and usage) to ensure optimal filtration. An extra filter element is provided for convenience.

Image 4.1: Illustration of the upgraded water filter and its function in removing impurities.
4.3 Ice Bin and Interior Cleaning
The ice storage bin features thick, multi-layer insulation foam to keep ice frozen for up to seven hours. The plastic food zone is designed for easy cleaning. Regularly wipe down the interior surfaces of the ice bin and the plastic food zone with a mild, food-safe cleaning solution and rinse thoroughly.

Image 4.2: Diagram showing the thick foam insulation layers of the ice storage bin.
5. Troubleshooting
If you encounter issues with your Coolski Commercial Ice Maker, refer to the following common troubleshooting steps. For persistent problems, contact customer support.
- No Ice Production: Check power supply, water supply connection, and ensure the water filter is not clogged. Verify that the machine is not in 'Reservation' mode.
- Low Ice Production: Ensure proper ventilation around the machine. Clean the condenser coils if dusty. Check water pressure.
- Ice Cubes are Too Small/Large: Adjust the ice cube thickness setting via the LCD control panel.
- Machine Leaking Water: Inspect all water and drain hose connections for tightness. Check for blockages in the drain line.
- Error Code on LCD: Refer to the specific error code displayed on the LCD panel. Consult the full product manual or contact customer support with the code for detailed guidance.
6. Specifications
Detailed technical specifications for the Coolski Commercial Ice Maker Machine IM450:

Image 6.1: Diagram showing the key dimensions of the ice maker unit.
| Feature | Specification |
|---|---|
| Model Number | IM450 |
| Brand | Coolski |
| Product Dimensions (D x W x H) | 70.9D x 58.4W x 165H Centimetres (28D x 23W x 65H inches) |
| Ice Production per Day | 204 kg (450 lb) |
| Storage Bin Capacity | 136 kg (300 lb) |
| Wattage | 680 watts |
| Voltage | 115 Volts |
| Refrigerant | R404a |
| Material Type | Stainless Steel |
| Cooling System | Air Cooled |
| Certifications | ETL, DOE |
7. Warranty and Support
7.1 Warranty Information
The Coolski Commercial Ice Maker Machine IM450 comes with a comprehensive warranty:
- Compressor: 6-year warranty
- Parts: 3-year warranty
This warranty covers defects in materials and workmanship under normal use. Please retain your proof of purchase for warranty claims.
7.2 Customer Support
For technical assistance, warranty claims, or any questions regarding your Coolski ice maker, please contact the manufacturer or your authorized dealer. Contact information can typically be found on the product packaging or the seller's website.


