
1. Product Overview
The Riloer CW-8110 is a 12V 20W car anti-theft alarm siren designed to enhance vehicle security. It features a 6-tone alarm speaker with a loudness of 125dB and a detection range of up to 100 meters. This system is suitable for various 12V vehicles and includes two remote controls for convenient operation.

Image 1.1: Riloer 12V 20W CW-8110 Car Anti-theft Alarm Siren unit.
Key Features:
- High Performance: Operates at 12V with 10A working current, 10mA quiescent current, and 20W power.
- Loud Alarm: 6-tone alarm speaker with 125dB loudness.
- Wide Application: Compatible with various 12V cars, suitable for electric, pneumatic, and modified central locking systems.
- High Sensitivity: Features 7 adjustable sensitivity levels, with a default setting of level 4.
- Remote Control: Includes two remote controls for convenient arming and disarming.
- Easy Installation: Simple two-wire connection to the vehicle battery.

Image 1.2: The Riloer CW-8110 alarm siren is universally compatible with 12V cars, motorcycles, SUVs, trucks, scooters, and electric bikes.
2. Safety Information
Please read all safety instructions carefully before installation and operation. Failure to follow these instructions may result in product damage, property damage, or personal injury.
- Electrical Safety: Ensure the vehicle's power is disconnected before attempting any wiring. Incorrect wiring can cause short circuits or damage to the vehicle's electrical system.
- Professional Installation: If you are not familiar with automotive electrical systems, it is highly recommended to have the product installed by a qualified professional.
- Voltage Compatibility: This product is designed for 12V DC systems only. Do not connect to other voltage sources.
- Placement: Install the siren in a location where it is protected from direct water exposure and extreme heat. Ensure the bell mouth faces downwards to prevent water accumulation.
- Remote Controls: Keep remote controls away from children. Do not attempt to open or modify the remote controls.
3. Package Contents
Upon opening the package, please verify that all items listed below are present and in good condition:
- 1 x Riloer Car Alarm Siren (Model: CW-8110)
- 2 x Remote Controls
- 1 x English User Manual (this document)

Image 3.1: Included remote controls with approximate dimensions.
4. Specifications
| Feature | Specification |
|---|---|
| Model | CW-8110 |
| Type | Central Door Lock Automation (Alarm Siren) |
| Material | Plastic + Hardware |
| Color | Black |
| Working Voltage | DC 12V |
| Power | 20W |
| Quiescent Current | 10 mA |
| Working Current | 10A |
| Working Frequency | 433.92 MHz |
| Alarm Loudness | 125 dB |
| Alarm Range | 100m / 328.08ft |
| Sensitivity Levels | 7 levels (default: 4th level) |
| Operating Temperature | -40 to 80 ℃ |
| Cable Length | 50cm / 19.69inch |
| Overall Siren Size | Approx. 8.8 x 10 cm (3.15 x 3.35 inch) |

Image 4.1: Dimensions of the Riloer CW-8110 Car Anti-theft Alarm Siren.

Image 4.2: Alarm loudness and range specifications.
5. Setup and Installation
Follow these steps to install your Riloer CW-8110 Car Anti-theft Alarm Siren:
- Choose a Mounting Location: Select a secure and discreet location in the engine compartment, away from direct heat and moisture. Ensure the siren's bell mouth can be positioned facing downwards to prevent water ingress.
- Secure the Siren: Use appropriate fasteners to firmly mount the siren unit to a stable surface in the chosen location.
- Wiring Connection:
- Connect the red wire of the siren to the vehicle's 12V constant power source (positive terminal of the battery).
- Connect the black wire of the siren to the vehicle's chassis ground (negative terminal of the battery or a suitable ground point).
- Test the System: After installation, reconnect the vehicle's battery and test the alarm system using the remote controls.
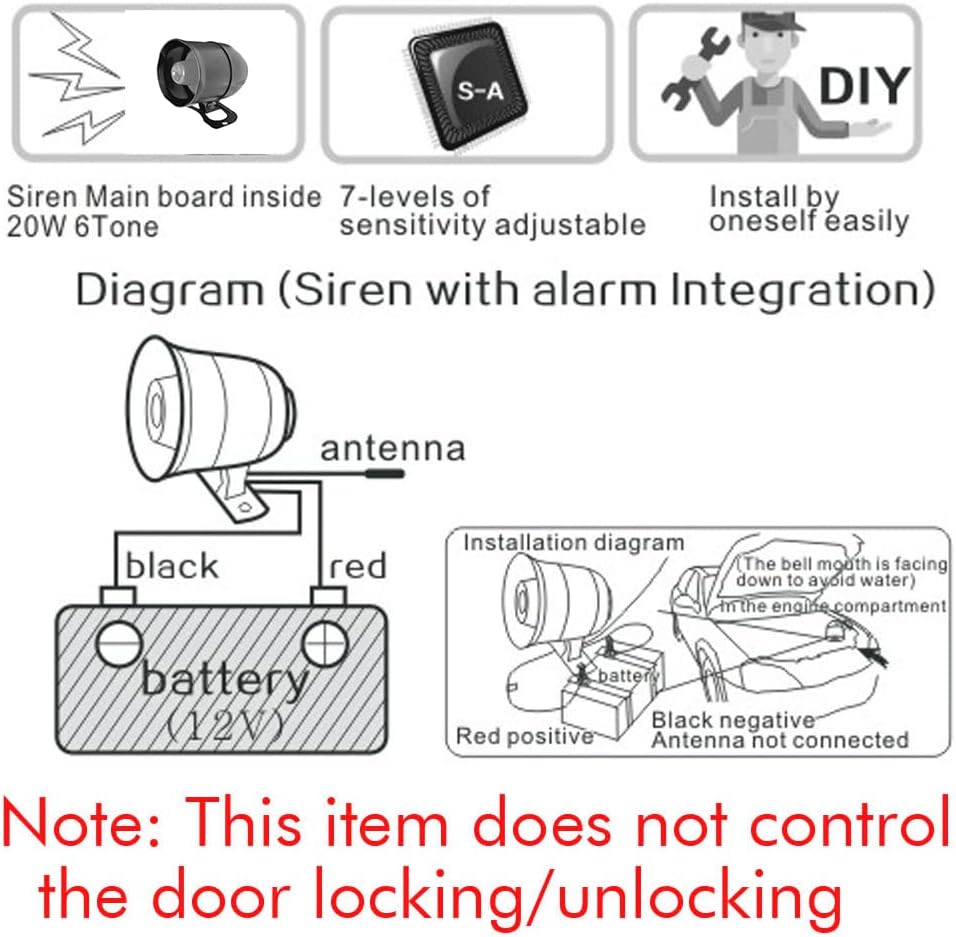
Image 5.1: Wiring diagram for the Riloer CW-8110 alarm siren. Ensure the bell mouth is facing down to prevent water accumulation.
Note: This alarm system is designed to provide an audible deterrent and does not control the vehicle's door locking or unlocking mechanism.

Image 5.2: Internal view of the integrated alarm module within the siren.
6. Operating Instructions
Remote Control Functions:
The alarm system is operated using the provided remote controls. Typically, these remotes feature 'lock' and 'unlock' buttons, which correspond to arming and disarming the alarm.
- Arming the Alarm: Press the 'lock' button on the remote control. The siren will typically emit a confirmation sound, and the system will be armed.
- Disarming the Alarm: Press the 'unlock' button on the remote control. The siren will emit a different confirmation sound, and the system will be disarmed.
- Panic/Locate Function: Some remotes may have an additional button (e.g., a horn icon) to trigger the alarm manually or locate the vehicle. Refer to your remote's specific design.
Sensitivity Adjustment:
The alarm system has 7 levels of sensitivity, with level 1 being the lowest and level 7 being the highest. The default setting is level 4. You can adjust the sensitivity to suit your needs.
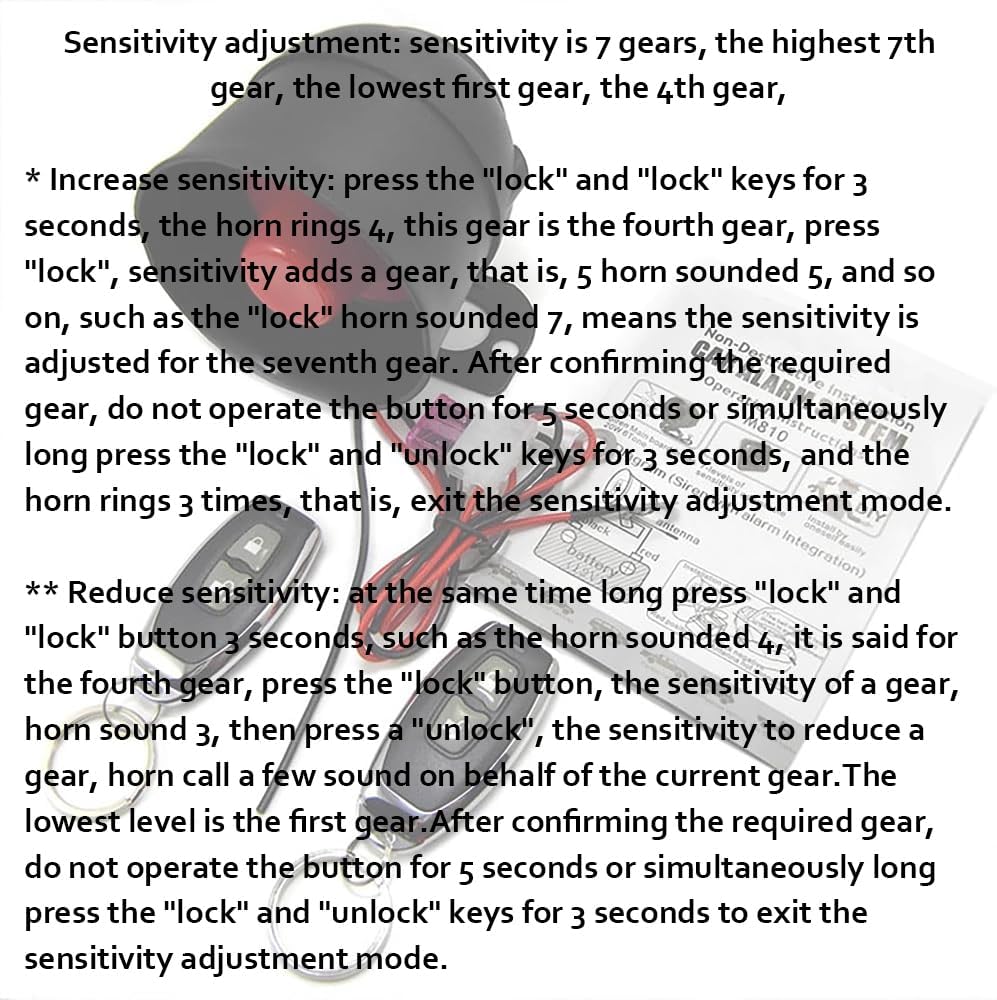
Image 6.1: Remote control sensitivity adjustment procedure.
- To Increase Sensitivity:
- Press and hold the "lock" and "lock" keys simultaneously for 3 seconds. The horn will sound 4 times, indicating you are in the 4th sensitivity level.
- Press the "lock" button repeatedly to increase the sensitivity level. Each press will advance the sensitivity by one level (e.g., 5 sounds for level 5).
- Once the desired sensitivity level is reached, do not operate any button for 5 seconds, or simultaneously long press the "lock" and "unlock" keys for 3 seconds. The horn will sound 3 times, confirming exit from sensitivity adjustment mode.
- To Reduce Sensitivity:
- Press and hold the "lock" and "lock" keys simultaneously for 3 seconds. The horn will sound 4 times, indicating you are in the 4th sensitivity level.
- Press the "unlock" button repeatedly to decrease the sensitivity level. Each press will reduce the sensitivity by one level (e.g., 3 sounds for level 3).
- Once the desired sensitivity level is reached, do not operate any button for 5 seconds, or simultaneously long press the "lock" and "unlock" keys for 3 seconds. The horn will sound 3 times, confirming exit from sensitivity adjustment mode.
7. Maintenance
To ensure the longevity and optimal performance of your Riloer CW-8110 Car Anti-theft Alarm Siren, follow these simple maintenance guidelines:
- Regular Cleaning: Periodically wipe the siren unit and remote controls with a soft, dry cloth to remove dust and dirt. Avoid using harsh chemicals or abrasive cleaners.
- Remote Control Batteries: The remote controls are powered by button batteries. If the remote's range decreases or it becomes unresponsive, replace the battery with a new one of the same type. Refer to the remote's casing for battery type information.
- Wiring Inspection: Occasionally check the wiring connections to the siren for any signs of corrosion, fraying, or loose connections. Ensure all connections are secure.
- Environmental Protection: While the siren is designed for automotive use, avoid exposing it to extreme conditions beyond its specified operating temperature range or prolonged direct water immersion.
8. Troubleshooting
If you encounter issues with your Riloer CW-8110 Car Anti-theft Alarm Siren, refer to the following troubleshooting guide:
| Problem | Possible Cause | Solution |
|---|---|---|
| Siren does not sound | No power connection Loose wiring Faulty siren unit | Check power and ground connections to the battery. Ensure all wires are securely connected. If connections are good, the siren unit may be faulty and require replacement. |
| Remote control not working | Dead battery in remote Out of range Remote not paired (unlikely for new unit) | Replace the remote control battery. Move closer to the vehicle. Contact customer support if the remote is new and not functioning. |
| Alarm triggers too easily/not easily enough | Sensitivity setting is incorrect | Adjust the sensitivity level using the remote control as described in Section 6. |
| Siren sounds weak or distorted | Low voltage Siren unit damage Obstruction in bell mouth | Check vehicle battery voltage. Inspect siren for physical damage. Ensure the bell mouth is clear of debris. |
If the problem persists after attempting these solutions, please contact Riloer customer support or consult a qualified automotive technician.
9. Warranty and Support
Specific warranty information for the Riloer 12V 20W CW-8110 Car Anti-theft Alarm Siren is not provided in this manual. For details regarding warranty coverage, return policies, or technical support, please refer to the product packaging, the seller's website, or contact Riloer customer service directly.
When contacting support, please have your product model (CW-8110) and purchase information readily available.