
Introduction
Thank you for choosing the L8star Golf Rangefinder PF9 Pro. This high-precision optical instrument is designed to assist golfers in accurately measuring distances on the course. Featuring advanced technologies such as slope compensation, flag lock with pulse vibration, and continuous scan mode, it provides reliable measurements to enhance your game. This manual will guide you through the setup, operation, and maintenance of your device.
Package Contents
Please check the package to ensure all items are present:
- L8star Golf Rangefinder PF9 Pro
- Carrying Case
- USB Type-C Charging Cable
- Cleaning Cloth
- Instruction Manual

Image: The L8star Golf Rangefinder PF9 Pro and its included accessories: a protective carrying case, a soft cleaning cloth, and a USB Type-C charging cable.
Product Overview
Familiarize yourself with the components of your L8star Golf Rangefinder PF9 Pro.

Image: A detailed diagram illustrating the various parts of the L8star Golf Rangefinder PF9 Pro, including the eye lens, Type-C charging port, laser emitter, laser receiving lens, objective lens, power button, mode button, focus ring, and slope switch.
Key Features
- Built-in Magnetic Clip: For convenient attachment to golf carts or clubs.
- Slope-Switch Technology: Provides accurate distance compensation for inclines and declines.
- Flag Lock with Pulse Vibration: Confirms target acquisition with a short vibration.
- High Precision: Measures distances from 5 to 1300 yards with +/- 0.5 yard accuracy.
- Clear Vision: Fully multi-coated optics lenses for a brighter, clearer image with 6x magnification.
- Fast Focus and Read: Quick focus adjustment and measurement display within 8 seconds.
- Type-C Charging: Rechargeable 1000mAh lithium-ion battery for extended use.

Image: The L8star Golf Rangefinder PF9 Pro showcasing its built-in magnetic clip, allowing for easy attachment to metal surfaces like a golf cart frame.
Setup
1. Charging the Battery
The L8star Golf Rangefinder PF9 Pro is equipped with a rechargeable 1000mAh lithium-ion battery. Before first use, ensure the device is fully charged.
- Locate the Type-C charging port on the side of the rangefinder.
- Connect the provided USB Type-C cable to the rangefinder and plug the other end into a compatible USB power adapter (not included) or a computer USB port.
- The battery indicator on the display will show charging status. A full charge can provide approximately 5000 measurements.

Image: The L8star Golf Rangefinder PF9 Pro with its Type-C charging port visible, illustrating how to connect the charging cable.
2. Adjusting Focus
For a clear view through the eyepiece, adjust the focus ring.
- Look through the eyepiece.
- Rotate the focus ring (diopter) clockwise or counter-clockwise until the display and the target appear sharp and clear to your eye.

Image: A golfer adjusting the focus ring on the L8star Golf Rangefinder PF9 Pro eyepiece to achieve a clear view of the target and the internal display.
Operating Instructions
1. Power On/Off
- To power on the device, press the Power On/Start button.
- The rangefinder will automatically power off after 15 seconds of inactivity to conserve battery. To reactivate, press the Power On/Start button again.
2. Mode Selection (Meter/Yard)
To switch between meters and yards:
- With the device powered on, press the Mode/Meter & Yard Button to cycle through available measurement units.
3. Slope-Switch Function
The slope function provides compensated distance measurements, accounting for elevation changes. This feature can be toggled on or off for tournament play compliance.
- Locate the Slope Switch on the side of the rangefinder.
- Slide the switch to the 'ON' position to enable slope compensation. The display will show the compensated distance.
- Slide the switch to the 'OFF' position to disable slope compensation for legal tournament play. The display will show the direct line-of-sight distance.

Image: An illustration demonstrating the physical slope switch on the rangefinder and how its position affects the displayed distance, showing both slope enabled and disabled views.
4. Flag Lock with Pulse Vibration
This feature helps you lock onto the flagpole, ignoring background objects, and confirms acquisition with a vibration.
- Aim the rangefinder at the target (e.g., flagpole).
- Press and hold the Power On/Start button while sweeping the rangefinder back and forth slightly across the target.
- Once the rangefinder locks onto the flag, it will emit a short pulse vibration, and the distance will be displayed.
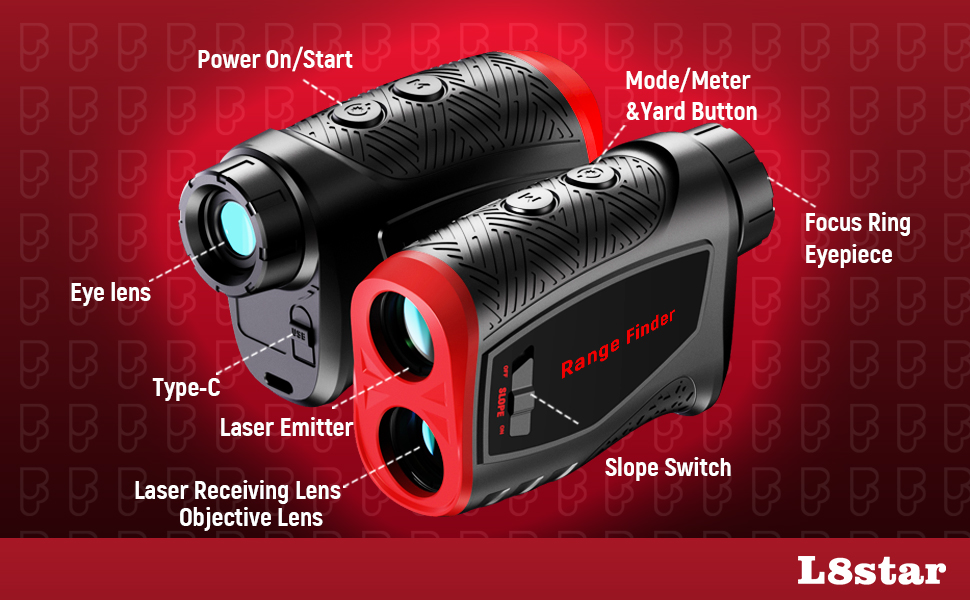
Image: The internal view of the rangefinder targeting a flagpole, indicating the distance and the pulse vibration feature confirming target lock.
5. Continuous Scan Mode
For quick measurements of multiple targets or moving objects, use the continuous scan mode.
- Press and hold the Power On/Start button.
- Scan across various targets. The display will continuously update with distances to different objects in your field of view.
Image: A series of simulated views through the rangefinder's eyepiece, illustrating how the continuous scan mode provides real-time distance updates as the user pans across different targets on a golf course.
Maintenance
Proper care and maintenance will ensure the longevity and optimal performance of your rangefinder.
- Cleaning Lenses: Use the provided cleaning cloth or a soft, lint-free cloth to gently wipe the lenses. Avoid using abrasive materials or harsh chemicals that could scratch the optical surfaces.
- Cleaning Body: Wipe the body of the rangefinder with a soft, damp cloth. Do not submerge the device in water.
- Storage: When not in use, store the rangefinder in its protective carrying case in a cool, dry place, away from direct sunlight and extreme temperatures.
- Battery Care: Recharge the battery regularly, even if the device is not used frequently, to maintain battery health. Avoid fully discharging the battery for extended periods.
Troubleshooting
If you encounter issues with your rangefinder, refer to the following common problems and solutions:
- Device Not Powering On:
- Ensure the battery is sufficiently charged. Connect the device to a power source using the Type-C cable.
- Press the Power On/Start button firmly.
- Inaccurate Readings:
- Check if the lenses are clean and free from smudges or debris.
- Ensure you are targeting the correct object. Use Flag Lock mode for flagpoles.
- Verify the unit of measurement (yards/meters) is set correctly.
- Environmental factors like heavy fog or rain can affect accuracy.
- Display Not Clear:
- Adjust the focus ring (diopter) until the display is sharp for your vision.
- Clean the eyepiece and objective lenses.
- No Pulse Vibration:
- Ensure the Flag Lock mode is active and you are successfully locking onto a target.
- The vibration is subtle; ensure you are holding the device steadily.
If the problem persists, please contact L8star customer support for further assistance.
Specifications
| Feature | Specification |
|---|---|
| Model Number | PF9 Pro |
| Measuring Range | 5 - 1300 yards (4.6 - 1300 meters) |
| Accuracy | +/- 0.5 yard |
| Magnification | 6x |
| Battery Type | 1000mAh Rechargeable Lithium-Ion (included) |
| Charging Interface | Type-C |
| Material | Plastic |
| Color | Black |
| Item Weight | 330 g |
| Water Resistance Level | Water Repellent |
| International Protection Rating | IPX? (Information not fully specified) |
Warranty and Customer Support
L8star is committed to providing high-quality products. For warranty information or if you require assistance with your L8star Golf Rangefinder PF9 Pro, please refer to the warranty card included in your package or contact L8star customer support through the retailer where the product was purchased. Please have your product model number (PF9 Pro) and purchase details ready when contacting support.