1. Introduction
Thank you for choosing the RCB 6.5 Inch Hoverboard and Hoverkart. This manual provides essential information for the safe operation, assembly, and maintenance of your product. Please read it thoroughly before use and retain it for future reference.
Package Contents:
- 1x 6.5-inch Hoverboard (Self-balancing Scooter)
- 1x Charger
- 1x User Manual
- 1x Hoverkart

Image 1.1: The RCB 6.5 Inch Hoverboard and Hoverkart package, showcasing both components assembled together.
2. Product Overview
The RCB Hoverboard is a self-balancing scooter equipped with LED lights and a Bluetooth speaker. The accompanying Hoverkart transforms the hoverboard into a seated vehicle, offering an alternative riding experience. Both components are designed for durability and user enjoyment.
Key Features:
- 6.5-inch solid rubber tires for stability.
- Colorful LED lights on wheels and chassis.
- Integrated Bluetooth speaker for audio playback.
- Durable ABS shell, dustproof and waterproof.
- Multiple safety protection systems.
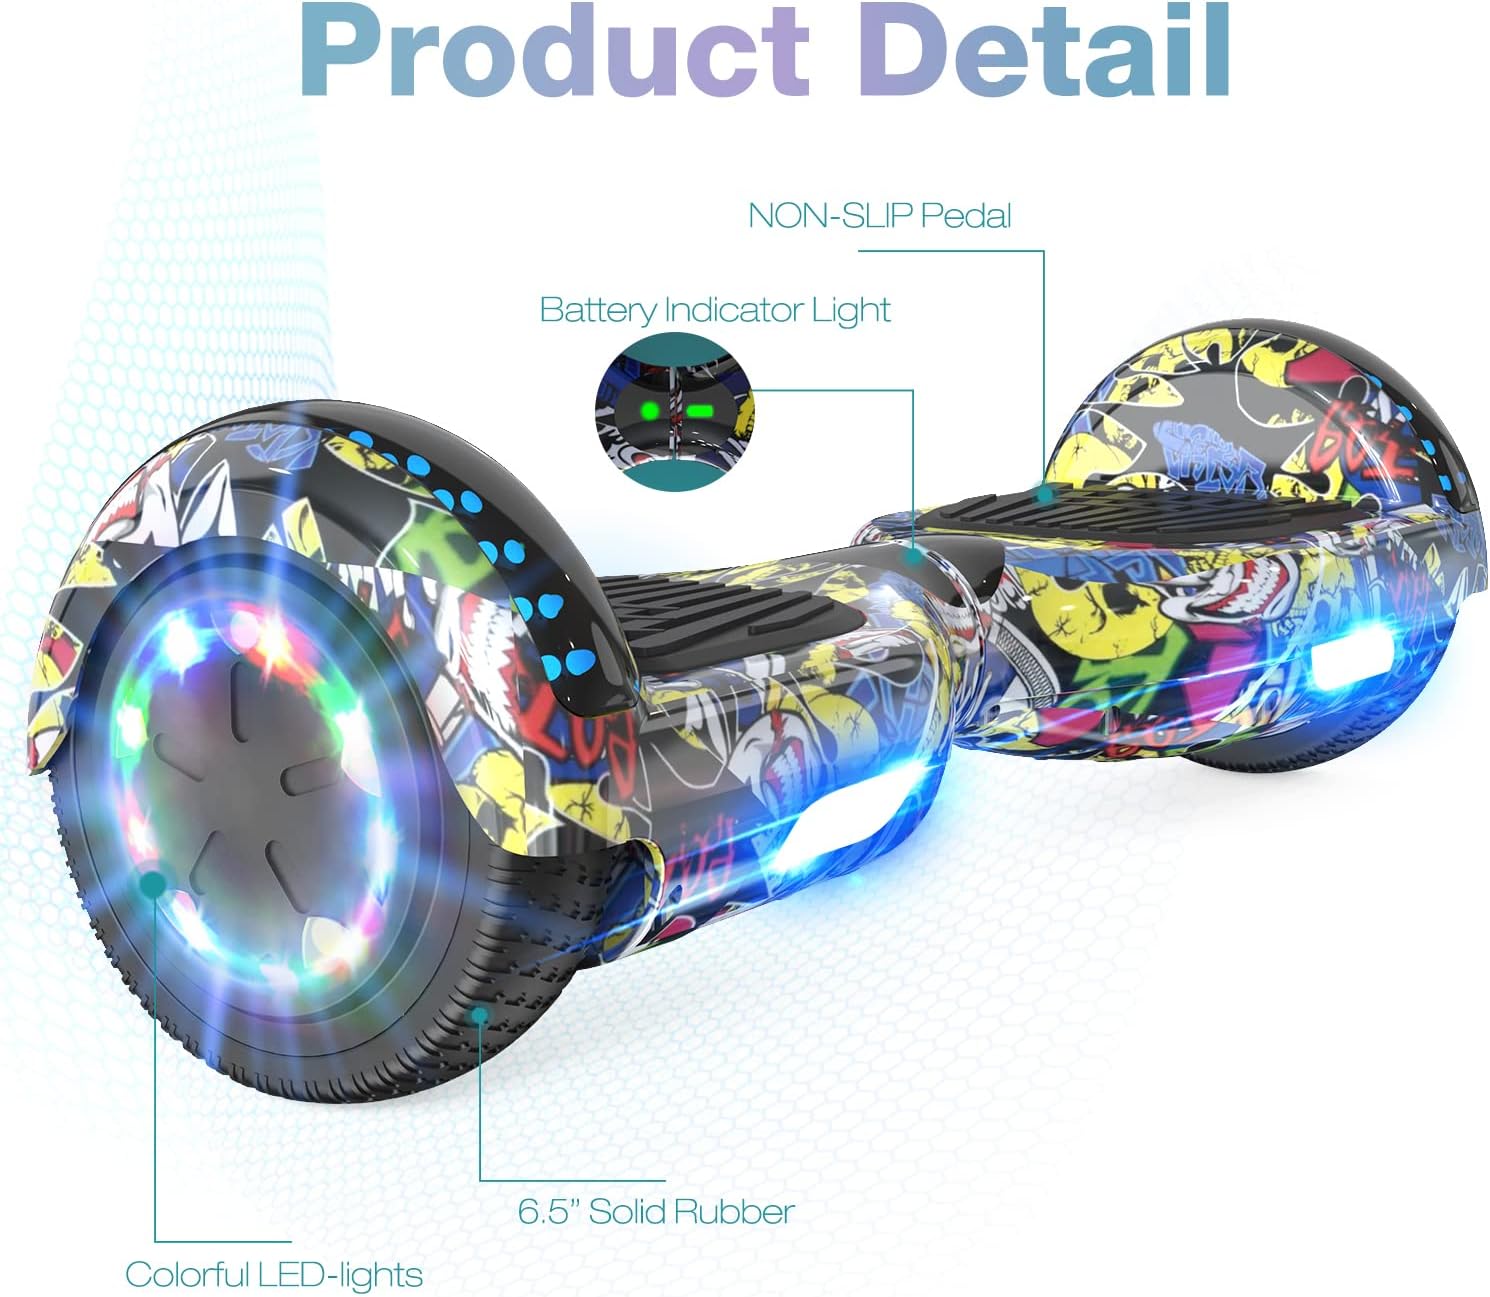
Image 2.1: Detailed view of the hoverboard, highlighting non-slip pedals, battery indicator lights, and colorful LED lights on the 6.5-inch solid rubber wheels.
3. Safety Guidelines
Your safety is paramount. Always adhere to these guidelines to prevent injury or damage.
- This product complies with European safety regulations.
- Recommended user age: 8 years and older.
- Minimum load: 20 kg. Maximum load: 100 kg.
- Always wear appropriate safety gear, including a helmet, knee pads, and elbow pads.
- Do not ride under the influence of alcohol or drugs.
- Avoid riding on wet, uneven, or slippery surfaces.
- Be aware of your surroundings and other pedestrians or vehicles.
- The hoverboard is equipped with a low battery warning and an overspeed warning system. Pay attention to these alerts.
- The product features a comprehensive protection system, including battery monitoring, short circuit protection, and an anti-fire shell.

Image 3.1: Visual representation of safety features, including warnings for low battery and exceeding speed limits.

Image 3.2: Diagram illustrating the hoverboard's multiple protection systems, such as low battery reminder, overspeed reminder, battery monitoring, short circuit protection, anti-fire shell, and 6.5-inch non-slip tires.
4. Setup and Assembly
4.1 Hoverboard Initial Check
Before first use, ensure the hoverboard is fully charged and inspect it for any visible damage. Confirm that the wheels spin freely and the footpads are secure.
4.2 Hoverkart Assembly
The Hoverkart is designed for quick and easy assembly, requiring no additional tools. Follow these steps:
- Unfold the main frame of the Hoverkart.
- Adjust the length of the Hoverkart to suit the rider's height. The length is adjustable from 31 to 44.5 inches. Secure the adjustment mechanism.
- Attach the comfortable sponge hand grips to the control bars.
- Securely fasten the Hoverkart to the hoverboard using the four adjustable straps. Ensure the straps are tight to prevent movement during operation.
- Verify that the 360° swivel sturdy front wheel is properly attached and moves freely.

Image 4.1: Illustration of the Hoverkart's adjustable features, including adjustable length, comfortable sponge hand grips, 360° swivel front wheel, and adjustable straps for attachment.
5. Charging the Hoverboard
The hoverboard is powered by a rechargeable lithium battery. Proper charging ensures optimal performance and battery longevity.
- Connect the charger to a standard power outlet.
- Plug the charging cable into the hoverboard's charging port.
- The charging indicator light on the charger will change (e.g., from red to green) when charging is complete.
- Charging time typically ranges from 2 to 3 hours.
- Do not overcharge the battery. Disconnect the charger once charging is complete.
- Note that using the Hoverkart will consume more electricity than operating the hoverboard alone.

Image 5.1: Diagram showing the hoverboard's motor and performance metrics, including a charging time of 2-3 hours, max speed, and load capacity.
6. Operating Instructions
6.1 Riding the Hoverboard
To operate the hoverboard, gently step onto the footpads. Lean slightly forward to move forward, backward to move backward, and shift your weight to turn. Practice in a safe, open area until you are comfortable with the controls.
6.2 Using the Hoverkart
Once the Hoverkart is securely attached to the hoverboard, sit comfortably in the seat. Control the movement by manipulating the two hand grips. Pushing both grips forward moves you forward, pulling both back moves you backward. Pushing one forward and pulling the other back allows for 360° rotations. Beginners can easily control the Hoverkart.
6.3 Bluetooth Connectivity
The hoverboard features an integrated Bluetooth speaker. To connect your device:
- Turn on the hoverboard.
- Enable Bluetooth on your mobile device (compatible with iOS and Android systems).
- Search for available Bluetooth devices and select the hoverboard (usually named 'Bluetooth' or similar).
- Once paired, you can play music through the hoverboard's speaker while riding.

Image 6.1: The hoverboard with its Bluetooth speaker function, illustrating how users can enjoy music during operation.
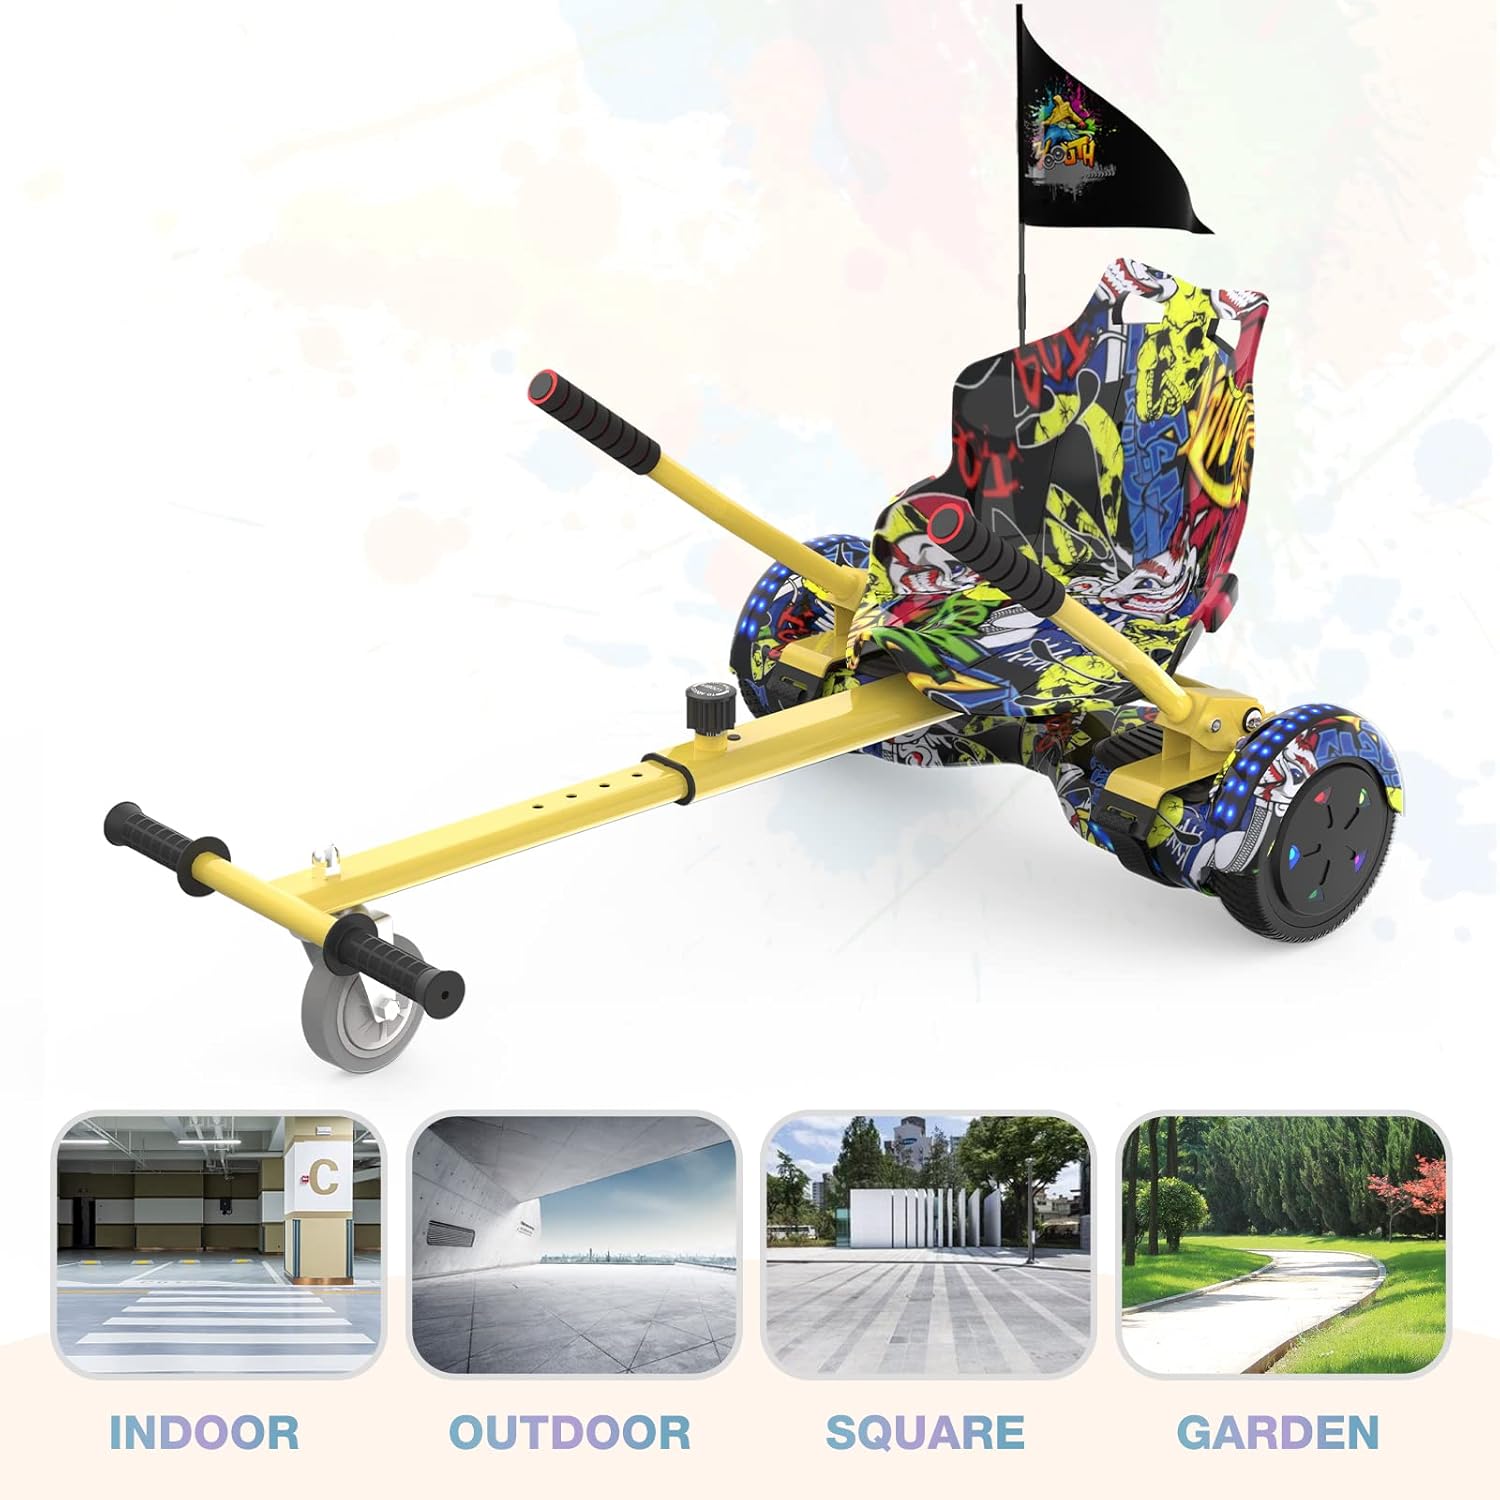
Image 6.2: Examples of suitable environments for using the hoverboard and hoverkart, including indoor spaces, outdoor areas, squares, and gardens.
7. Maintenance
7.1 Cleaning
Regularly clean the hoverboard and hoverkart with a damp cloth. Avoid using harsh chemicals or abrasive materials that could damage the finish. Ensure the product is dry before storage or next use.
7.2 Storage
Store the product in a cool, dry place away from direct sunlight and extreme temperatures. If storing for an extended period, ensure the battery is partially charged (around 50%) to maintain battery health. Recharge every few months if not in use.
7.3 Tire Care
The hoverboard uses solid rubber tires, which require minimal maintenance. Periodically check for any debris lodged in the treads.
8. Troubleshooting
If you encounter issues with your RCB Hoverboard or Hoverkart, refer to the following common problems and solutions:
| Problem | Possible Cause | Solution |
|---|---|---|
| Hoverboard does not turn on. | Low or depleted battery. | Charge the hoverboard for 2-3 hours. |
| Short battery life. | Battery not fully charged; heavy usage (especially with Hoverkart); aging battery. | Ensure full charge. Reduce continuous heavy use. If issue persists, contact customer support. |
| Hoverboard only turns to one side or is unbalanced. | Calibration issue; sensor malfunction. | Recalibrate the hoverboard (refer to specific calibration instructions if available, or contact support). Ensure even weight distribution. |
| Bluetooth not connecting. | Hoverboard not in pairing mode; device Bluetooth off; interference. | Ensure hoverboard is on. Restart Bluetooth on your device. Move closer to the hoverboard. |
| Unusual noises during operation. | Loose components; internal issue. | Stop using immediately and inspect for loose parts. If unable to identify, contact customer support. |
9. Specifications
Hoverboard:
- Model Number: Z1+
- Wheel Size: 6.5 inches
- Battery Type: Rechargeable Lithium-ion
- Charging Time: 2-3 hours
- Load Capacity: 20 kg - 100 kg
- Maximum Speed: 10-12 km/h (varies based on user weight, terrain, and battery level)
- Shell Material: Durable ABS
- Tire Type: Solid Rubber
- Special Features: Bluetooth, LED Lights, Dustproof, Waterproof
- Product Dimensions (L x W x H): 58.4 x 18.6 x 17.8 cm
- Item Weight: 8 kg
Hoverkart:
- Minimum Length: 48 cm
- Maximum Length: 83 cm
- Maximum Load: 100 kg
- Distance Between Handles: 40-54 cm
- Net Weight: 5.5 kg
- Compatibility: Universal for most gyropodes/hoverboards
10. Warranty and Support
For warranty information, technical support, or service inquiries, please refer to the purchase documentation or contact your retailer. Keep your proof of purchase for any warranty claims.


